Hello, everyone – I’m Pasadena. I’m an experienced coach under the Rocket League Coaching Discord. I have coached many people both in and outside of the server, and I like to consider myself a good coach, with a fantastic approach to individual learning styles and understanding my mentees. In this editorial, I’ll be writing a piece on the theory of learning in Rocket League – follow this piece wisely, and use it to make the most out of receiving coaching, practising and improving in Rocket League.
How To Get Good At Rocket League – A New Perspective
Firstly, I’d like to introduce you to a new perspective of learning in Rocket League. This will help you to make sense of my understanding of skillsets seen in different ranks. Like any skill, we improve mainly through practise and through observation. Rocket League is subject to many variations of plays, styles and scenarios due to it being a physics-based game. Consider the following: for the first time in an online match, you see somebody air dribble, this maneuver manages to shatter your defenses and award the opposing team with a goal. Now that you’ve seen someone make this play, you know that such plays are possible, and will be mindful of them in the future. As you become more and more resilient to these air dribble attacks, your opponents will adapt accordingly, and will try to create nuances in this play to beat you once more, such as faking the air dribble or blocking the clear. The competitive meta is a constant tug-of-war, and in order to succeed, you should be mindful of this – make note of any plays that outwit you and learn to defend against them: consider your actions.
Suppose now that we liken the skillsets within Rocket League to the alphabet, and place them in order of difficulty, in arbitrary fashion. For example, A could be analog stick control, B could be flipping, and K could be ceiling shots. If we were to list every minute detail about Rocket League in this, of course we’d need close to an infinite number of letters to work with, so we’ll try to keep it down.
I believe, although it evolves as the meta changes, that each rank encompasses a specific few of these letters. Perhaps Bronze encompasses A, B and C. I also believe that you should imagine this alphabet to be foundational, such that you must achieve C before D, D before E, and so on and so forth. Now that you have this in your mind, let’s move ahead.
Understanding the Rocket League Meta for Your Tier NB:
For further understanding, you can assume each of the skills to have sub-sets of their own, such as A{A,B,C…}, B{A,B,C…} so on and so forth if you wish to imagine it that way.
I am a Grand Champion player myself, and through observation at lower ranks, it is clear that whilst there is a large variance in microgame, macrogame (see Applicability for terminology) is certainly consistent within their respective ranks, and should be considered if you feel like you’ve hit a wall.
To go into more detail about the foundational skills: I believe that in order to understand and counter an offense or defense, you need to understand what exactly is under inspection in the first place. For example, a Silver player will not understand backboard defensive maneuvers if they don’t understand why backboard shots are so effective, from not having encountered them in their games. As such, backboard defense would never be part of the Rocket League meta if they were deemed not worthy of a counter.
How To Rank Up In Rocket League – Understanding The Four Stages of Competency
In psychology, the four stages of competence, or the “conscious competence” learning model, relates to the psychological states involved in the process of progressing from incompetence to competence in a skill. Source: Wikipedia.
If you’re serious about wanting to improve in Rocket League, you should learn to love this triangle, and also understand it. I will refer to the four sections in 1a as UC, CC, CI and UI for their respective acronyms.
Unconscious Incompetence (UI) – Does not understand or know how to do something and does not recognize the deficit
Conscious Incompetence (CI) – Does not understand or know how to do something, but recognizes the deficit
Conscious competence (CC) – Understands and knows how to do something. Performing task requires concentration
Unconscious competence (UC) – The skill has become second nature and can be performed easily
Consider the aforementioned Bronze player, whose play encompasses skills A, B and C. Skills like E, say wall shots, will remain in the red zone, or UI for this player. UI, or Unconscious Incompetence, is whereby you are making mistakes and you are unaware of them or not implementing the skill at all. Eternally toxic players will remain in red, since they fail to realise their own mistakes and blame others for them. Don’t be this kind of player; it is disruptive to your learning and your teammates’ experiences. If you ever feel like you’ve hit a ‘wall’ in Rocket League, then you’re probably in UI about something – get someone to check it out! It is also worth noting that you will remain in UI regarding plays you’ve not encountered before, or were totally unable to stop – you learn nothing from a play not actually beating your defense, but rather you being miles away from it in the first place. A failure to realise this is endemic within Rocket League coaching, as a plethora of inquisitive and ambitious souls request to play Solo Duel against a high-rated player, and tell their masochistic minds that they learnt something in the process of being beaten 14 to 0 – it helps no one: remember these skills are foundational.
Now consider the Bronze player tackling skill D: basic dribbling. This player may very well have mastered A, B and C, but are very much in the orange zone: Conscious Incompetence; CI. To be in CI regarding a skill means to be aware of your mistakes/that you’re making them. This differs from UI, since the learner is aware of their mistakes. There are a few sub-stages to UI to consider:
Low-UI: I am aware that I am making a mistake.
Medium-UI: I am aware that I am making a mistake, and what that mistake is.
High-UI: I am aware that I am making a mistake, what the mistake is and how to rectify it.
Talking to a Rocket League Expert Will Only Get You To CI
It is important to understand that coaching, through means such as replay analysis or study, can only take you to the top-end of CI; a coach cannot put the hours in for you, and neither can they help you much when it comes to the yellow or green zones. Take note of this in your mind; make the most out of your coaching by making sure you are at the top end of UI before finishing your session with them – any good coach should be able to illustrate this. A good coach will make you aware of a few improvements can and should be made at your level; a good mentee will process this information and apply themselves to it, returning only when they feel they’re comfortably competent with the skill they were previously working on. Receiving coaching every day, or trying to improve too fast, will only work to your detriment. To demonstrate the yellow zone, Conscious Incompetence: CC, we’ll consider skill C. Let’s imagine that our Bronze friend hasn’t quite mastered C yet, but is well on their way. If they are diligent, they’ll be consciously competent during their games regarding skill C. What does this mean? Well, in order to break a bad habit or establish a new one, whether it be muscle memory or mode of thinking, you must resist the urge to do so, and implement the new one appropriately. CC is just this; CC is actively and consciously thinking about making decisions in game in order to become better at implementing it. This can be tricky, daunting and quite disruptive – it will be very disruptive to begin with. With time, however, you will more quickly be able to implement this skill competently in game, until it becomes a nearly unconscious.
But wait – there’s more. What about green: Unconscious Competence; UC? This process sort of happens dynamically. You will achieve UC when you no longer have to think about completing an action, or you do so for such a short time that it’s negligible – do you have to consciously think about holding accelerate?
I hope not.
If you follow this process of coaching, either through the RLCD, or by yourself, and getting to the top of CI, then grinding through to the top of CC, up until UC, then I promise that you will make far more use out of your hours, and will likely improve much more quickly than your peers. Do your best to keep your whiffs excuse-free and understand why each and every play occurred in the fashion it did. Save your replays and look at what skills are being used against you. Play against people slightly above your rating and try to see what tactics they’re implementing that are giving you trouble. If you take up the mantle and do these things, then you will be in a fantastic position to fly through those ranks – one red skill might just be the difference between Platinum III and Diamond I.
If you consider the picture above, you’ll see two coaches from the RLCD approving this method of learning.
Applying This Theory To All Rocket League Ranks
Where else can I apply this understanding in Rocket League? Well, everywhere. I like to separate Rocket League into two types of game or sections: microgame and macrogame.
With each type being incredibly important in understanding the patterns within your respective rank and figuring out why you’re there.
Microgame covers all things mechanical and configurable, from your ability to flick the ball to the configuration of your deadzone and camera settings. Microgame is incredibly important to keep on top of, both to keep the game enjoyable and consistent. Professional players are incredibly in-tune with their microgame, and it really comes as a result of a lot of practise, which means lots of hours if you want to be on their level. Microgame is still subject to time-use-efficiency, though: use your time efficiently to practise on specific mechanical aspects of the game, and you’ll once again be ahead of the game.
It is important to not put too much emphasis on improving your microgame, or mistaking poor macrogame for poor microgame and vice versa. There are many players trapped within their rank despite their microgame being excellent, and this can happen to the best of us if we become stuck in a rut. Practise fundamental and exotic mechanics ad infinitum, paying attention to the levels of competency, and you will succeed.
Macrogame asserts itself within the deeper understanding of the game: rotation, where and when to flick the ball and why we do these things. Macrogame is arguably a more important factor of your rank, as is exhibited in the Solo Duel playlist. Improving your macrogame, thankfully, requires far less time than your microgame, although it demands a deeper understanding. Coaches and more experienced players will be well-equipped to explain the macrogame observed in your respective ranks – and how to conquer it.
A brilliant way to improve your macrogame over time is to play conscientiously: pay extra close attention to your teammates; analyse the play; be a hawk on the field. Aside from explicit tutorials regarding macrogame, even watching professional players’ games and taking notes is a marvellous way to improve your understanding. If you use your time rightly, then you can quickly become a macrogame connoisseur; if you don’t, you cannot expect to improve, be this with -or without- a coach.
In Conclusion
In order to take full advantage of this method of learning, first make sure you understand the content fully. Read and re-read any parts you lack understanding of, or ask for explanations via other mediums, such as aural ones, if needed.
Make sure to schedule yourself. If you wish to coach yourself or be coached, then create a schedule. It doesn’t have to be fancy, or rigorous – just make a promise to yourself that you’ll commit to this style of learning on a regular basis.
Do not play too much; it’s very easy to become overly engaged with the gripping story of Rocket League (and uncover the mystery of those weird egg people) and play for a few too many hours. Regular breaks will ensure you have time to process the information. In the event of tilting or losing your nerve, then take some time out to consider your situation before trying again.
Finally, if you’re set on improving at Rocket League, then use all resources at your disposal. There are plenty of training maps, tutorials, coaches and altruistic minds out there who’d be happy to help. Have some humility – do not miss out on an opportunity to learn! Visit the RLCD for a myriad of resources and such persons, and engage with the community discussion, if you dare.
For all you teachers and learners out there, here’s a couple of quotes to send you away with.
“There are no secrets to success. It is the result of preparation, hard work, and learning from failure.” – Colin Powell
“A good teacher can inspire hope, ignite the imagination, and instill a love of learning.” – Brad Henry
Good luck; have fun.
About Author
Pasadenais a Grand Champion level Rocket League player and RLCD Coach. She has been a Grand Champion and top 100 player since Season 3. She is a regular on our discord and a incredible coach and analyzer of Rocket League play. She is also a great resource for tweaking your Rocket League Camera and Display Settings.
Hi all. Chupa49 here again with another guide. This post is all about Rocket League Pro Camera Settings, Controller Settings, and how to optimize your frames per second (FPS) on PC. When I provide Rocket League Coaching to new players on PC I always run through a technical review of the players settings before I dive into a coaching sessions. I had a template I would go through as I’m a pretty process oriented person. I wanted to share my technical guide with you all today so you can implement several of the optimization steps I go through with players everyday.
Rocket League Camera Settings
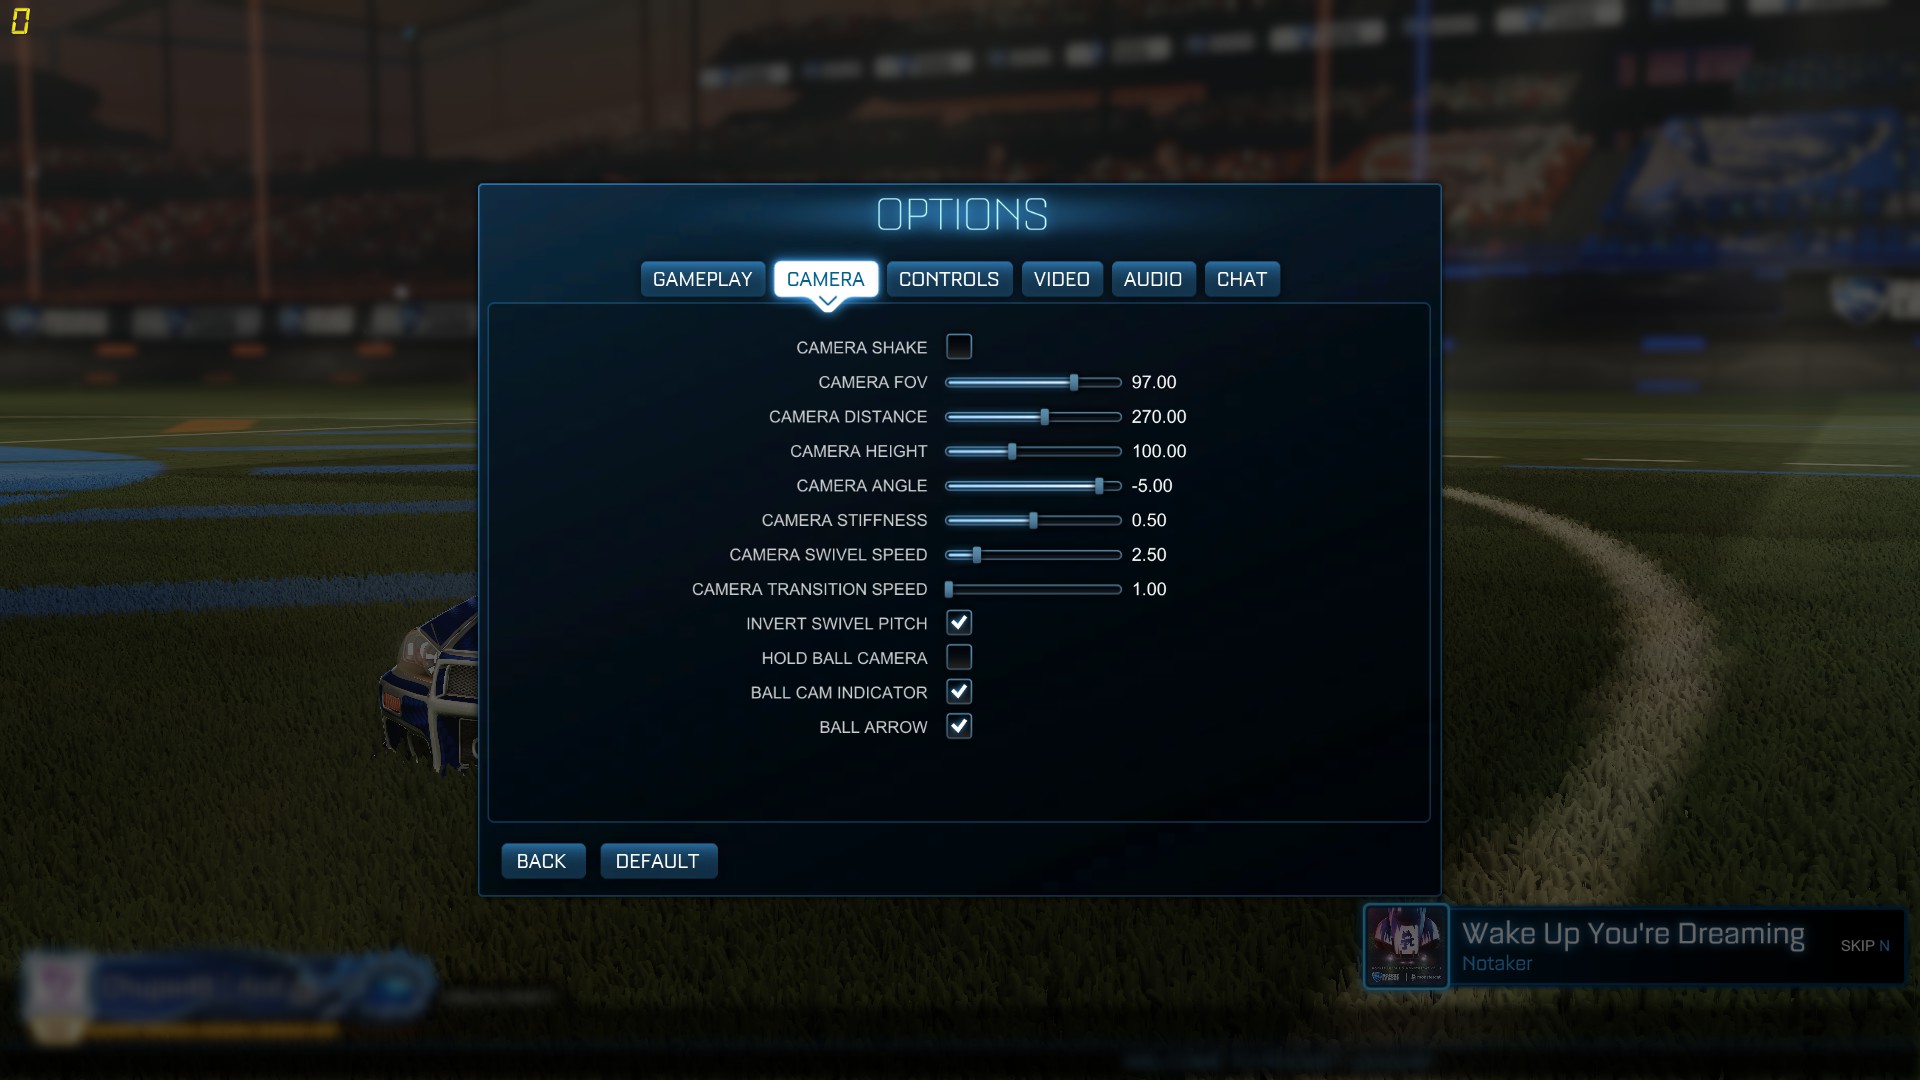
One of the first things I will see with new or low tier players is some have never changed their camera settings. The default camera settings are frankly piss poor for higher level play and do not provide the adequate field vision you need in order to see most of the field. The major issue with camera settings is there are so many out there and the settings feature is pretty diverse so it’s difficult to find one that works for you. Let’s break down each setting first then I will go into best camera settings and pro camera settings.
Camera Shake
This option toggles camera shake when you make goals, hit the ball hard, demo someone, or get demo’ed yourself. It should be the first thing that you turn off when modifying your camera settings.
Camera FOV
Camera FOV adjusts how much width you can see. Think of this like your cone of vision. You can see more of the field with a higher FOV. Gameplay will feel slower with a lower FOV and faster with a higher FOV.
Camera Distance
The option adjusts distance behind your car and where the camera will be. With a higher camera distance, you can see more of what is behind the ball because the camera is further away from you and less obstructed by your car.
Camera Height
This option adjusts the distance the camera is positioned above your car. The higher the camera height, the higher the camera will be be above your car. At higher distances this can provide a bird’s eye view of the field at the sacrifice of precise movement for the player.
Camera Angle
This setting will adjust the angle at which the camera is viewing your car. If you adjust this to the max you will have a more bird’s eye view which can make it harder to align shots. If the angle is too low you may not have a good view of the field in front of you.
Camera Stiffness
This adjusts how loose the camera is when following your car. At lower settings the camera will zoom out far when you are moving at fast speeds. At higher settings, the camera will be more rigid. Most players tend to just leave this at default.
Camera Swivel Speed
This is the sensitivity of the camera. Adjusting this will affect how fast the camera turns. The higher the setting the easier it will be for you to see the action as fast as possible. If you have it on lower settings, the camera will turn slower so you can have more control over what you are looking at exactly.
Camera Transition Speed
This is a new feature as of the Autumn 2017 update. This setting updates how quickly the camera transitions between ball camera and the default camera. At the highest setting, the camera will transition nearly instantaneous. The default setting for this is 1 and I believe most players have not adjusted this because it’s a newer update to Rocket League. Since this is a newer feature I have supplied at video from ItsJPwnAge so you can see what it does first hand.
Invert Swivel Pitch
This changes the up/down movement of the right stick. I’m a super old school combat flight simulator gamer from the X-wing/Wing Commander days so I have this on inverted. It’s all personal preference for you on what to pick.
Hold Ball Camera
If you turn this on you will need to hold the ball camera button to keep ball camera on. Most pros have this option turn off.
Ball Cam Indicator
Turns on the red ball cam indicator on the bottom right in-game
Ball Arrow
This is the white arrow that shows up in-game that tells you where the ball is when it is outside of your field of vision. This is a helpful tool and should be left on.
The Best Rocket League Camera Settings
Before I go into various settings, let’s first talk about what makes a good camera setting for the game. The best rocket league settings have the following:
They provide the players with enhanced field of vision without hampering car movement. Field of vision that is too great will lead to sluggish camera movement and loss of precision
The camera settings are low enough where you have precision on ball specific skills like dribbling and fakes, but high enough when you can see more of the field
If you are new to camera setting adjustments, focus on FOV, distance, and stiffness to start as these are the most important camera settings to change
Rocket League Pro Camera Settings
When players are lost on what settings to go with, I usually ask if they subscribe or admire any current Rocket League Pros. The reason why I ask this is because pros have spent countless of hours increasing their skill set and knowledge in the game. They fine tune their camera settings to work best for their play style. If you admire a certain pros then there are likely two things going on here:
You like their style of play so their camera settings will suit the play style you will eventually prefer
You watch their tutorial videos or streams so if you use the same camera settings as them it is easier for you to pick up what they are reading and mimic how they play
I’m going to supply several Rocket League Pro camera settings to get you start so you can experiment. You can find a good list of camera settings on the team liquid wiki here if you want see the full list
Server
Player
FOV
Height
Angle
Distance
Siffness
Swivel
EU
Ferra
110
130
-7.0
320
1.00
1.0
NA
Jacob
100
120
-4.0
300
0.65
6.0
EU
Kuxir97
102
140
-4.0
350
0.35
7.0
NA
SquishyMuffinz
110
110
-3.0
280
0.45
4.20
EU
Fairy Peak
110
100
-5.0
250
0.40
10.0
Rocket League Controller Settings
The next section I go over with the players I coach are controller settings. The default controller settings are not ideal for high level play as the setup does not provide easy access to buttons and controls for high level maneuvers. Below are the two most common settings I have players switch to.
Function
PS3/PS4 Controller
XBox Controller
Jump
X
A
Boost
R1
RB
Power Slide
Square or L1
X or LB
Air Roll
L1
LB
Reverse
L2
LT
Roll Right or Left
O
B
What Is The Best Controller For Rocket League?
You have several controller options when it comes to playing Rocket League. In my mind there are only 4 controllers that you should consider for Rocket League competitive play:
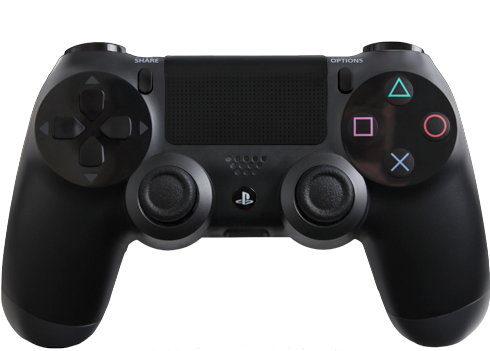
PS4 Controller – This is the preferred controller for Rocket League Pros. Also known as DS4 on forums. Works seamlessly with Rocket League on PC so you can just plug in the controller directly to your USB port without 3rd party software.
XBox One Controller – Good responsiveness and naturally compatible with other games
Xbox 360 Controller – Another good choice
PS3 Controller – Otherwise known as dual shock 3 (DS3)
Rocket League Controller Deadzone Adjustments
After getting the buttons changes, the next step is modifying the deadzone type. Within steam there is an option to change your dead zone settings for Rocket League that will increase the diagonal range for your controller. This will provide a slight speed increase to your turning. It might not seem like much, but in Rocket League any slight advantage you can provide yourself will add up. The first thing we want to do is change the deadzone type of your controller to square in Steam
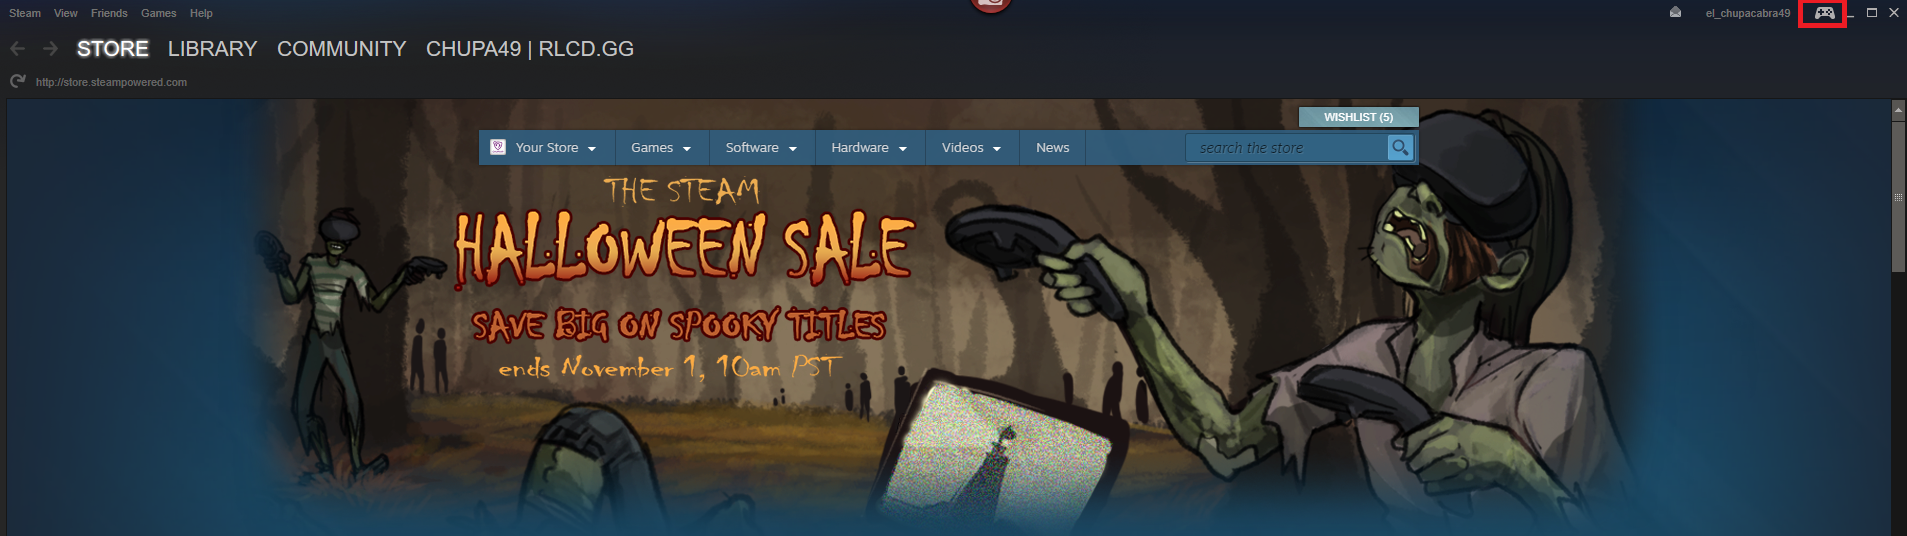
How To Change Your Deadzone Type To Square In Steam
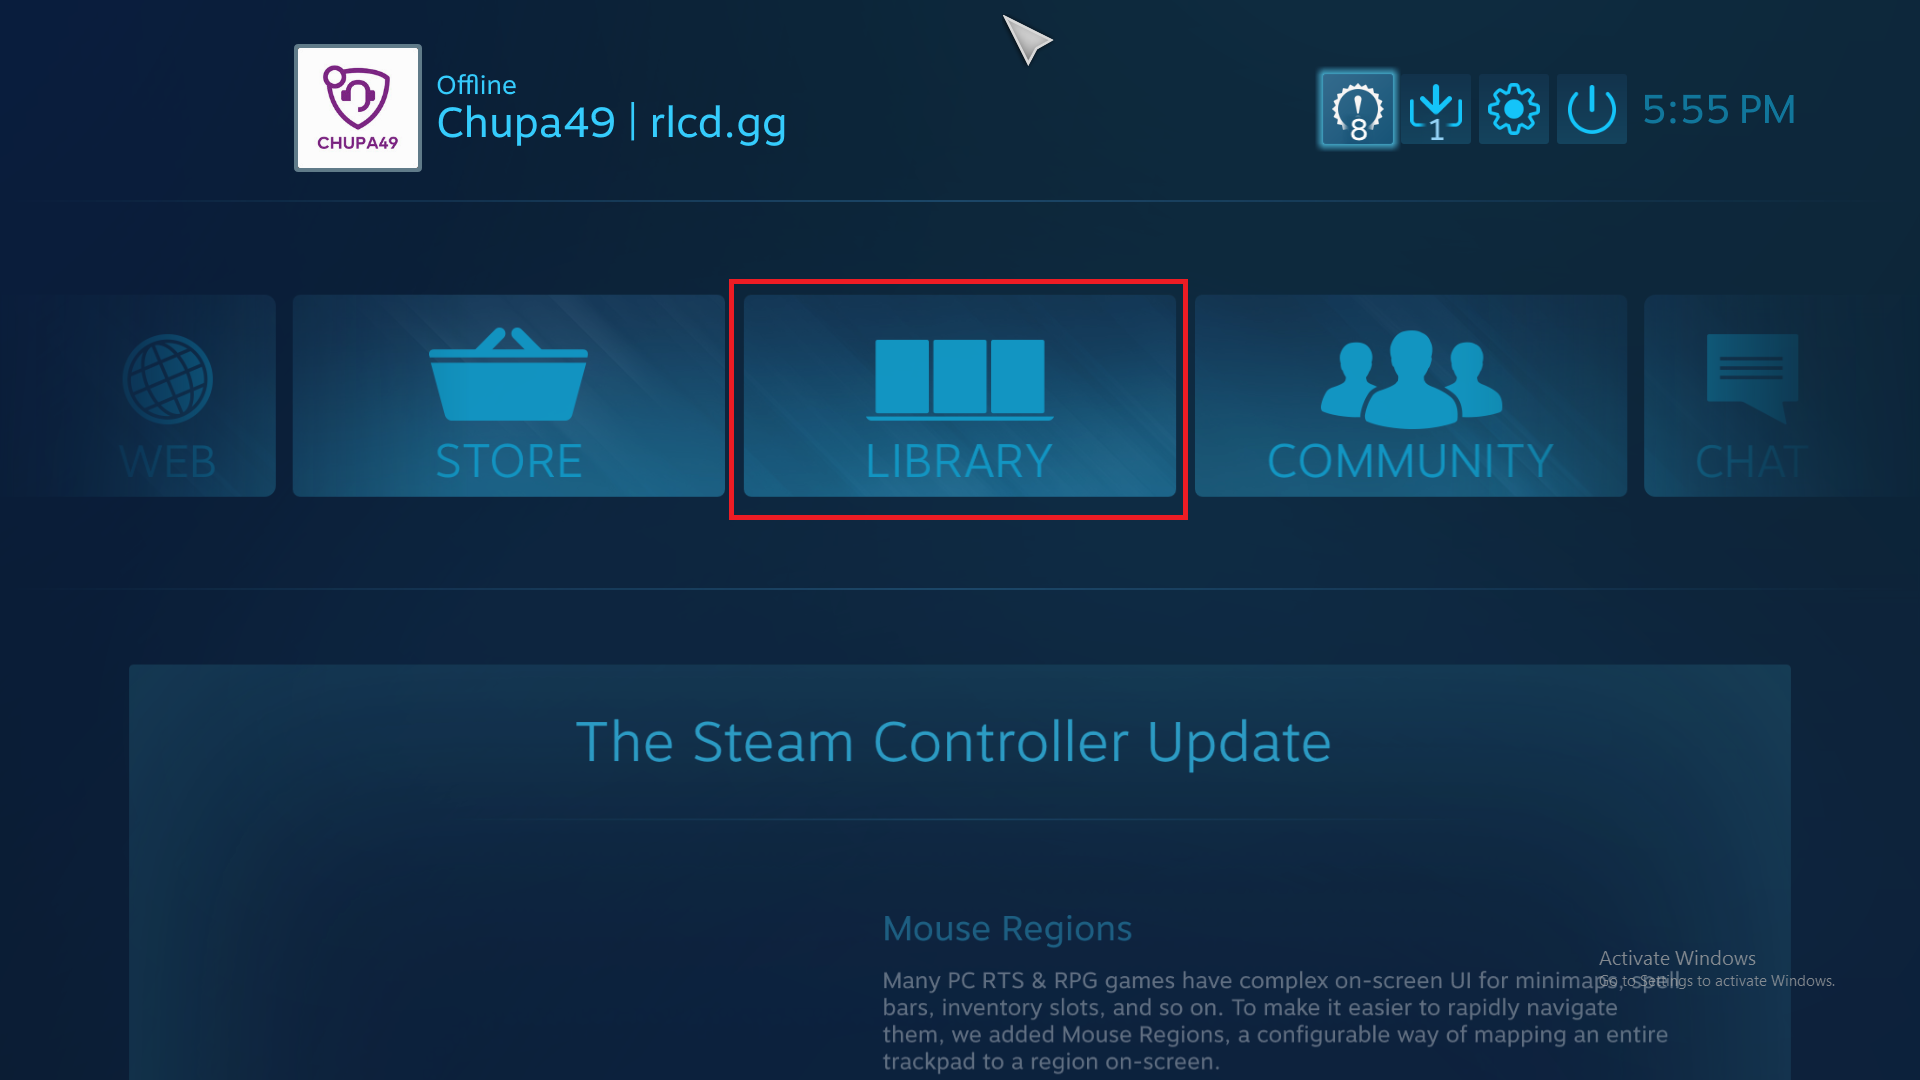
In order to change your deadzone type, you will need to enter big picture mode in steam. The big picture mode option in steam is located on the top right of your steam console as shown in the screenshot below:
Once in big picture mode, select the gear icon on your screen:
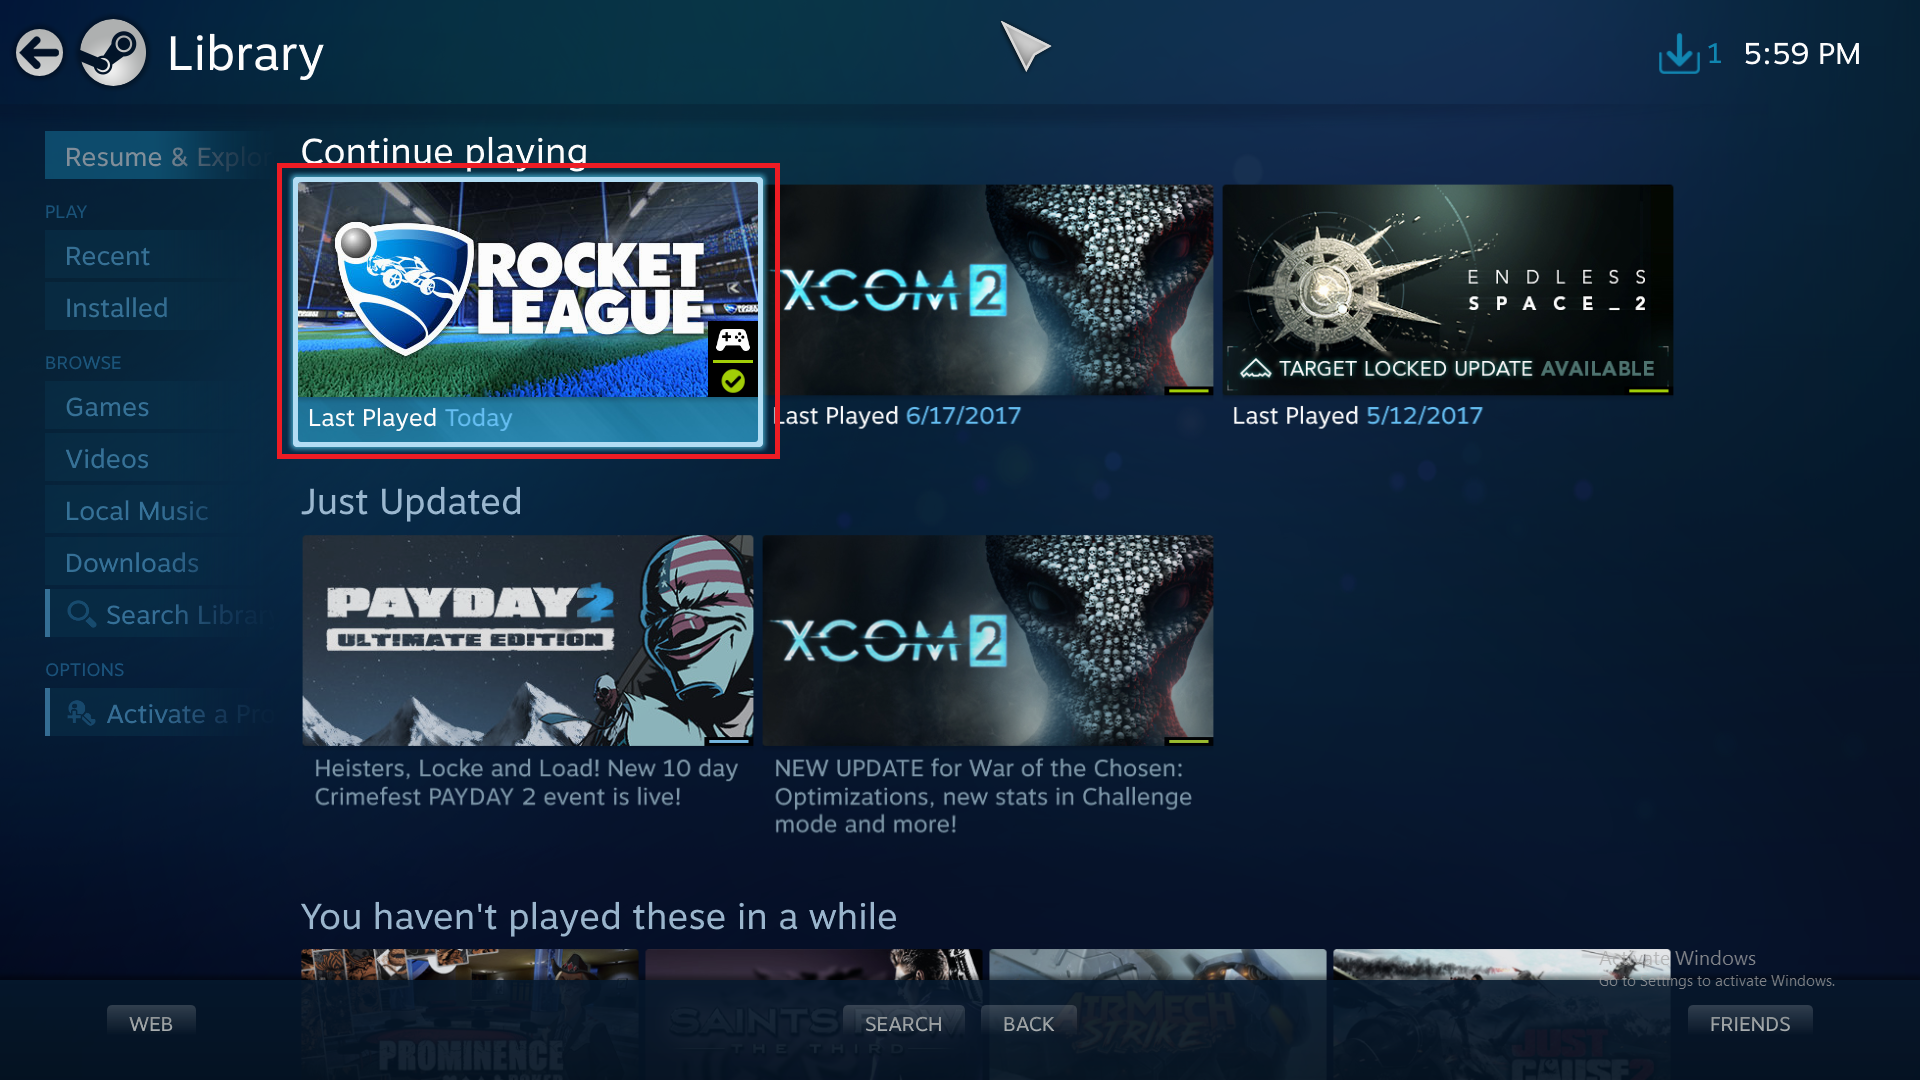
Select Rocket League:
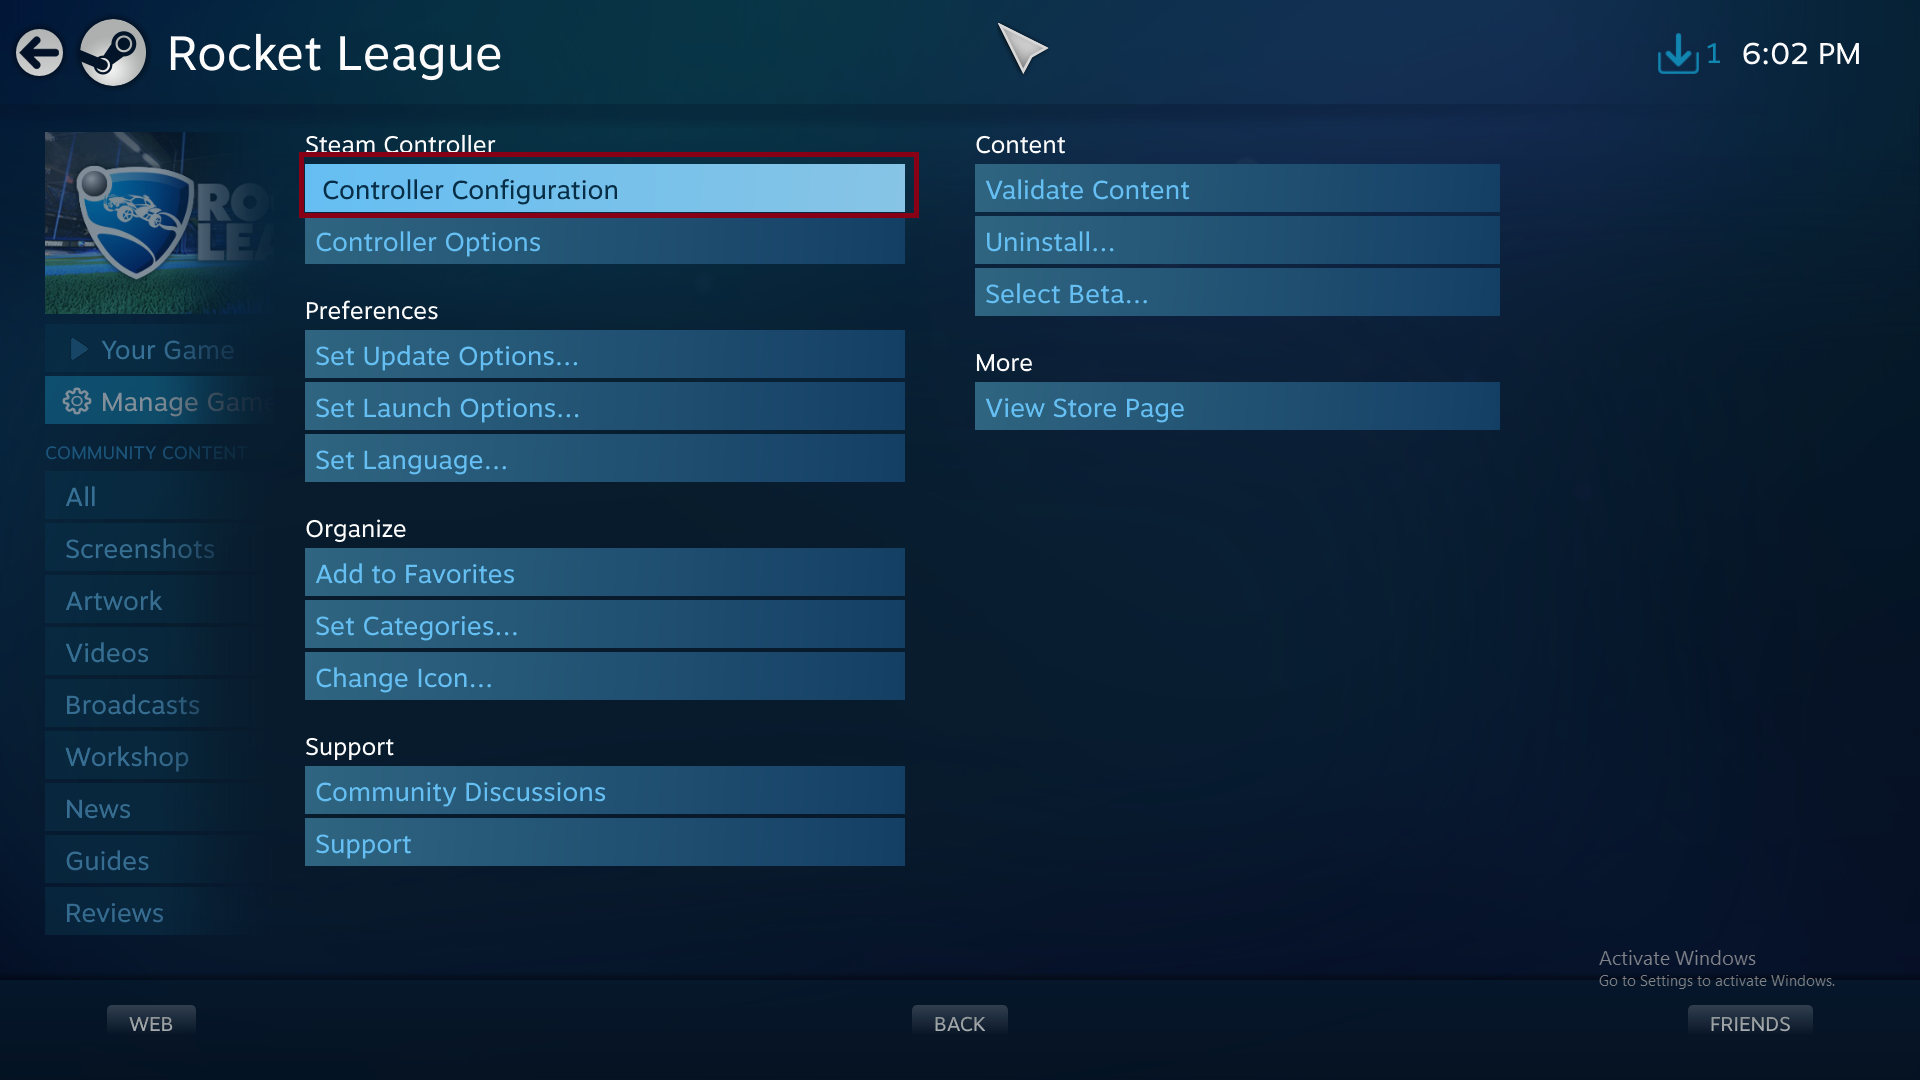
Now go to the Gear Icon that says manage game. Click on Controller Configuration:
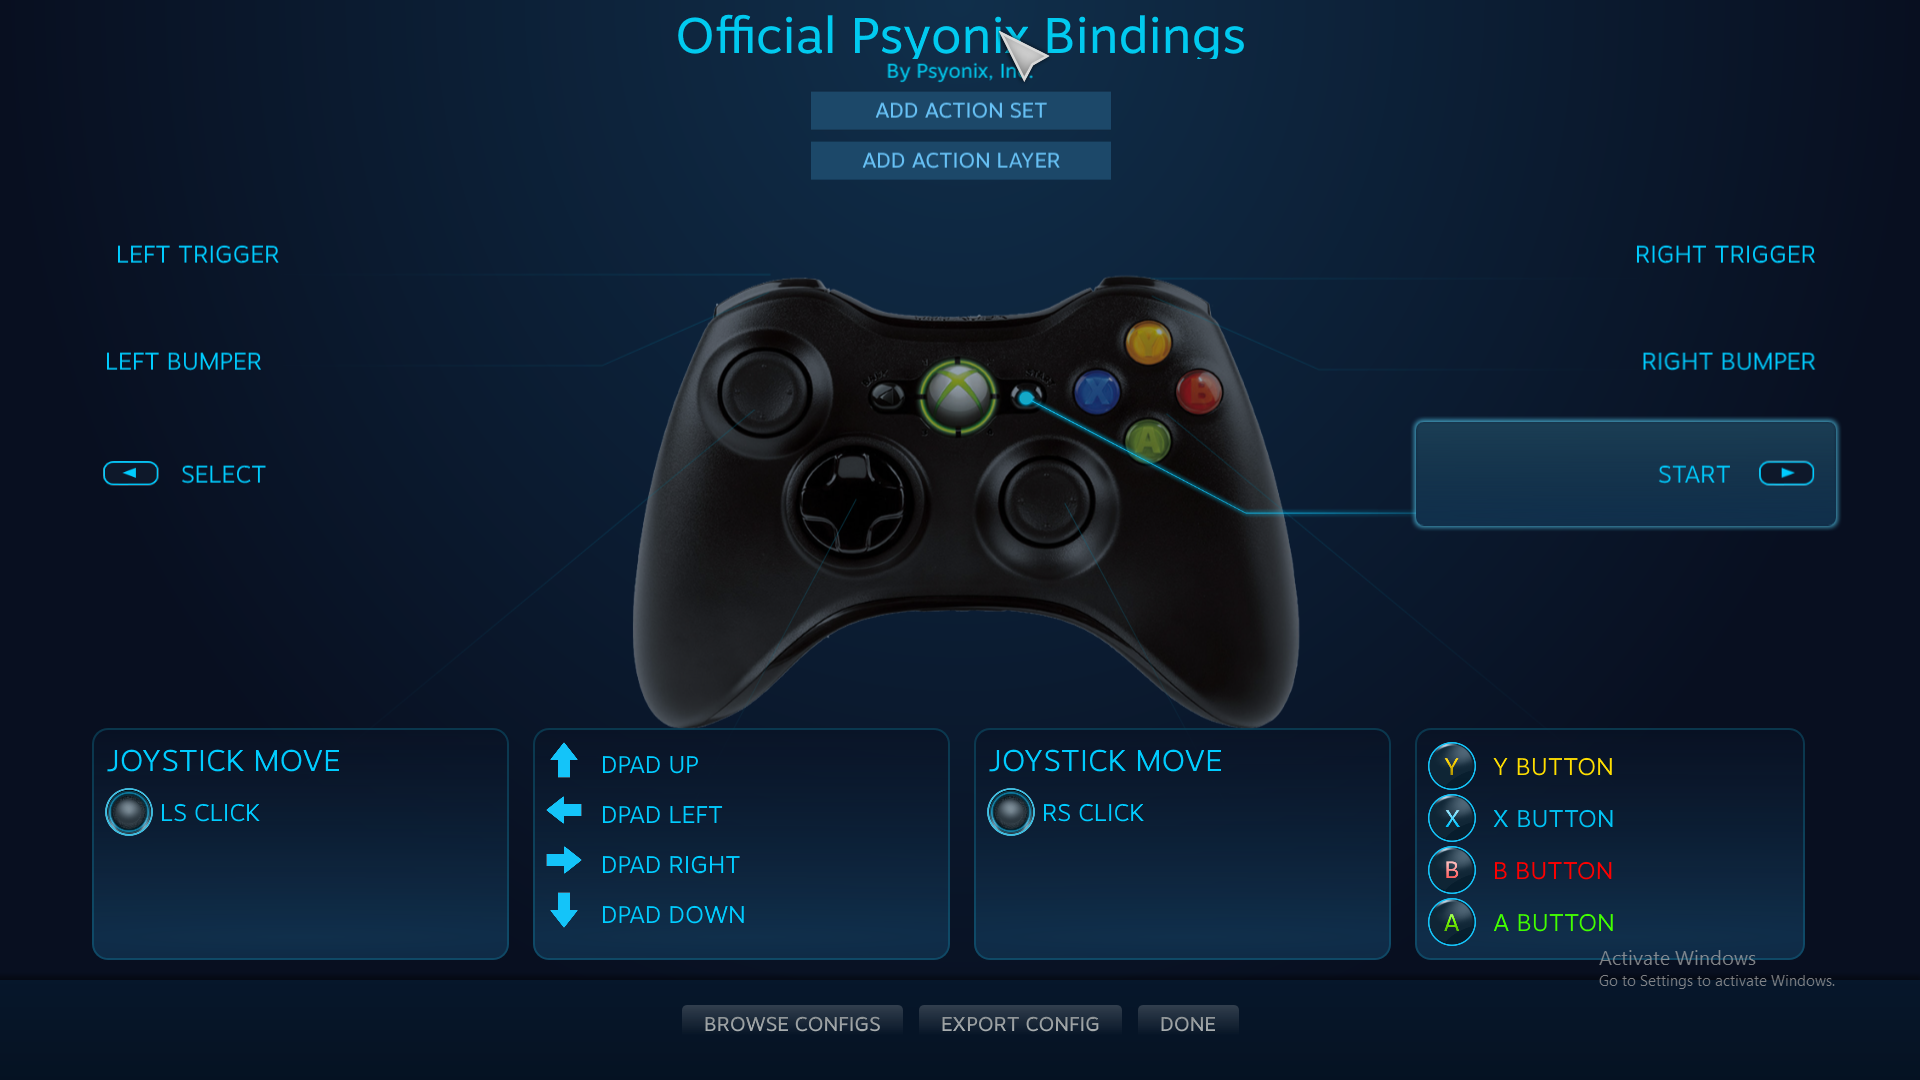
While in the controller configuration you will see your controller layout the two points of interest here will be the Joystick Move for the left and right analog sticks. Let’s click on the left one so I can show you how to change the deadzone type:
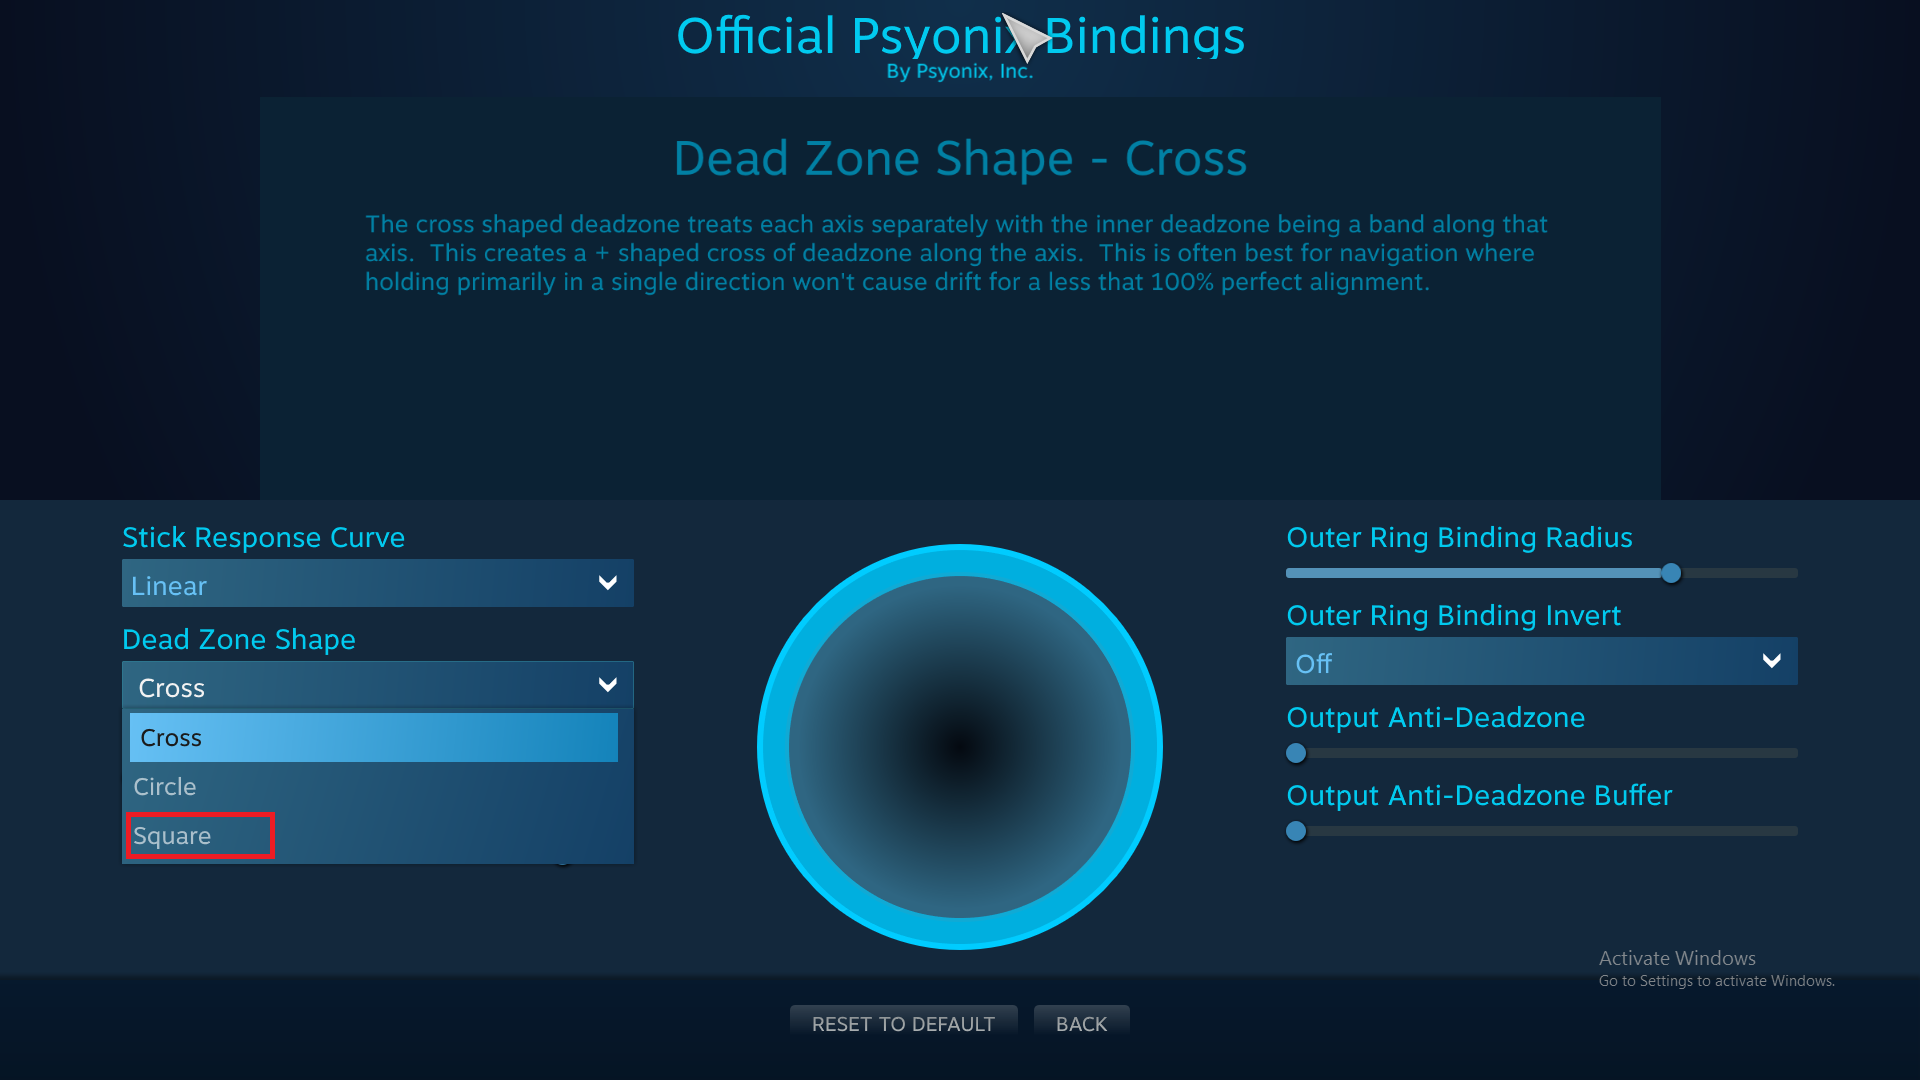
Now we are getting into the juicy stuff :). Go ahead and click on Additional settings button on the bottom left. Here we will want to click on deadzone shape and change it to square. The default will likely be on cross.
That is usually all I mess with here. There are other things you can change here like the stick response curve. It defaults to Linear. You can change it to aggressive to get a really sensitive analog stick, but personally I found this hard to get used to as I was having trouble aiming shots and my half flips were getting jacked up with the sensitivity. Once you have these settings saved, you can disable Steam’s big picture and still use the controller configurations.
Adjusting Your Deadzone Settings Within Rocket League
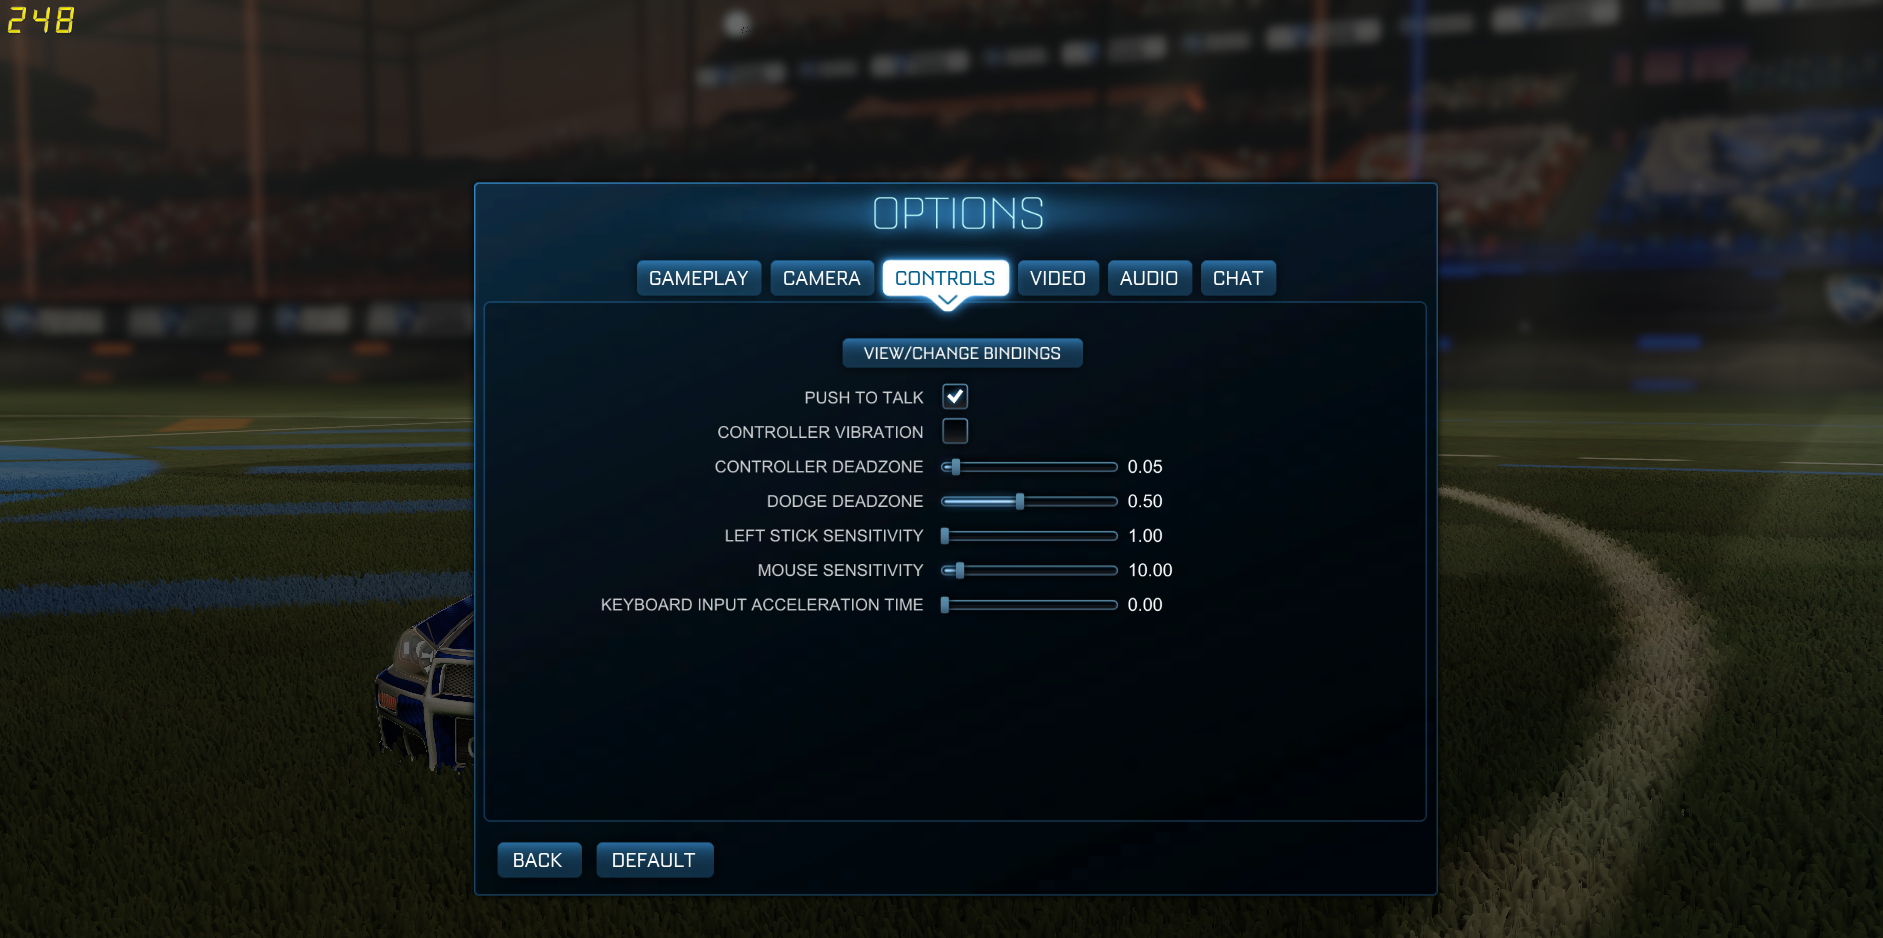
After you have updated your deadzone settings on steam, the next step is to update your deadzone settings within the options menu of Rocket League. Doing so affects the deadzone in-game and makes controls more sensitive for you. The default setting tends to be not as responsive as you are going to like.
I would suggest updating the controller deadzone to .15 to start then adjusting from there. There is another feature called Dodge deadzone that you can modify as well. The Dodge deadzone has been a new update from Rocket League and most players do not know about it yet. I keep mine at default. Some players have reported that increasing the dodge deadzone down minimizes back flipping. The lower you set it the more sensitive the dodges will be. Since this is a newer feature of the game, I have provided a video from Shmootz that goes into more detail:
The Rocket League FPS Guide – How to set up Rocket League for Max Frames per Second (FPS)
Frames per second or FPS is a big deal in rocket league. The smoother the game plays for you the easier it will be for you to be responsive during key moments in the game. Not a lot of guides I have seen go over this in detail and this is something I check out with anyone I coach. I want to ensure your rig and game are set up optimally so you do not have any feelsbad moments in the game when your FPS suck or you lack the hardware for the best responsive experience.
Increasing the Rocket League FPS Cap
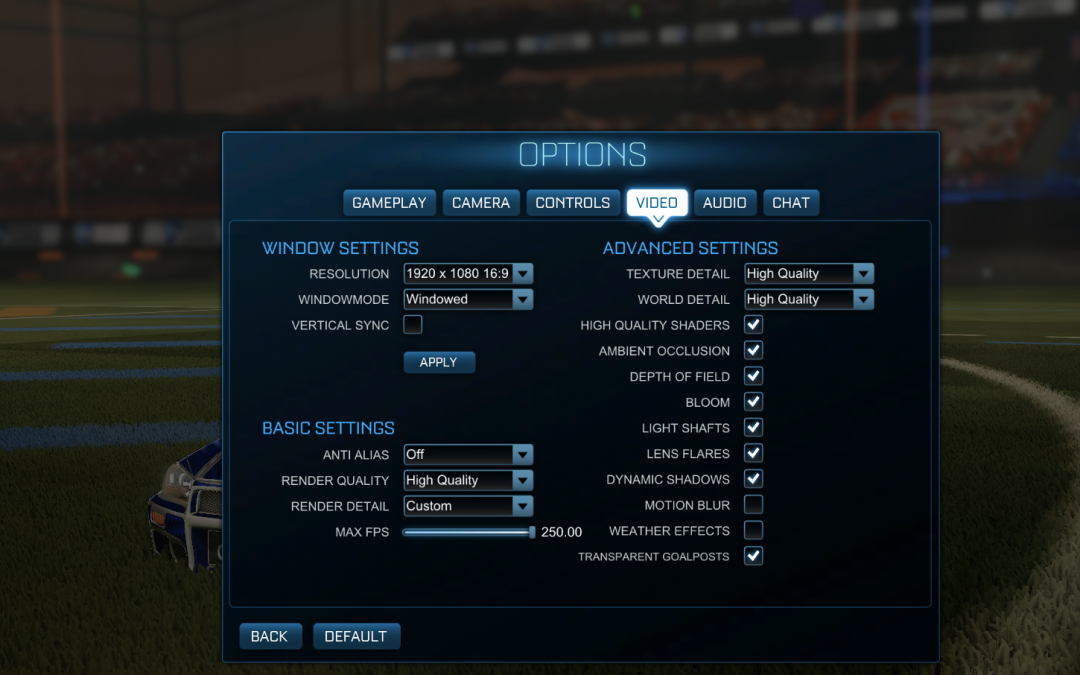
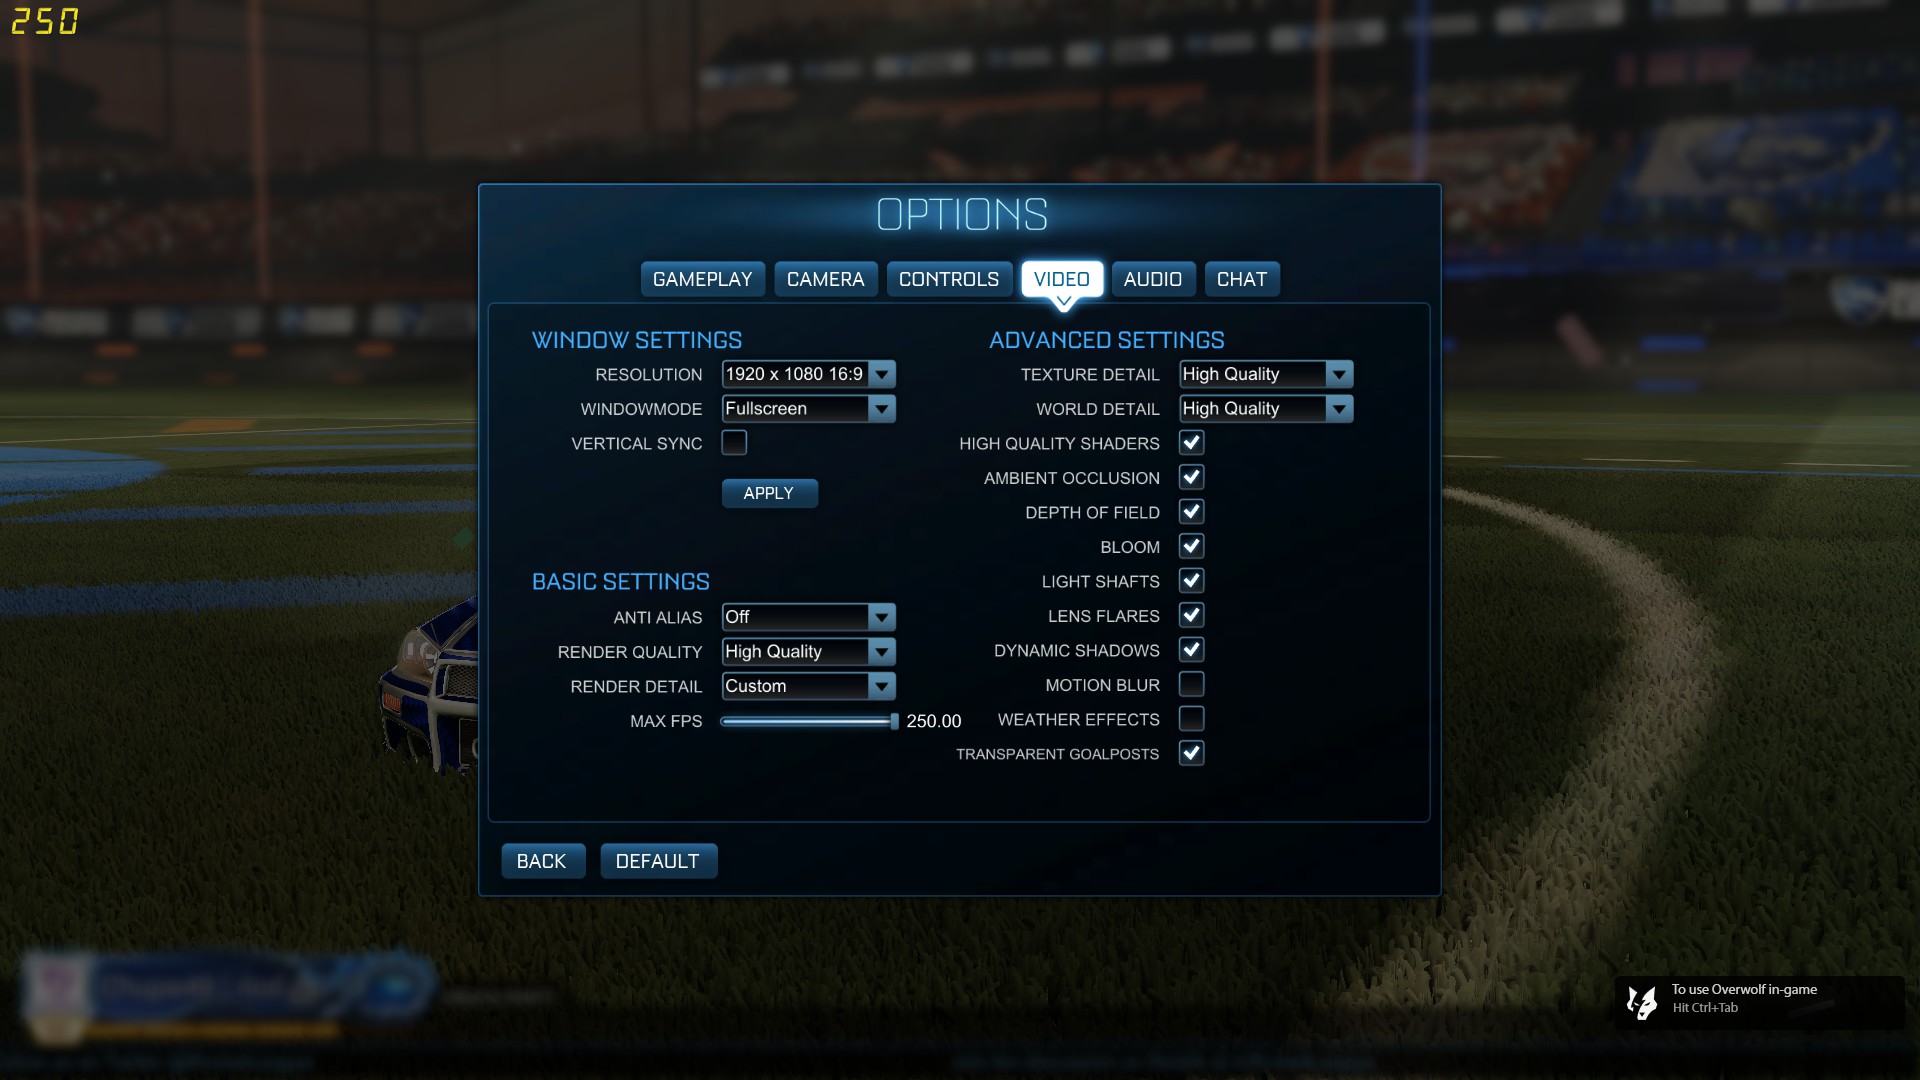
The first thing we need to do is increase the FPS Cap to the max. Go to the options button in game and within the options window go to the Video Tab. In the video tab go to max FPS. Turn that max FPS to 250.
Adjusting Graphical Settings to Avoid FPS Drops
Increase the FPS cap is a great start, but we need to optimize your graphical settings to ensure you have maximum performance throughout your gaming session. We want to avoid a big graphical load on your graphic card, which would lead to FPS drops. GPU software does a horrible job of “optimizing” the game for performance, so we are going to want to do this manually.
Vertical Sync
Vertical Sync or “Vsync” syncs your GPU with your monitors frame rate. This keeps frames from display evenly and prevents screen tearing. Vsync is a hotly debated topic among gamers. Personally, I just turn the option off even though I only have a 144 hz monitor. Most folks I talked to say keeping it on produces input lag and input lag is something you want to avoid.
Anti Alias
Run at FXAA low. MLAA for Rocket League does not provide much of a difference yet requires a lot of performance from your GPU. The graphical differences between off and FXAA is huge so I would not change that unless you have a low end PC.
Render Quality
Set this to high quality. The game does not look good without it. Only go with quality if you have a low end PC.
Texture Detail
This setting does not drag your frames per second performance down. You can probably keep this at 100% and be fine.
World Detail
Some players turn this off to avoid the detraction of additional background details. You will see less trees and less detail in the background if you set this to performance. Turn it off for max performance.
High Quality Shaders
Pretty much a must to keep on as the game does not look very good without it. Only turn off if you have a low performance PC.
Ambient Occlusion
This just provides extra shadows. Aesthetics for the price of FPS performance. I would recommend that you turn this off.
Depth of Field
Keep on, with it turned off the end of the field looks blurry when they are far away. Turning on the setting mimic real life. This is a video game so I would like to keep my super human vision thank you very much.
Bloom
It enhances the lights of the game. For maps like Champions Field this may be distracting. It would be a good idea to turn off. It’s more of an aesthetic change then FPS related.
Light Shafts
This adds sunlight glare when you are going up for aerials. Probably a good idea to turn this off. It does not have a FPS performance affect, but it may cause game play issues.
Lens Flare
Similar to Light Shafts. Another option you probably should turn off to avoid any game play related issues.
Dynamic Shadows
This is useful as you use the shadows to to give you information on the field. However, it does have a major impact on FPS performance. I would recommend turning this off if you have a low-end PC rig.
Motion Blur
Oh god turn this off! I want my vision clear when I’m running at full speed. No FPS performance impact but it hurts the game play experience.
Weather Effects
Turn it off. It distracts you when playing and has a FPS affect. It looks nice, but in competitive play all I care about is optimizing and keeping my FPS from dropping.
Monitoring Your FPS Performance
There are two ways to monitoring your FPS performance:
Download a tool like Overwolf. I am a big fan of overwolf as it not only tracks my FPS performance but it also displays the MMR ratings of the opponents I’m playing online
Turn on the the FPS counter on Steam with the settings menu. To do this in steam go to settings>ingame then go to the In-Game FPS counter and toggle it on.
While in-game check the FPS counter. Hopefully, you stay above the 144 FPS mark. If you are dropping frames during gameplay, look at the settings again and adjust as you need to. The key is to keep you above the 144 FPS mark throughout your entire gaming session so you can take advantage of your monitor’s capabilities and have slack for frame drops.
The Case for 144 hz Monitors
If you are really serious about Rocket League competitive play, I would highly suggest upgrading to a 144 hz monitor. A 144 hz monitor vs a 60 hz monitor helps you because the higher refresh rates makes everything look both faster and smoother. It makes a world of difference and frankly it is really hard to go back once you make the change. Pretty much all pro gamers these days are rocking at least 144 hz monitors as of the date of this post. It is worth every penny to invest. As I said before, some of these changes since marginal, but in sum they all add up. Rocket League and e-sports in general is a game of pixels and frames per second. Any advantage you can get you should take.
When shopping for a new gaming monitor, you will want to look at the input lag and responsive time of the monitoring. Ideally, you will want an input lag figure less or equal to 7ms and a response time of less than or equal to 1ms. Some gaming monitors these days market a 0 ms input lag.
About Author
Chupa49 is part of the RLCD.GG website staff. He joined us as a Challenger 1 back in Season 3. As of the beginning of season 6, he is a Diamond 3 player. He has benefited from the discord server by getting coached by several members. As a part of giving back to the community that has helped him get to a tier he never thought was possible, he wrote up this guide to help out many others in his situation with very limited time and with no direction to go to find the right type of settings that help optimize their gaming experience. Chupa49 has also published a detailed rocket league training pack guide for players ranked diamond and below.
Hi all, Chupa 49 here. As a player who has very limited time to play, finding great resources that I can use to concentrate on improving my skills are Rocket League can be pretty difficult. In this post, I want to go over Rocket League Training Packs, how they are beneficial to you, and go through my selection of over 35 training packs that are ideal from Silver all the way up to Diamond.
How To Improve at Rocket League Using Rocket League Trainer Packs
Rocket League Training Packs are custom training sequences created by Psyonix and players within the Rocket League Community. It was a response to the old custom Rocket League Trainer that was a PC exclusive created by Ra1n. Back then, PC players enjoyed a custom trainer that you could use to run various drills. Console players were unfortunately left in the dark until Psynoix released the Custom Trainer late in 2016. Since then, all players could access the customer trainer.
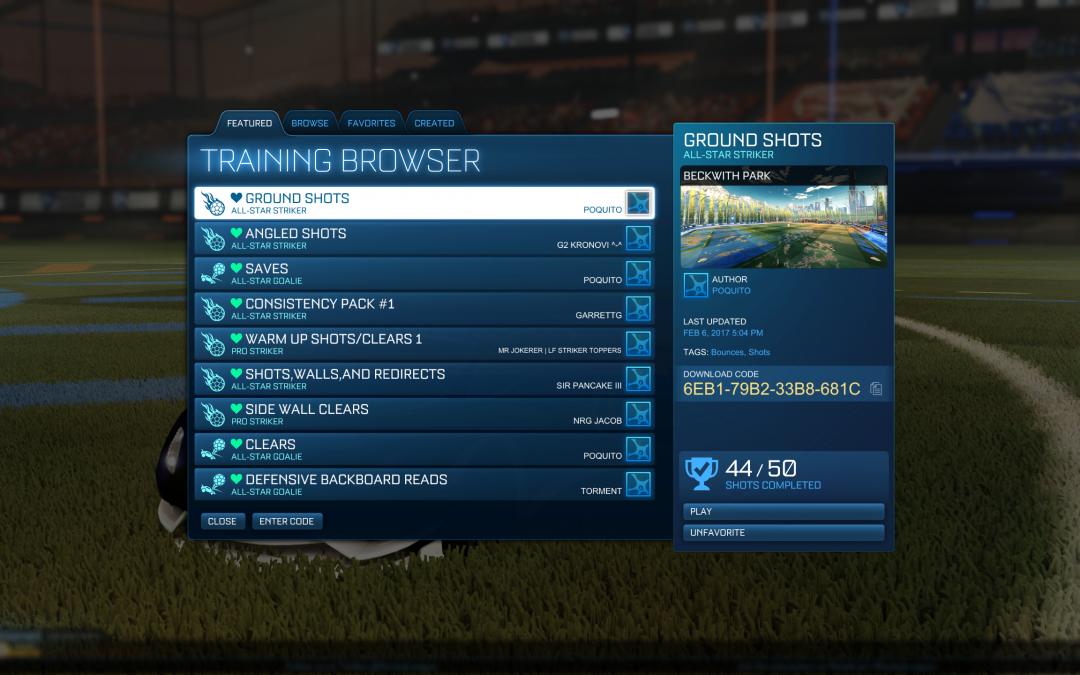
Recently, I have been diving into training packs and have been a bit frustrated at finding training packs appropriate for my skill set as most are way too hard for me. The other issue I have is finding video content on how to actually do these training packs. I understand training packs are great, but if a video doesn’t exist that shows you how to complete the pack, it can be difficult to actually perform the drills. This is definitely more noticeable in advanced packs like say backboards where a lower ranked player won’t really know where to hit the ball and when to jump. The last thing that has been annoying for me is the inability to search for training packs within the game. I mean, really a simple search function would be great. I get on forums or even on our server and players will recommend a pack by name. Well, if you don’t know what the heck the code is you are SOL.
So because of this frustration, I went out and made this compilation post to benefit all players in the Rocket League Community. This is a list of various training packs broken down by type of skill. My criteria for selecting these Rocket League Training packs were as follows:
A video exists on how to perform the drills on the training pack so you can follow along
A skill level is assessed so you can find the one that works for you – many videos are created by advanced players who likely have forgotten the skill set of the lower ranks. Since I am a Diamond level player and see the skill set in this tier everyday I have revised many original assessments these creators had
Code is supplied so you can find it online
Skill level for these packs will go up to Diamond. As of this post date I am a Diamond III level player so I do not feel comfortable talking about high tier packs. If you are Champ and above in rank check out our Champ to Grand Champion Rocket League Trainer Pack List.
The creator has a social media or website so I can give proper credit to
So let’s get started.
Air Dribbling
Every newbie player in rocket league dreams of hitting Reddit worthy air dribble goals. They look awesome when you make them, but before I list out the packs you can use to practice I will say if you are not at least a mid-diamond level player (as of Season 6 update), this is something you really shouldn’t pursue as there are far more critical skills you can master. The Freestyle King, Jhzer has a great overview on how to perform Air Dribbles below:
Rocket League Coaching Discord member and coach Wayprotein starts up our post with this Popup aerial pack. Popup aerials are a common scoring method in the mid ranks in Rocket League competitive play. Practicing precision first touches will introduce the balance concept when it comes to air dribbling
Ground Air Dribbles
Creator – Nathz Name – Ground Air Dribble Level – Platinum, Diamond Code – BCCA-F2A0-966A-5F96
Ground Air Dribble Training Rocket League
Learning Ground air dribbles is a killer skill if you can pick this up in Diamond or Platinum. This map focuses solely on this skill so you can practice away!
An updated pack by Wayprotein to make it available to PS4 players. It starts off basic and moves to more immediate level air dribbles.
Aerial Shots
Aerials are a more realistic skill set to master as a newbie. Before getting into aerials, I would recommend getting muscle memory on how to do a quick aerial. Quick aerials will allow you to get up much faster than most players are low tiers, help you hit very high shots, and make you a better defender. To learn more about quick aerials, I’m going to show this video by Sir Timbers to get you started.
Tutorial: Faster Aerials | Rocket League
Understand and study this video well before beginning aerial training. Now that you got that down let’s list out a few rocket league training packs:
All-Star Training Aerials
Creator – Psynonix Level – Bronze, Silver, and Gold 1 Code – NA
(ROCKET LEAGUE) Aerial Training – All-Star: 100%
There is no pack for this. Just use the all-star level training provided in the game. This should provide you with plenty of practice to use your quick aerials
Rocket League Training Wayprotein Basic Aerials (Xbox One)
These are some basic aerials that will come up during games. They will be hard at first for this level, but this is a good introduction and a bridge to more advanced aerials
This pack introduces 90 degree aerials to the player. This is another common ingame scenario when you have to fly in and hit tricky 90 degree shots – usually off of 50/50s or ceiling bounces
Freestyle Goals 2 – Training Pack – Rocket League Freestyle Goals
This is a great pack to introduce freestyle aerials and shots. These scenarios usually come up in play from passes or wall hits and will provide the player plenty of solid practice time. The 2nd shot is bugged so you can’t 100% the pack, but the rest of the shots are good to practice on.
Ball Catching
Ball catching is a skill that starts becoming critical when you hit Diamond level play. If you know how to catch, you will have an agility advantage over your opponents. At Diamond it will give you the edge to get to Champ and at Champ it becomes a common skill. Start practicing with these drills so you get ahead of the curve!
All-Star Aerials – Catch Training
Creator – Psynonix Level – Gold, Platinum Code – NA
All-Star Aerials is a great way to begin learning how to catch the ball. Fire up the training and focus on getting the ball to land on the top front of your car with the intention of slowing the ball down.
An 8 shot pack. I don’t have a video of this, but I included it because there aren’t a lot of catch drills on the trainer that work for this level.
Backboards – Offense
Being able to score off backboards is similar to catching at Diamond. Not a lot of players at that tier can do it, but knowing now will get you ahead of the curve. It’s absolutely critical past Diamond as everyone starts hitting basic backboards at Champion and it gets more advanced from there.
Rocket League Pro Packs: MasonRL90's Basic Rebounds (with a twist)
Start here to begin learning how to hit backboards. This is a small 9 shot pack training pack, but it builds a solid foundation for more advanced backboard training.
[Rocket League] Wayprotein Training Ground Backboard Double Touches/Passes (XBOX)
After getting good at Mason’s training pack, give this one a try. This is a nice step up into more intermediate level backboard training packs. If you start nailing these, you will start breezing through Diamond.
Backboards – Defense
While the threat of backboard goals are low for tiers below Champion, Knowing backboard defense is important as it will get you favorable clears and positioning for your teammates. Your opponents at Diamond and below will sit or delay a backboard so getting good at these drills now will get you through a lot of games.
Created by Rizzo after John Sandman asked for a pack to defend against backboards. There are only 8 shots in the training pack, but each position is setup very well. This is the main training pack you’ll need until you get to Champion level play
Dribbling
Dribbling is important from Gold onward. Personally, I suck a dribbling, but I know enough to steer the ball to where I need it to go. It is a very big skill in 1s if you want to get past Gold tiers.
This is a small 5 pack training, but it focuses on basic turning of the ball. This a good introduction to dribbling in my opinion. Focus on turning the ball, landing it on the top of your car, and dribbling it down into the net.
This 16 shot training pack will take you from zero to hero when it comes to dribbling
Dribbling Challenge 1
Creator – French Fries Level – Gold, Platinum, Diamond, Champion, Grand Champion Code – NA
Rocket League Dribbling Challenge [100% – 3:32 – World Record]
This is a great map to challenge once you get these dribbling training packs down pat. It starts out easy, but gets insane later on. There is a Dribbling challenge 2 available now – but you shouldn’t be challenging that until you can complete this one.
Kickoffs
Everyone needs to practice kickoffs. The problem is you can’t really do kickoff training unless you hop into a game, so here is the next best thing:
Kickoffs
Creator – Boldbirdman Level – All Code – 7EE0-F697-7453-7123
This is a very simple training pack that lines you up in kickoff position so you can practice your kickoff start over and over again. Here is a video on fast kickoffs so you can get practicing
0ver Zer0's Fast Kickoff Tutorial
Goalie Training
Being a good goalie and making saves is an on going skill development. You need to get faster and better at making saves and positioning the ball to a teammate or away from the opposing team as you move up in tiers. I have provided a few packs that are appropriate for up to Diamond Tier range.
All-Star Goalie Training
Creator – Psynonix Level – Silver, Gold Code – NA
(ROCKET LEAGUE) Goalie Training – All-Star : 100%
The standard all-star goalie training should be plenty for up to gold training, especially if you are still learning to quick aerial. Keep practicing these and move on to a training pack once these become easy.
A 16 shot pack that puts you through some off-position situations where you have to make a save. I highly recommend this pack as it will get you familiar with controls reversing when you have ball cam on.
Passing
There isn’t a good pass training pack due to the limitations of the Rocket League Customer Trainer, but you can at least practice how to receive and score off passes. Here is a passing set I would recommend.
[Rocket League Training] Passing – Downfield Right
[Rocket League Training] Passing – Infield
This 3 training course pack focuses on both passing and receiving. You are limited to what you can do with the passing sequences, but try your best to replicate the pass given to you in the pack. Odd numbered shots you are receiving and even numbers shots you are attempting to pass.
Pinch Shots
Until you get to around mid-Diamond, most pinch shots are by chance or luck. These training packs focus on purposely creating a pitch shot chance so you can familiarize yourself with the mechanic in the game.
This pack is a step up from the first one mentioned. No video is available – but it’s Biddles. Everything he releases is great to use.
Power Clears
Power clears is a basic skill that all Rocket League players at any tier needs to master. The training packs listed in this section are basic in nature as many other training packs incorporate power clears as part of their training.
A 16 shot training pack that takes you through multiple power clear scenarios. To power clear, wait for the ball to hit the ground then right after it bounces go for the hit.
Redirects
Redirects are usually by chance up until high Diamond. Here are a few lower level redirect training courses that should get you going. Most redirect packs available are too advanced until you are at Champ level.
Rocket League In-Game Trainer Easy Redirects and Backboard Shots
Another intro pack. This one is only 7 shots. Again – redirects are an advanced skill so I’m spoon feeding you easier redirect training packs so you can build your foundation for more advanced ones.
This 8 shot rocket league training pack highlights common kickoff scenarios where you can hit the ball off the rebound for a goal. These situations happen a bunch on all playlists. If you get good at thing, it is not uncommon to get an extra goal off these rebounds every game.
Shots
Everyone hates missing shots. So here are a few training packs that work on improving your accuracy
Rocket League Pro Packs: Fickle Platypus' Shots You Shouldn't Miss
Flicke’s shot pack is one of the best shot training packs on the server.
Biddles Progression
Creator – Biddles Level – All Code – 7E96-B9C7-3AC0-9B70
Biddles Progression Montage
Biddles does it again with an epic 40 shot training pack. This is a must to go through.
Wall Shots
Wall shots become common from Gold tiers and on. They get more and more advanced at higher tiers. Here are a few all wall shot training packs that are appropriate for Diamond tiers and below.
Advanced Wall Shots Training Pack – Rocket League – PS4, PC, XBOX1
A 14 shot wall offense rocket league training pack. Some of these wall shots you can backboard after the initial hit for extra practice and flair.
Wall Defense
You are not going to get out of Diamond if you do not get good at wall defense. It starts becoming a major deal In diamond as players will hit goals off wall and rebounds
No Flip Clears – Rocket League Custom Training Tutorial #15
Knowing when to flip and not flip when it comes to wall clears will prevent from getting weak clears that will put your teammates in bad situations. This 10 shot training pack will help develop your timing and feel for when you can clear without flipping your car.
Being unable to clear the ball and feeling pressure is frustrating. This pack puts you through various uncomfortable wall clear sitations. All these balls should be cleared past midfield.
Rocket League Trainer Pack Creator Credits
This post would have not been possible without these great creators who put the hours in their game to develop these rocket league training packs. Below are all the creators used in this post and where to find them and follow on social media. If I couldn’t find their social media, I have linked to their Rocket League Tracker Profile. Give them some love by following them.
Biddles – Link Boldbirdman – Link Christo 5 – Link Flickle Platypus – Link French Fries – Link Jayless Gaming – Link MasonRL – Link Moldy Bread Nasty Zjoon – Link Nathz – Link ProfessionalShanks Rizzo – Link Timothy RL – Link Torment – Link tRose888RL Vinne The Gooch – Link Way Protein – Link Yeeza – Link
Thanks for reading and viewing and see you in-game or on our Discord server! Also, check out our other post about Rocket League 2v2 strategy.
Rocket League Training – About the Author
Chupa49 is part of the RLCD.GG website staff. He joined us as a Challenger 1 back in Season 3. As of the beginning of season 6, he is a Diamond 3 player. He has benefited from the discord server by getting coached by several members. As a part of giving back to the community that has helped him get to a tier he never thought was possible, he wrote up this guide to help out many others in his situation with very limited time and with no direction to go to find the right type of training and coaching at his level that would be beneficial to him.
I’m Juicy, a 21-year-old guy from the Netherlands, and I think I have about 2000 hours logged over various accounts. I’ve been playing this game religiously since Season 3, which was also the first season that I got Grand Champion. After I got Grand Champion, I was playing with a friend of mine who was close to top 100 in 2s, and she told me that I was absolutely horrible to play with. As you can imagine I was absolutely mortified by that, being under the impression that because I was a Grand Champion I must be a good player at the very least. So we went through one of our games together as a replay, and she was so right. I was almost playing like one of those teammates that you scream at. In that Rocket League coaching session we talked about a few things that I’d like to tell you guys about today: – Defensive mindset – Offensive mindset Now, you might have read some other guides online, but I’m going to try and be a bit different. Why? Because I’m going to try and make you see scenarios through the eyes of your teammate, instead of your own – so let’s begin.

 Suppose now that we liken the skillsets within Rocket League to the alphabet, and place them in order of difficulty, in arbitrary fashion. For example, A could be analog stick control, B could be flipping, and K could be ceiling shots. If we were to list every minute detail about Rocket League in this, of course we’d need close to an infinite number of letters to work with, so we’ll try to keep it down.
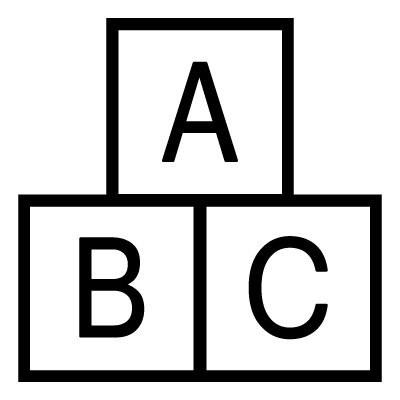 I believe, although it evolves as the meta changes, that each rank encompasses a specific few of these letters. Perhaps Bronze encompasses A, B and C. I also believe that you should imagine this alphabet to be foundational, such that you must achieve C before D, D before E, and so on and so forth. Now that you have this in your mind, let’s move ahead.
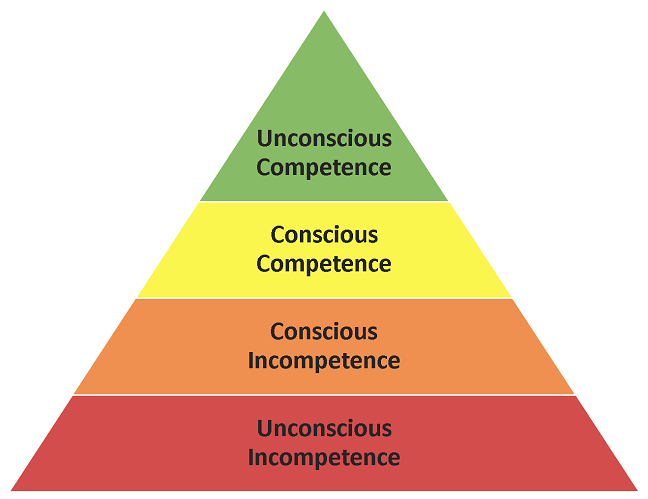

 Macrogame asserts itself within the deeper understanding of the game: rotation, where and when to flick the ball and why we do these things. Macrogame is arguably a more important factor of your rank, as is exhibited in the Solo Duel playlist. Improving your macrogame, thankfully, requires far less time than your microgame, although it demands a deeper understanding. Coaches and more experienced players will be well-equipped to explain the macrogame observed in your respective ranks – and how to conquer it.


