Hello. I’m Pasadena, a coach within the RLCD. You might have previously seen an editorial piece that I wrote here, about the theory behind learning in Rocket League. In this post, I’m going to do my best to answer a question I get asked very often: “What’s the difference between a square and a cross deadzone?” as well as give you some ideas about which you should use. I have played Rocket League extensively with both types, and the differences between the two are far from negligible. Changing from one to the other might be a step in the right direction towards becoming the best Rocket League player you can be.
Rocket League Deadzones – A Game Changing Explanation!
Contents
- 1 Rocket League Deadzones – A Game Changing Explanation!
- 2 What is a Deadzone in Rocket League?
- 3 Visual Differences Between Radial and Square Deadzones in Rocket League
- 4 The Mathematics – Why Square Deadzones Have More Reach
- 5 Solutions – How to Modify Deadzone Settings in Rocket League
- 6 Effective Differences – Field Examples of Deadzone Differences
- 6.1 Flick Differences with Deadzones
- 6.2 Turning Differences with Squared Deadzones
- 6.3 Flip Resets with Deadzones in Rocket League
- 6.4 Visual with Square Deadzone
- 6.5 Visual with Regular Deadzone
- 6.6 Aerials and Recovery Deadzone Differences
- 6.7 Visual with Square Deadzone
- 6.8 Visual with Regular Deadzone
- 7 Parity Concerns
- 8 Auf Wiedersehen; Until We Meet Again
- 9 Deadzones – A Game Changer (About the Authors)

What is a Deadzone in Rocket League?
Firstly, I’d like to take a paragraph to briefly describe what a deadzone is, and provide resources regarding how you can configure your deadzone appropriately. A deadzone essentially refers to an area of input from your controller’s analog stick (also known as ‘joy stick’) which is ignored by a system. This means that if you move your analog stick within a deadzone, then you should see no changes on screen, effectively acting as if you didn’t move the deadzone at all. Typically, deadzone configuration settings range from 0.00 to 1.00. It is important to note that in Rocket League, the Controller Deadzone configuration setting refers to a radial deadzone, which means that the area of the deadzone is described as a circle. The deadzone settings within Rocket League can be found in the options menu, under the ‘Controls’ tab. Within this tab you can also find the ‘Dodge Deadzone’ setting, which will allow you to configure a cross-sectional deadzone that impacts at which point enough analog input is received to warrant a dodge, instead of a regular jump. Rocket Science is a fantastic YouTube content creator who has created a deadzone visualiser you can try out here, to better understand both of these concepts. I will include a video below that includes all you need to know about Rocket League and deadzones, by the same content creator.
Finally, make sure to check out Dodge Deadzone Explained – Rocket Science #7.1 also, to find out more about dodge deadzones.

Visual Differences Between Radial and Square Deadzones in Rocket League
With my fantastic artistic abilities and the use of Paint, I’ve attempted to make a simplified visual representation of both a square and a cross deadzone, that will be useful for most intents and purposes in understanding where the differences between the two come from.
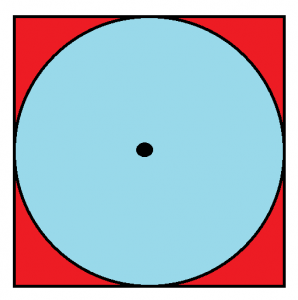
A cross radial deadzone. The area in blue describes the area of input that can be received from the controller within the limits of the deadzone. The red area describes any area where input cannot be received from the controller within Rocket League.
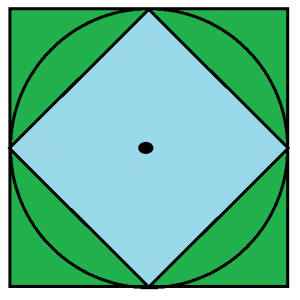
A square radial deadzone. The area in blue describes where input can be received from the controller within the limits of the deadzone. The area in green describes where input can be interpreted and made into an output within Rocket League.
Functional Differences with Rocket League Deadzones
To break this idea down, on the left, within the cross deadzone, the small black dot should be interpreted as a pointer, or where the analog stick input is received by Rocket League as being. The black dot is able to move within the entirety of the blue area, but is unable to reach the red area, however the red area is a part of the analog input that can still be received by the game, but with a cross deadzone, you’re unable tor reach this. In the picture to the right, depicting my representation of a square deadzone, the circle described on the left is now instead a kite shape, or a rotated square. The difference, however, is that the entirety of the input area, both the red and blue area, are all within that small square. The blue area once again represents where the black dot is able to move, however the green area describes where input can still be interpreted by the game. In short: there are parts of the analog controls that a square deadzone can reach, through manipulation of the deadzone, but the cross deadzone can’t. As the image shows, this is apparent in the diagonals. Since mathematically a diagonal is comprised of both its horizontal and vertical components, then unless you are holding the analog stick exactly to the sides or towards the top and bottom, the square deadzone’s input is able to achieve a stronger output from Rocket League. This difference reaches its maximum if the analog stick is held directly at 45 degrees to the normal. Below, I’ll describe some of the maths behind this, if you’re interested.
The Mathematics – Why Square Deadzones Have More Reach
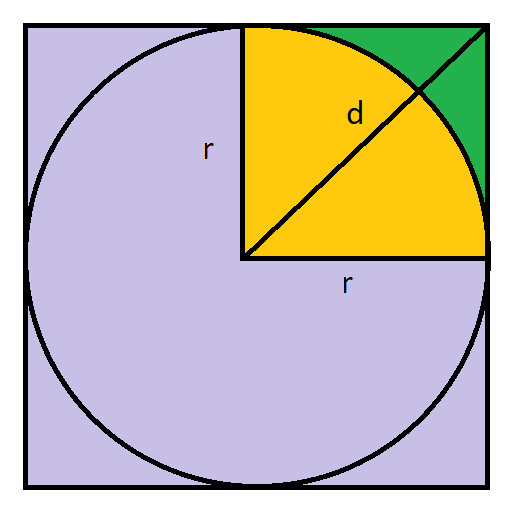
For this example, we want to find out the ratio between the circle’s radius r and the diagonal across the highlighted area, d.
Using Pythagoras’ theorem, it follows that:
d² = r² + r²
d² = 2r²(d²)½ = (2r²)½
d = (√2)r
√2 ~ 1.414
If we assume that r has an arbitrary value of 1, then:
d = (1.414)(1) = 1.414
So a square deadzone is able to reach approximately 41% further than the regular radial cross deadzone. Since the deadzones are measured in terms of vertical and horizontal components, in actuality, this value is halved, to which we’ll approximate as ±21% difference.
If you use an XInput software, such as DS4Windows, you can visually see this by adjusting the sensitivity of your analog controls.
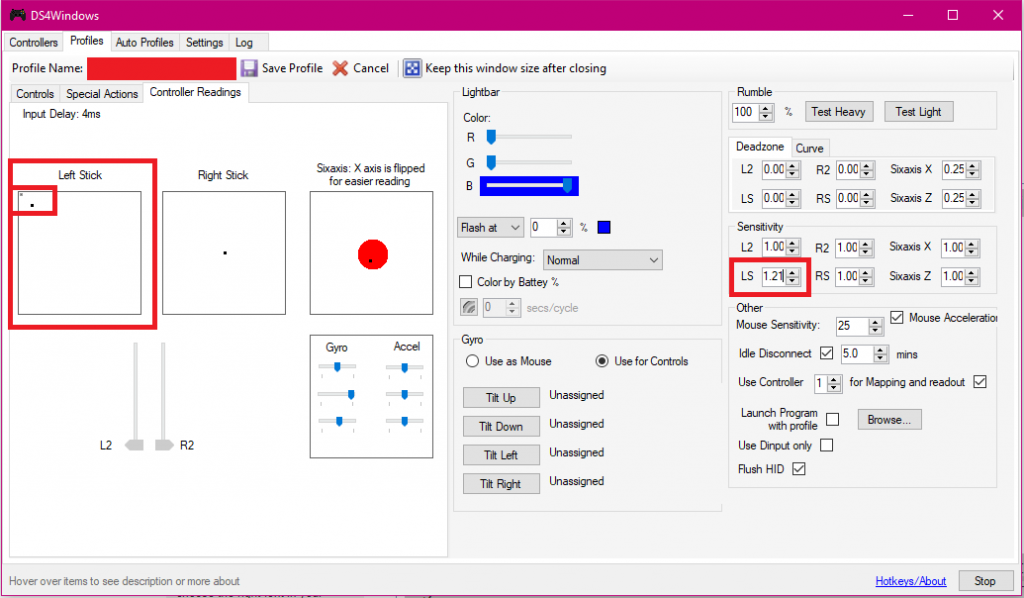
This is a controller profile of mine shown in the XInput Software DS4Windows. On the right, you can see I’ve increased the left analog stick sensitivity to 1.21, or 121%. On the left, in the ‘Left Stick’ display, the more opaque dot shows the input my controller is receiving, and the more transparent, grey dot shows what the output is. As you can see, along the diagonal, the analog input is effectively emulating a square deadzone.
Solutions – How to Modify Deadzone Settings in Rocket League
Ways to square your deadzone are described in Rocket Science’s video through the Steam controller configuration settings. These configuration settings can be quite difficult to use, and there have been numerous reports of them causing problems for others – myself included. When I used to use a square deadzone, I used Durazno’s Squareness software, which can be found in a Reddit thread here. As mentioned in that post, the DS3, or Dualshock 3, (the controller the Playstation 3 uses) uses a squared deadzone by default. Two notable players who use a Dualshock 3 are Kuxir97 and Fairy Peak, for this reason. This begs the question: what can console players do? Am I at a significant disadvantage playing on console because of this? Well, there’s a fairly rudimentary way of getting around this on consoles, however it is far from perfect, for reasons I will explain shortly. As shown above, you can increase the sensitivity of analog inputs by approximately 21% in order to achieve an otherwise squared deadzone. There are two configurable settings within the Rocket League options menu under ‘Controls’: ‘Steering Sensitivity’ and ‘Aerial Sensitivity’. For all intents and purposes, I would keep these two near the same value at all times. Increase them how you like, however having them different will likely result in inconsistent controls, and thus less control. Console players can increase their sensitivity values to approximately 1.40 or higher to help overcome the ‘inertia’ felt from lacking the diagonal strength in your controls. I don’t believe this increases the range, so this is unlikely to effectively square your deadzone, but it’s currently the best thing to do on console to stay competitive. On PC, you can effectively emulate a square deadzone to a better extent as seen below, by increasing the analog sensitivity by 21%, but you’ll see the issue that arises when you do this.
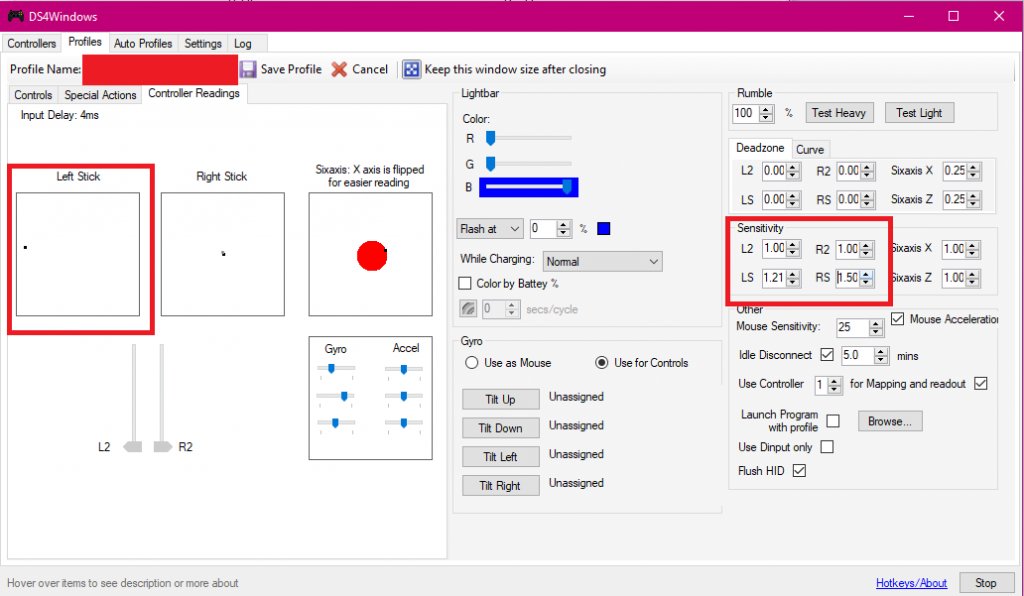
If you look at the image above, you’ll see that within the ‘Left Stick’ display, the grey dot is no longer there, however the sensitivity of the left stick is still the same. Just to make things more clear, I increased the sensitivity of the right stick by 50%, and you can see the dot barely next to the centre point of the ‘Right Stick’ display. So, where is the dot; what’s the output? Well, the dot displaying the output is actually outside of the borders of the area shown. Going beyond the border doesn’t make the input any greater, however it’s effectively receiving an input of me pushing the analog 100% towards the left, when in actuality I’m holding it at around 80-90%. This means that unless you are holding the analog stick at exactly 45 degrees to the normal, or in diagonal fashion, then your deadzone is no longer able to emulate a square one. If you’re interested, this happens because the inputs are received as vectors with horizontal and vertical components, however the sensitivity option applies this to the resultant vector, and not its components independently. So, unless you were to hold the stick fully towards any of the sides, then your input will always be stronger than intended. Is this a problem? I personally believe it is. As you’ll see in the next section, the way a square deadzone can affect your ability to play Rocket League can be quite drastic, and sometimes allowing you to utilise mechanics that are otherwise impossible, or extremely difficult to do, with a cross deadzone.
Effective Differences – Field Examples of Deadzone Differences
Generally, playing with a squared deadzone makes the game more difficult to control, however offers the ability to do more things, effectively increasing the skill ceiling. Since the diagonal of the inputs is able to be reached, things you will immediately notice are a tighter turning radius (or feels more responsive) and the ability to spin on the diagonals more quickly during aerials. The latter of the two is shown below. The video in which this particular instance is shown can be found here.
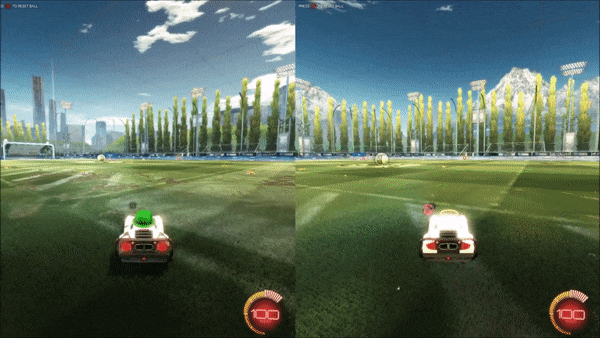
The car on the left spins with a squared deadzone whilst the car on the right uses a regular deadzone. The squared deadzone requires a quicker spin.
Freestylers often use a squared deadzone to allow them to make more full rotations before making the final shot. Flip resets (off the ball) are also markedly more easy to achieve with a squared deadzone, however controlling the ball in the air can be a lot more difficult to achieve without using a very high deadzone value, such as 0.25 or higher.
The area in which square deadzones dominate the most is in the Solo Duel playlist. Generally, in my experience, regaining control of the ball after a challenge in playlists like Standard and Doubles is more difficult with a squared deadzone, simply because you’re more likely to make a more powerful hit, or your increased speed of play means you’ll beat your opponent to the ball without them challenging it as strongly, which can lead to possession being given away. In the Solo Duel playlist, you don’t have to be too concerned about where the ball goes so long as you beat your opponent to it: tighter turning, faster aerials, faster rotations and a stronger diagonal are all key to being a threatening opponent and purely keeping your opponent out of the game. Often, you will find very mechanically gifted players on the Solo Duel leaderboard who struggle in other playlists. I’ve found that this can often be due to a square deadzone, however this isn’t always the case. Personally, I find I’m much more easily able to compete at a high level during solo duels with a square deadzone, as opposed to a regular one. Try each out yourself, and see what feels better for you.
Flick Differences with Deadzones
One very important part of dribbling and the Solo Duel playlist in general are flicks. As you get more highly rated in Rocket League, you will begin to see your opponents utilise flicks from an angle instead of linearly, which in short, means that diagonals are going to be involved. A certain flick has the potential to dominate a game should you be consistent enough with it: the 45-degree flick. The 45-degree flick essentially involves rotating your car to a 45-degree angle, and back-flip half-flipping to launch the ball across the length of your car. In my experience, with the extra power from the squared deadzone, these flicks have the potential to be absolutely unstoppable. It is also significantly more difficult to set up 45-degree flicks with a regular deadzone, as well as the flicks launching the ball more slowly and often lower. Below, is an unlisted video I created showcasing a few minutes with -and without- a square deadzone, and trying out a few flicks in free play. Hopefully you can see the differences in power and height. These flicks can be extremely venomous, check out a few of these flicks by RLCD.GG official team member, xXander. Also be sure to check out his Twitch channel, which he soon plans to fill with streams, showcasing his incredible Rocket League abilities.
Turning Differences with Squared Deadzones
In relation to the tighter, more responsive turning that comes from having a squared deadzone, one specific area in which the difference is very noticeable is when turning clockwise or anti-clockwise up a wall. Since Rocket League is a physics-based game, just as you’ve probably realised by now that the ball always returns to the ground – so must your car. As you drive up a wall, the in-game ‘gravity’ pulls your car back down. As you turn towards the normal of this force, then the force propelling you upwards will become weaker and weaker relative to this gravitational force. So how is this effective? Well, when trying to turn as previously described, there’s a noticeable sluggish nature with which you’re able to navigate the wall, and often to keep control, you need to powerslide at certain times in order to maintain a tight turning radius. When using a squared deadzone, because there’s a greater vertical component wherever your analog stick is diagonally held, you’re able to maintain a greater upwards force, and in effect, you’re more easily able to turn on the walls when pulling away from gravity. This might seem like a very small thing, but I’m sure we can all recall times where turning in the corner whilst defending has felt particularly sluggish and difficult, sometimes resulting in you not being able to face the ball as quickly as you’d intended to. Although this can’t really be shown visually, I’ve included an example of the kind of turn I mean below.
Also take note that the “sluggish” feeling when using a non-squared deadzone is still present in general turning. Your turning radius technically isn’t affected, since you’re only holding the analog stick at right-angles, however when turning in games and the analog stick crosses the diagonal, the difference is definitely apparent. Going from a squared deadzone back to a regular one is something I’ve experienced a lot of difficulty with personally. Turns that you are normally expected to make with ease suddenly require a much more hefty use of powerslide, and it can be difficult to chip the ball effectively when turning on it with very little space.
Flip Resets with Deadzones in Rocket League
As previously mentioned, another high-level mechanic I’ve noticed is considerably easier with a squared deadzone is using the ball as a surface to reset your flip from. It’s generally easier in practicality because the quicker diagonal turning allows you to get around the ball, and often in games making the decision to go for a flip-reset is a quick-to-be-made under certain circumstances, and being able to find your way towards the side or the bottom of the ball as quickly as possible is extremely important in being able to generate enough power to reset your flip. Another reason they are much easier is because you are able to recover more quickly after the reset. If you didn’t know, to achieve a flip-reset, you’re required to touch the ball with all four of your wheels (and some force) at once, but at the same time, your undercarriage will make contact with the ball. The undercarriage of your car is the weakest part of it, and actually has the unique quality of slowing the ball down when making contact. Due to the nature of this, often when attempting to achieve a reset, you’re inevitably slowed down, and often too much to properly catch up with the ball or get under it enough to take another shot with your newly-acquired flip. The quicker turning from the squared deadzone and the more powerful diagonals help to create a much ‘cleaner’ feel to resetting your flips, since as you slide off the ball, you don’t seem to lose as much power. Flip-resets made with a regular deadzone in my experience generally require quite a large set-up as opposed to being something you can spontaneously do. Here’s an example of a more ‘spontaneous’ flip-reset I got with a squared deadzone.
Visual with Square Deadzone
Visual with Regular Deadzone
Aerials and Recovery Deadzone Differences
A ‘game-changer’ for me when it comes to discerning between my playstyles using each type of deadzone if definitely the way it affects my aerial play and recoveries in general. Lots of people switch deadzones when learning to properly half-flip. Half-flips are remarkably easier using a squared deadzone, and gives you a much better feeling of manoeuvrability; it is far easier to half-flip diagonally. In an intensive solo duel, a quick half-flip can absolutely be the difference maker in challenging the ball effectively and leaving yourself out of position. For the purposes of testing this, I attempted to half-flip in a rough radius around and towards the ball, however I was using the type of half flip I don’t use. The type of half-flip seen is done without using a control binding for air-roll left or air-roll right; only the regular air roll binding is used, in combination with diagonal flips. When testing both types of deadzones, I didn’t experience too much difficulty either way, since I’m used to manipulating flips accordingly, however there was a noticeable difference: the regular deadzone often made it difficult to half-flip towards certain angles, and sometimes resulted in my car being unable to complete a flip properly. Below will be two clips, firstly using a squared deadzone, and the other – a regular one. Notice during the testing with the squared deadzone, even when I messed up slightly, I was able to recover; I wasn’t able to do so without.
Visual with Square Deadzone
Visual with Regular Deadzone
As mentioned previously, a squared deadzone often gives you the competitive edge by being able to recover much more quickly, both in the air and on the ground. It’s difficult to show this through any kind of demonstration beyond you testing this for yourself, however the difference should be immediately apparent to any player with a good sense of their mechanical ability. A big downside, in my opinion, of the squared deadzone is that it can make aerials feel much more difficult to control due to the added speed of rotation, and what feels like an almost increased sensitivity. Personally, I’ve developed the chronic habit of rotating unnecessarily when aerialing, which may make my claim dubious, however I often see the accuracy versus speed trade-off in players who choose to square their deadzone. For this reason, I’d definitely recommend not changing from a regular deadzone until you’re very mechanically competent, e.g: Champion I and above. I’ve included some final clips below that are quite old, but would have felt impossible at the time without the recovery speed of the squared deadzone.
In some areas of the game, I’d much prefer the slower and more methodical control that a regular deadzone offers. One area in which this is particularly noticeable is when air dribbling. Due to the slower rotations, and less powerful diagonal axes, it can be a lot easier to set up a controlled air dribble, from the ground and the walls, but note that it’s noticeably more difficult to get under the ball to ‘re-lift’ it without a squared deadzone, simply because the rotations can be too slow. Just as before, I’ve included an example below that demonstrates this. In this example, I’d just followed up on a kickoff in a two-versus-two, and had been bumped multiple times by an opposing player, who was also blocking me during my ascent up the side wall. Despite this, and working with very little space, I was able to set up a controlled air dribble, and even flick ballcam off to get the last touch around the defender. This might seem like a fairly unremarkable example, but this is something I would have struggled to do if I had been using a squared deadzone.
Parity Concerns
Before I go, I’d like to share my opinion on the parity concerns I believe come into question with regards to squared versus regular deadzones in Rocket League. For anyone unfamiliar, ‘parity’ is the state or condition or being equal, or at least here, a measure of it. In any competitive environment, parity is a serious concern, and is especially applicable within competitive video gaming. It’s very important that every player has the same tools at their disposal, and has the same opportunities as their competitors. The practical differences between these deadzones in Rocket League have always bothered me immensely, because it feels like a distinct trade-off between aspects of my play, and I feel sometimes at an advantage or disadvantage when compared to my competitors because of this. For example, I feel like using a square deadzone in the Solo Duel playlist is an objective advantage in a lot of circumstances, and often it’s immediately clear at high ranks if your opponent is using one, and you have to compensate for this with how you play. A lot of people might liken this to different cars having different hitboxes, and whilst that in and of itself is a parity concern, i.e: “what car is best?”, it’s something that’s available to all players. Squared deadzones are not available to all players, and something feels horribly unsatisfying about being able to consistently nail certain mechanics exclusively with it – and others exclusively without it. If an issue as polarising as this happened as a result of an update, it would likely be patched as soon as possible. but it’s been in the game from the start, with keyboards and certain controllers emulating a squared deadzone perfectly, and so it feels like this parity concern will always reach an impasse. I don’t believe it’s appropriate to remove it entirely, since certain players are accustomed to using it, and only it, and it’s certainly not a good solution to make a standardised deadzone of any kind, however I feel like all users should have have access to it. I’m not a technical, or design, expert, so I’m unsure of if this would be possible to implement, if at all, however after using both deadzones, the apparent differences can make the game feel totally unsatisfying and leaves me feeling discontent about it. What do you think? Is this an issue that should be taken more seriously if Rocket League is to be taken as such, as an e-sport?
Auf Wiedersehen; Until We Meet Again
I hope you enjoyed reading about this, and I apologise profusely for any errors in the article, or technical issues arising, however I’m a fairly inexperienced editor – I’d love your feedback. There are many aspects to both deadzones that I’ve not covered in this article, which leaves me with a bad taste in the mouth, since this is something I’m strangely passionate about, however I implore that anyone considering switching between either to extensively test this for themselves, As previously mentioned: I’m passionate about this topic, and would be happy to answer any personal questions you might have about all kinds of configuration settings – deadzones included! Stop by at the Rocket League Coaching Discord and say hi – I’d love to hear what you have to say. Once again, a big thanks to xXander and Rocket Science for helping to provide some of the content in this article. Until next time – happy queuing!
Deadzones – A Game Changer (About the Authors)

Pasadena is a Rocket League expert who shares her wealth of knowledge of mental game and gamesense to regulars on the RLCD server. She is been solely responsible for coaching up several high level players into Grand Champion levels. She has been featured in Mockit tournaments and had an epic 1 on 1 battle with xXander in our RLCD I Suck at 1s Tournament

xXander is a competitive Rocket League player who is a regular on the RLCD discord server and a top player on the 1s leaderboard. He is a frequent player in 6 mans and has been featured on JohnnyBoi’s YouTube Channel.