This a quick guide for anybody who is just starting the game and looking to understand the basics of the game to start progressing to that next level.
I want to note that the things listed in this post will not take a few minutes to learn. Rocket League is a very complex game and if you’re expecting to shoot through to the highest rank in a weekend, then you’re in for a bad time. It’s going to take you hundreds of hours to learn just the basics and then even longer to learn the more advanced mechanics.
Camera Settings & Ball Cam
When you first start the game chances are you have the default camera settings and haven’t quite researched much into how important your camera settings are. As this is just a basic guide pointing you in the right direction I won’t go into too much detail on this topic.
The best advice I’d give people here is to head over to Liquipedia and have a look at the camera settings that pros use and find one that works for you. If you’re on Steam you can use Bakkes Mod and have them all loaded into the game for you to select. If you’re using Epic Games BM won’t quite work yet.
Hitting The Ball Hard (Powershots)
This seems like an obvious one, but it’s one that is actually quite overlooked by people who are starting the game.
An essential skill in Rocket League is hitting the ball hard (most commonly referred to as booming the ball). Powerful shots are hard to defend and when used correctly it can put your opponents in a really awkward position allowing your teammate to capitalize on them being out of position.
Booming the ball is essential for defending your half, it will give you time and space to create a powerful counter-attack or allow your team to recover from awkward situations.
As you progress through the ranks, infield passes become more common and weak hits will start to be intercepted more frequently leading to you losing possession and potentially goals in your net.
If you want to learn more about hitting the ball hard, Turk of SRZ has an amazing video with a quick overview of how to do it.
The Basics: Power shots
Kickoffs
When you first start the game you’re going to suck at kickoffs. As you get better at the game you can start to learn more advanced kickoffs but we’re just going to cover a basic one here as it’s not worth your time practising things well out of your skill range.
Winning a kickoff can be the difference between winning and losing a game so learning how to do the basic kickoff early will help you massively.
Again, we’ve got a video from our coach Turk explaining exactly how to do a regular kickoff.
The Basics: Kickoffs
Aerials
This is probably going to be the hardest thing you will learn. Learning how to aerial properly is going to take you hundreds of hours.
Aerials are very hard. They require you to both control your car in the air and use the right amount of boost to get to it.
This is a difficult one to explain via text so I’m going to handover to Kevpert who’s got a great video on aerials.
Aerial Car Control | Rocket League Tutorial
Possession
Most people don’t think too much about possession because they just focus on smashing the ball as hard as they can, which sometimes is right but a lot of the times it will hinder more than it will help.
If you have space and boost, most of the time the best thing you can do is control the ball and keep it close to you. As you start to progress through the ranks you can start to incorporate more advanced mechanics like dribbling and flicking the ball. But we’re not going to cover them here.
This is something that will help you rank up in 1s a lot faster as you won’t be hitting the ball to the opponent for no reason and giving them possession.
Teammates & Tilting
“My teammates are all bad and they keep missing easy saves!!!!!! THEY’RE THE REASON I’M LOW RANKED!!!!!” – We hear this in RLCD almost daily and it’s almost never the case.
You have to remember that this game is hard and people will mistakes (including yourself) and the best thing you can do is be positive. Shouting at your teammates or getting mad at yourself will only do one thing and that’s losing games.
Losing games in Rocket League can be pretty crushing and learning how to deal with losing as early as possible will help you. Try to keep calm, remember it’s just a game and your rank really isn’t important as you’re still learning the game and it’s going to take hundreds of hours before you master the basics.
Mechanics
More often than not people will watch pros hit a flip reset and then go into freeplay and practice them for hours when really they should be learning how to play the game and master the basics. If you’re a low ranked learning flip resets and musty flicks then you’re going to struggle in the higher ranks because you haven’t actually learnt any of the basic mechanics that you need to progress further.
Mechanics are cool and super flashy but until you’re in the top ranks there’s absolutely no need to spend your time learning them. You can get well into the higher ranks without scoring fancy mechanical goals.
As your start to get into the highest ranks in the game feel free to start practising fancy mechanics but it’s really not required at all.
Freeplay & Training Packs
This is going to the most useful thing you can do. Freeplay is one of the best ways to practice hitting the ball, aerials and playing the game faster. I’d recommend playing at least 20-30 minutes of freeplay practice a day so you can put everything from this guide into practice.
Rocket League has community made training packs that will help you practice certain scenarios. Wayprotein has a great spreadsheet where you can filter it down to your current rank and get practising them.
Remember, this game is hard. Like, really hard. It’s going to take you a couple of hundred hours before you can even do half of the things listed on this page.
Every player in this game who wants to get better must put in the hours. Whether those hours goto ranked or freeplay is up to the player’s preference. However, the experience gained from ranked is much better than freeplay as its a good testing grounds for whatever you’ve learned. So go out there grind ranked, do your drills, do freeplay, custom training and most importantly don’t forget to have fun.
The Rocket League Ranking System. If you have been a long-term player of Rocket League, you are aware of all the changes to the ranking system and the names and designs of the Rocket League Ranks over the seasons. If you are new to the game, you may not be aware of the changes made over time to the competitive system. In today’s post, I’m going to go through the rich history of the Rocket League Ranking System. I’ll go over the changes, such as the controversial season 3 changes, the switch from RP to MMR, the seasonal distributions, and even the growth of the game. I’ll go through several charts and draw equivalencies so you can see what you would have been in other seasons if you were playing in them at your current tier. I’ll even provide an hrs to rank correlation so you can benchmark yourself to common rank growth over time. So now let’s get started. I hope you enjoy this one brought to you by Rocket League Coaching Discord :).
Rocket League Ranking System
Rocket League Season 1
Start Date: September 08, 2015 End Date: February 11, 2016 Start Date Avg Players: 17,439 End Date Avg Players: 25,699 Start Date Peak Players: 34,391 End Date Peak Players: 50,369 RLCS Season 1 Champions: IBuyPower (Kronovi, Lachino, Over Zer0) Rocket League Season 1 Rewards: Topper
Ah season 1. I remember these days fondly when I was noob thinking I was a god sitting in low silver ranks before I learned about Rocket League Coaching Discord. Back in those days, Rocket League used an RP system instead of the current MMR system you are familiar with today. The RP system was pretty confusing back then as points earned and lost were based on your expected win probability and based on the team’s average points versus the competition.
Rocket League Season 1 Competitive Tiers
Early Rocket League did not have many tiers. There were only 3 you would rank up for and the highest tier was just reserved for the top 100 players. Below were the tiers of Season:
Bronze
Silver
Gold
Platinum (reserved for top 100 players)
The Rocket League Rank Point Controversy and Transition to Match Making Rating (MMR)
According to Psyonix Corey, ranked play was a late addition to the game and they anticipated issues with the ranking system. In response to the confusion and frustration with the system, Psyonix switched to a points or MMR system similar to games like League of Legends. So after Season 1, players would gain and lose points scaled by your MMR. The visibility of your actual points was also taken away in later seasons. Back in Season 1, you could see your rank points or RP every game and known when you were going to rank up. In future seasons, only Grand Champions were privileged to see their skill points and the only way one could access their points real-time would be to use a tracker like RL Tracker Network, in-game apps like Overwolf, or mods like Alpha console.
These third party tools would report the skill rating (SKR) not MMR. The MMR of players would be hidden in game and would be used to compare with other players when the server is looking for other players when setting up matches.
The Early Days of Rocket League Competitive Play
These were the early days of Rocket League. An explosion of the game occurred when Rocket League was released for free through PlayStation Plus and many of us who joined the game on the July 7. 2015 PS4 Plus release date remember the server problems the game had trying to handle all the new players. There were also these players who were seemingly gods already at the game because they had played the unknown original game, Supersonic Acrobatic Rocket-Powered Battle Cars or SARPBC. These veterans, like Kronovi, propelled themselves to the top of the leaderboards and many competed in the first Rocket League Series Championship (RLCS). Some beta footage by Kronovi is shown below:
Kronovi – Rocket League Beta 2 Montage | Edited by Fyshokid
Rocket League Season 1 Rank Distribution
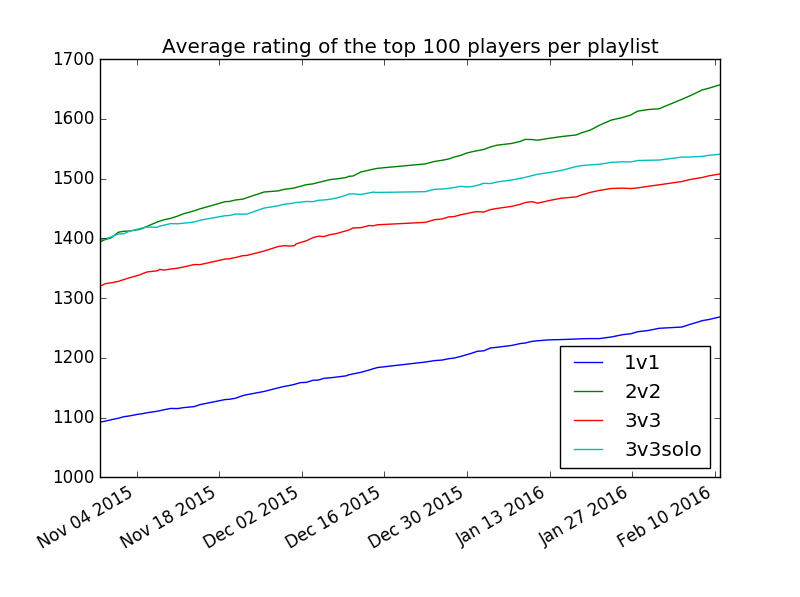
Unfortunately, this is the only Rocket League Season I could not find distribution stats for. However, I do have a nice chart on the average rating of the top 100 players (Platinum rank) over time throughout the season. 2s proved to have the highest rating nearing 1700 while 1v1 represented the lowest at slightly over 1200 at the end of the season.
Source – http://i.imgur.com/sppvIJS.png
Rocket League Season 2
Start Date: February 11, 2016 End Date: June 20, 2016 Start Date Avg Players: 25,699 End Date Avg Players: 26,120 Start Date Peak Players: 50,369 End Date Peak Players: 55,029 RLCS Season 2 Champions: FlipSid3 Tactics (Markydooda, kuxir97, gReazy) Rocket League Season 2 Rewards: Rocket Boost
The Rocket League ranking system was completely overhauled in Season 2. Psyonix had implemented an MMR points system so now progression was tied to a more skill based progression system versus the points based progression system of Season 1. The ranks were also expanded with new icons for each rank.
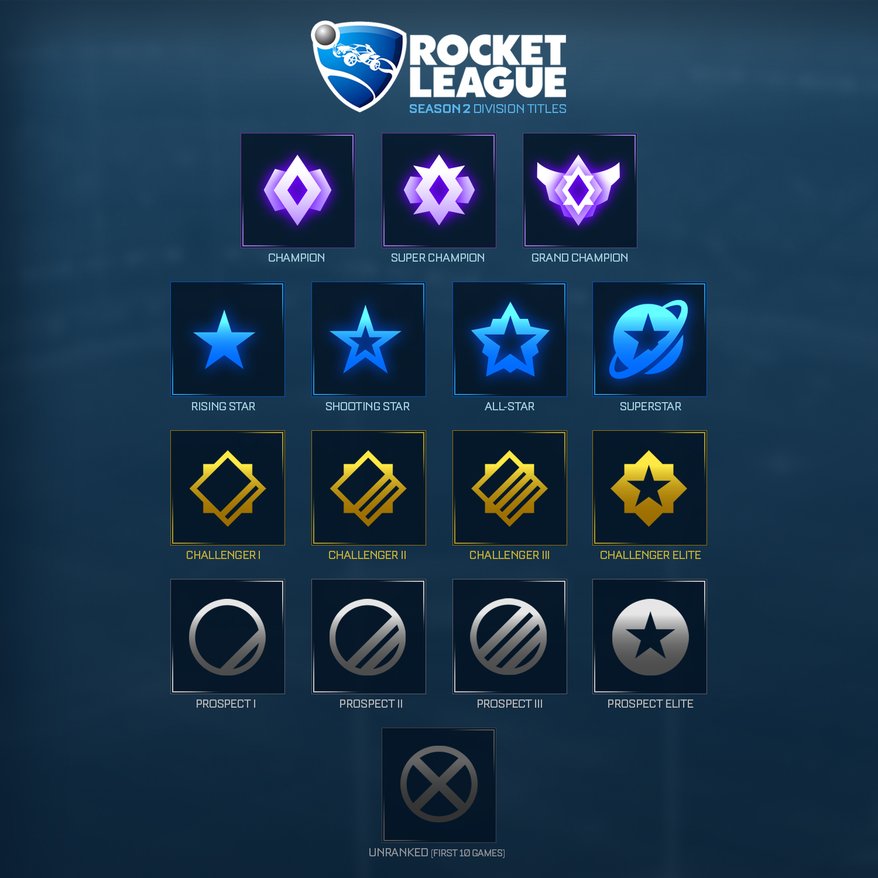
Rocket League Season 2 Competitive Tiers
Season 2 originally started with 12 tiers. The Superstar division you see in the above picture was called Champion. Later in the season, the Rocket League ranking system update split up players into 15 competitive tiers. The new tiers graphics are shown above and the names of the tiers are shown below:
Unranked
Prospect I
Prospect II
Prospect III
Prospect Elite
Challenger I
Challenger II
Challenger III
Challenger Elite
Rising Star
All-Star
Superstar
Champion
Super Champion
Grand Champion
The new update also split these tiers further into 5 divisions. Promotion would not occur back then until you got to division 2 of the new tier. Demotion for tiers would work similar where you would not demote until you hit division 4 of the prior tier. This did lead to some complaints about the Rocket League competitive system feeling harder to progress, which is why in later seasons you only see 4 divisions instead of 5.
Season 2 launched starting everyone out as unranked and attempted to line everyone up to the appropriate new rank. Below were the initial ranks from season 1 to season 2:
SKILLRATING
TITLE
OLD TITLE
OLD RANK
0
UNRANKED
UNRANKED
250
PROSPECT I
UNRANKED
500
PROSPECT II
BRONZE1
750
PROSPECT III
BRONZE1
100
1000
PROSPECT ELITE
BRONZE2
200
1250
CHALLENGER I
BRONZE3
300
1500
CHALLENGER II
SILVER 1
400
1750
CHALLENGER III
SILVER 2
500
2000
CHALLENGER ELITE
SILVER 3
600
2250
RISING STAR
GOLD 1
700
2500
ALL-STAR
GOLD 2
800
2750
SUPERSTAR
GOLD 3
900
3000
CHAMPION
GOLD 3 / PLATINUM
1000+
Rocket League Competitive Play – Rocket League Series Championship 2 (RLCS)
Season 2 Grand Finals After Movie – RLCS S2
RLCS season 2 saw the rise and dominance of the European server teams. Since the beginning of Rocket League, teams like IBuyPower and Kings of Urban (now NRG) dominated tournaments. RLCS season 2 was EU’s time with an all EU final of Mock-It Esports vs. FlipSid3 Tactics. FlipSid3 brought with them the rotational theory that is now popular today. In the early days of Season 1, players like Gibbs were specialists. As the skill level of pros increased dramatically, pros were expected to be all-rounders and rotational theory popularized by FlipSide3 now become the new meta in competitive play. Armed with more experience in LAN play and an EU friendly crowd with the venue being hosted in Amsterdam, FlipSid3 came and dominated RLCS Season 2 and took the crown establishing the EU dominance in competitive play that we would see in Season 3 and 4 of RLCS.
Rocket League Season 2 Rank Distribution
Rocket League Season 2 provided us with the first inside look at the stats where one could gauge where they were at compared to the total population of server. The best stats we had back then was rocketleaguestats and below was taken from the 3rd party site near the end of the season:
We can also go off Psyonix’s official graph released at the beginning of the Season 3 ranking changes:
So to break this down in top player percentages here is where you would stood in Season 2 based on rank:
Rank
Percentage
Prospect I
Top 99.53%
Prospect II
Top 97.03%
Prospect II
Top 97.43%
Prospect Elite
Top 89.43%
Challenger I
Top 70.53%
Challenger II
Top 47.03%
Challenger III
Top 27.53%
Challenger Elite
Top 14.53%
Rising Star
Top 2.63%
All Star
Top 0.93%
Super Star
Top 0.33%
Champion
Top 0.13%
Super Champion
Top 0.03%
Grand Champion
Top 0.01%
Rocket League Season 3
Start Date: June 20, 2016 End Date: March, 22, 2017 Start Date Avg Players: 26,120 End Date Avg Players: 33,763 Start Date Peak Players: 55,029 End Date Peak Players: 74,330 RLCS Season 3 Champions: Northern Gaming (Reemko, Deevo, Turbopolsa) Rocket League Season 3 Rewards: Wheels
Rocket League Season 3 begin a resurgence in Rocket League popularity. A number of changes occurred to the game that created new buzz in the game including new game modes, the introduction to crates, and increased popularity of RLCS. A huge change in the rank system also created controversy as to what defines a Grand Champion.
The Introduction of the Rocket League Crate System
On September 8, 2016, Psyonix released a new crate system that allowed players to obtain new items that could be unlocked using keys that were available to purchase in-game. Prior to the crate release, the only in-game purchases were DLC Rocket League Cars like the Fast and Furious cars and the Supersonic Fury DLC pack. Now, the majority of new car bodies would be released through the crate system and an explosion of trade sites and communities popped up. For the most part, the crate system was welcomed with open arms, but some Youtubers like NeatMik, warned against the loot box system; but supported Psyonix’s reasoning for implementing the system.
ROCKET LEAGUE IS GETTING CRATES
It was only a matter of time that a loot box system would hit the game as the proceeds of the game were being used to fund the ever-growing popularity of Rocket League E-Sports. Rocket League training also exploded with new comers wondering how to trade in Rocket League and how to get the best deals.
Rocket League Competitive Play – Rocket League Series Championship 3 (RLCS)
Psyonix in listening to its fan feedback about better tournament formatting, announced major investments into Rocket League Esports. The Company announced that it would invest $2,500,000 into Rocket League Esports in 2017 to support RLCS, community-run tournaments, console tournaments, and even a collegiate league.
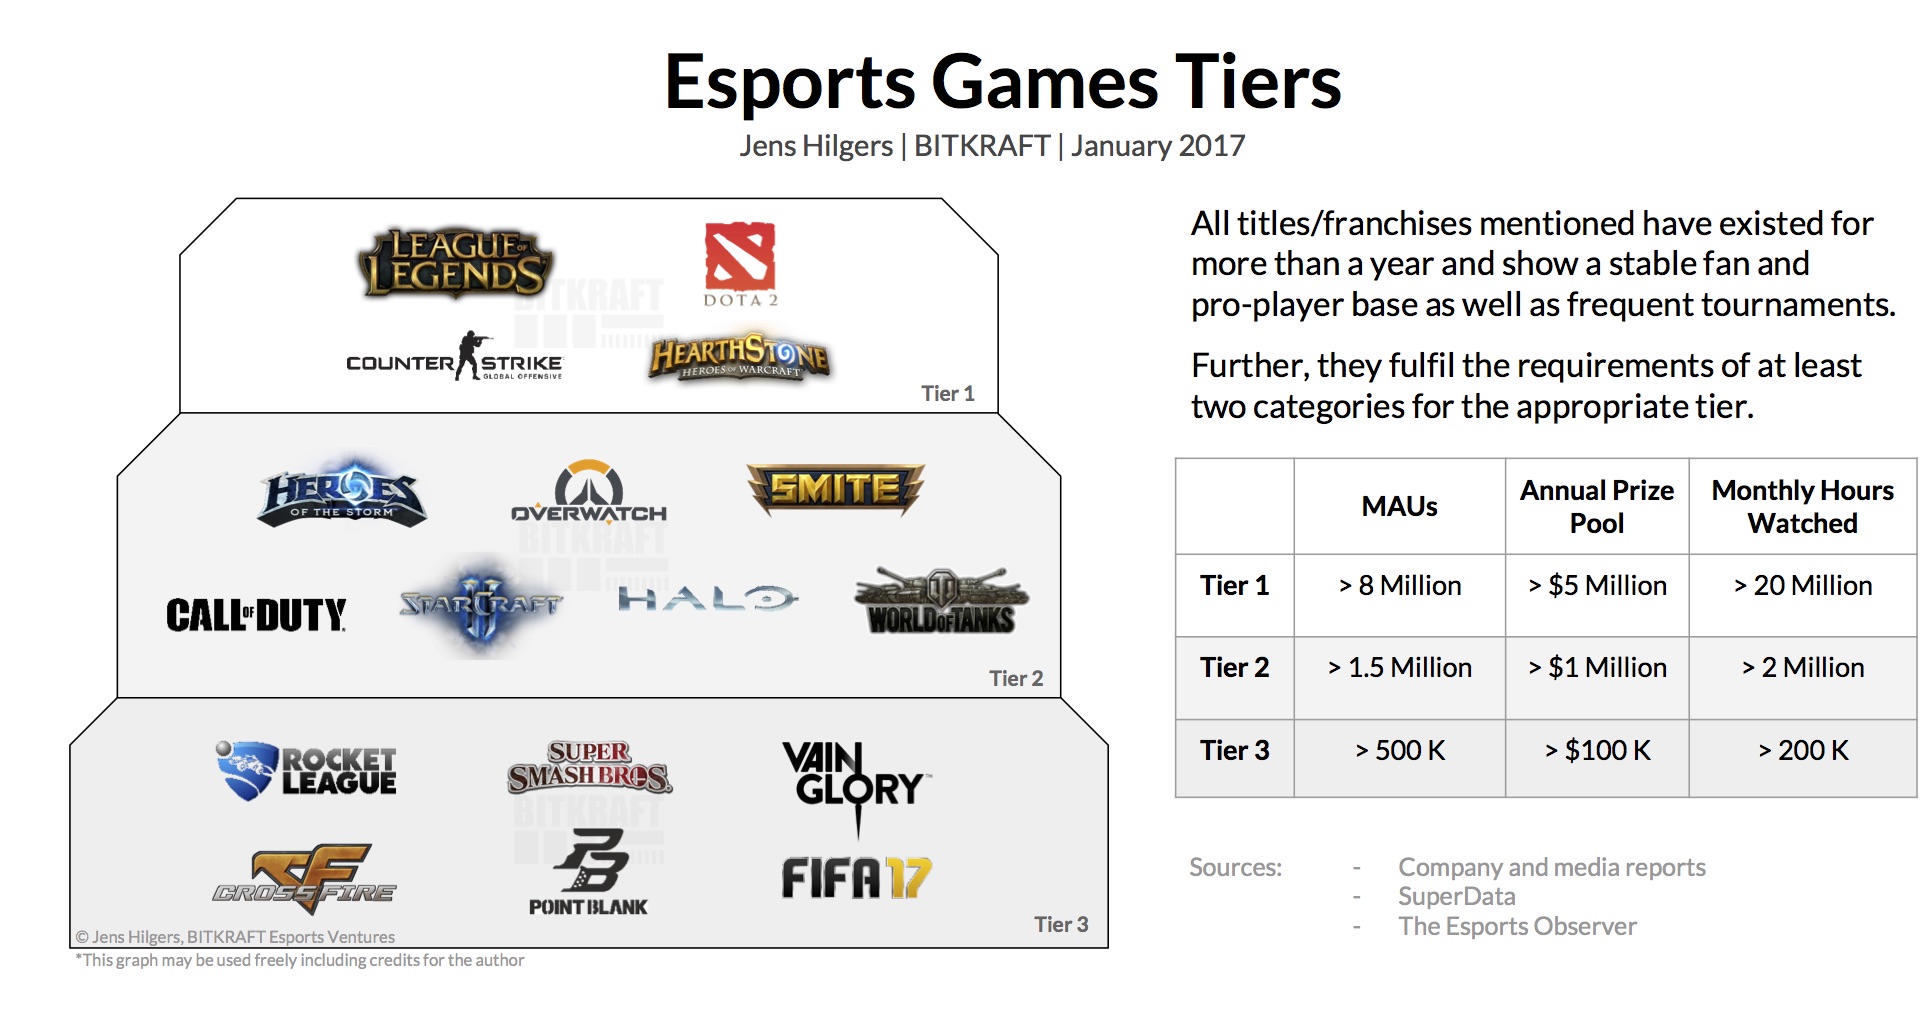
RLCS season 3 debuted with the largest ever prize pool for a Rocket League Esports tournament at $150,000. Rocket League had officially jumped into the Tier 3 category of Esports and there was discussion in the esports world if Rocket League could growth into a Tier 2 Esports title by the end of 2017 or early 2018. To provide further insight on the Esports game tiering, Jens Hilgers, the CEO of DOJO Madness and Founding partner of BITKRAFT Esports Ventures categories Esports titles into 3 tiers:
Tier 1 – Annual Prize Pool of Over $5 million
Tier 2 – Annual Prize Pool of Over $1 million
Tier 3 – Annual Prize Pool of Over $100,000
Rocket League Esports had risen to the same ranks as Super Smash Bros and FIFA. The investment from Psyonix was paying off.
Season 3 of RLCS included Oceanic (OCE) teams for the first time. NRG finally got over the hump defeating their first EU team in the RLCS LAN and defeating season 2 world champions F3. There was also an unknown team that came out and surprised everyone called The Leftovers. RLCS analyst Gibbs gave Leftovers only 1 game in his prediction against F3 and they surprised everyone with a dominant 3-1 performance.
Despite the NA home advantage with the venue being hosted in Los Angeles, EU once again continued their domination. 3 of 4 teams in the final 4 were EU and the final became another all EU final with Mock-It once again finishing second and Northern Gaming taking the crown.
Season 3 World Championship After Movie – RLCS S3
Rocket League Season 3 Rank Change
On October 11, 2016, Psyonix once again made changes to the Rocket League ranking system. After hearing feedback from the community about how difficult it was to hit the higher competitive tiers in rank play, Psyonix made a change to the ranking system to allow more players into the high star and champ rankings. It was a very sizable change where Season 2 All-Stars and Superstars were now competing for Grand Champion ranks. You can see the before and after changes below.
Before the October 11, 2016 Update
After the October 11, 2016 Update
Rocket League Season 3 Ranking Distribution Stats
Rocket League Season 3 was a very controversial competitive season for ranked play. It was the easiest of all seasons to hit Grand Champion and Champion rank. According to Psyonix Corey, the ending Season 3 GC rate in the 2v2 playlist was 0.3%. This essentially meant that anyone who got Champ rank and up in Season 2 could be propelled to a Grand Champion in Season 3. Below is the most accurate stat distribution table we could find as there were no official stats from Psyonix available for the end of Season 3:
Rank
Percentage
Prospect I
Top 100%
Prospect II
Top 99.50%
Prospect II
Top 98.50%
Prospect Elite
Top 94.30%
Challenger I
Top 83.40%
Challenger II
Top 66.50%
Challenger III
Top 47.40%
Challenger Elite
Top 31.20%
Rising Star
Top 19.30%
All Star
Top 6.20%
Super Star
Top 2.90%
Champion
Top 1.40%
Super Champion
Top 0.70%
Grand Champion
Top 0.40%
As you can see in the breakdown, the Champ wheel rewards only required you to be in the top 1.40%. The Season 3 Grand Champion title really lost its value here as you will see in the future season rank updates.
Rocket League Season 4
Start Date: March, 22, 2017 End Date: July 5, 2017 Start Date Avg Players: 33,763 End Date Avg Players: 35,006 Start Date Peak Players: 74,330 End Date Peak Players: 68,232 RLCS Season 4 Champions: Gale Force Esports – GFE (Reemko, Deevo, Turbopolsa) Rocket League Season 4 Rewards: Trail
Rocket League Season 4 had several major changes to the Rocket League ranking system in what became the most difficult and trying season of competitive rocket play yet.
Rocket League Ranks Season 4 Changes
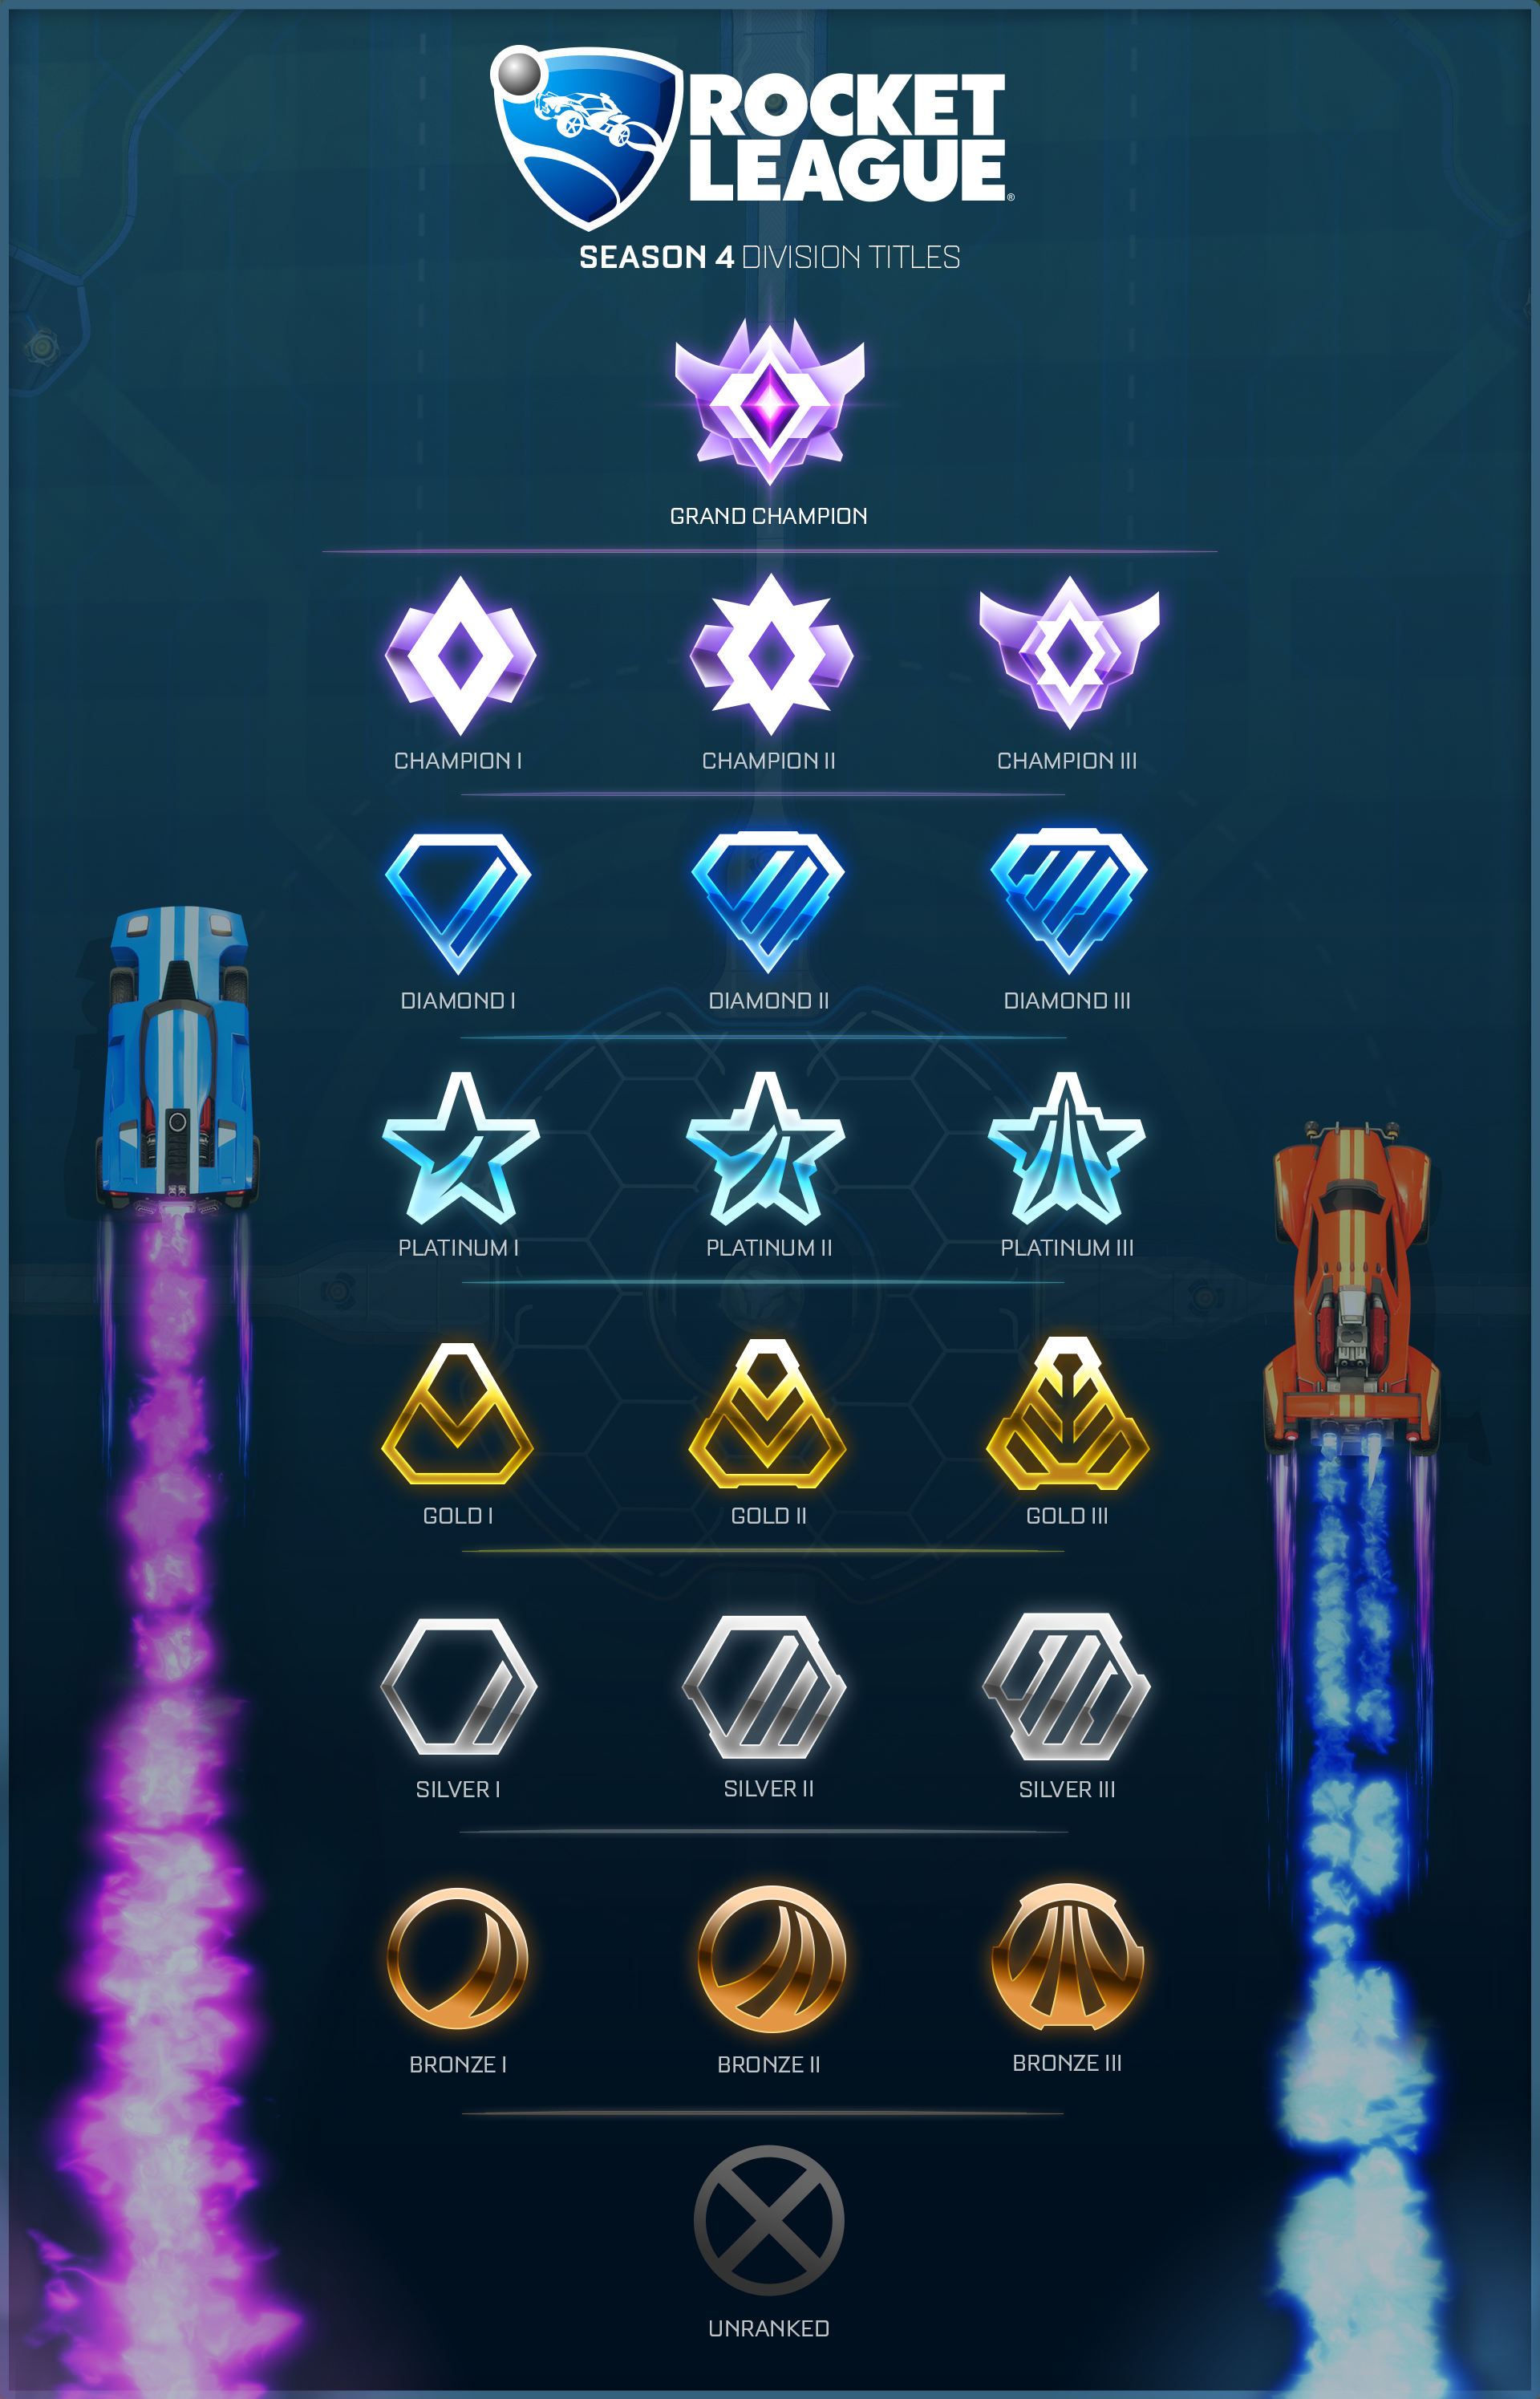
Rocket League Season 4 overhauled the ranking icons. Instead of the star and champ naming system, Season 4 ranks used a more standardized format similar to games like League of Legends.
The new ranking system split up players into 19 competitive tiers. The new Rocket League Ranks from lowest to highest are shown above and are outlined below:
Unranked
Bronze I
Bronze II
Bronze III
Silver I
Silver II
Silver III
Gold I
Gold II
Gold III
Platinum I
Platinum II
Platinum III
Diamond I
Diamond II
Diamond III
Champ I
Champ II
Champ II
Grand Champion
In addition, the division system went from 5 divisions down to 4. You no longer had to be in division 2 to be promoted. You were now promoted when you hit the division I for the new tier. The main expansion into the ranking system was the Diamond level tier, which created 3 new tiers for players to challenge until they would hit the coveted Champion and Grand Champion tiers.
Rocket League Competitive Play – Rocket League Series Championship 4 (RLCS)
RLCS Season 4 kicked off in Washington D.C. with incredible hype. After the huge success of RLCS season 3, Psyonix had proven that Rocket League was a legit ESport. Venues such as Dream Hack now sponsored a Rocket League tournament and offered a $100,000 grand prize.
New blood came into the series this season as younger players aged into the competitive age minimum and the resurgence of NA was imminent as Cloud 9 exploded onto the scene with big wins at Dream Hack and X Games.
PSG Sponsors a Rocket League team, the Rise of OCE, NA rises again, and the return of the King
The most exciting RLCS to date had a number of great developments for the series. PSG, a professional French football team became the first real sports team to create and sponsor a Rocket League team in RLCS. Comprised of some of the youngest players in the LAN, PSG anchored their team with Ferra, the surprise MVP of the Leftovers from Season 3.
OCE entered RLCS once again, with Chefs eSports Club leading the way and shocking everyone at the LAN with a dominant upset victory against NRG. NA pride was damaged, but not out as this was the Season where NA would rise again to the competitive ladders. G2 finally got its team mojo working and Cloud9 challenged to get 2 NA teams in the final four.
However, EU continued to be dominant, with Gale Force ESports and Method going head to head in the final round. Gale Force, led by RLCS Season 3 World Champion Turbopolsa went undefeated in LAN. Turbo cemented himself as a legend as the King returned to become the only 2 time and repeat world champion in the history of RLCS.
Season 4 World Championship After Movie – RLCS S4
Rocket League Season 4 Ranking Distribution Stats
Season 4 was a trying season, especially for those who were on the cusp of Champion tier or at Champion tier in Season 3. The season started with a soft reset and Grand Champions from the prior season were getting thrown into matches with Star level players. I personally remember all the Season 3 grand champions I played early in the season, somehow beating them all, and getting placed into Platinum 3. Below was the best equivalency chart we had at the beginning of placements:
S3 DOUBLES RANK
S4 DOUBLES RANK
PROSPECT 1
BRONZE 1 – BRONZE 2
PROSPECT 2
BRONZE 3
PROSPECT 3
SILVER 1
PROSPECT ELITE
SILVER 2 – SILVER 3
CHALLENGER 1
SILVER 3 – GOLD 1
CHALLENGER 2
GOLD 1 – GOLD 2
CHALLENGER 3
GOLD 2 – GOLD 3
CHALLENGER ELITE
GOLD 3 – PLATINUM 1
RISING STAR
PLATINUM 1 – PLATINUM 2
SHOOTING STAR
PLATINUM 3
ALL-STAR
DIAMOND 1
SUPERSTAR
DIAMOND 2
CHAMPION
DIAMOND 3
SUPER CHAMPION
CHAMPION 1
GRAND CHAMPION 1155-1265
CHAMPION 2
GRAND CHAMPION 1265-1356
CHAMPION 3
GRAND CHAMPION 1356+
GRAND CHAMPION
This was the first time since early season 3 where we got official stats from Psyonix. Below are the doubles playlist official data. As you will see, this was the most difficult Rocket League competitive season to date.
Breaking down the chart further, here is the rank to top percentages detail:
Rank
Percentage
Bronze I
Top 100%
Bronze II
Top 95.23%
Bronze III
Top 86.99%
Silver I
Top 75.40%
Silver II
Top 61.49%
Silver III
Top 48.19%
Gold I
Top 36.66%
Gold II
Top 26.00%
Gold III
Top 18.15%
Platinum I
Top 12.58%
Platinum II
Top 7.76%
Platinum III
Top 4.93%
Diamond I
Top 3.22%
Diamond II
Top 1.76%
Diamond III
Top 0.98%
Champion I
Top 0.60%
Champion II
Top 0.26%
Champion III
Top 0.12%
Grand Champion
Top 0.07%
A season 4 grand champion was a gigantic achievement. Anyone who has the title deserves a ton of respect for getting through the slaughter-fest that was season 4.
Rocket League Season 5
Start Date: July 5, 2017 End Date: September 28, 2017 Start Date Avg Players: 35,006 End Date Avg Players: 31,315 Start Date Peak Players: 68,232 End Date Peak Players: 70,230 RLCS Season 5 Champions: TBD Rocket League Season 5 Rewards: Player Banner
After the Season 4 reset chaos, Psyonix carried over ranks from Season 4 into Season 5.
Rocket League Season Reward System Change
The biggest change from Season 4 to Season was the season reward system. In prior seasons, once you hit the tier for the reward you earned it at the end of the season. In season 5, you had to win a number of matches in the tier you were trying to get your reward in before you would earn it. This was primarily implemented to combat boosting and to maintain interest in the season as time went on.
Rocket League Season 5 Ranking Distribution Stats
Rocket League Season 5 ranking distribution stats provided a slightly easier path to the higher tier of competitive play, likely due to the ranks carrying over from Season 4. Below are the official stats from Season 5’s doubles playlist:
Breaking down the chart further, here is the rank to top percentages detail:
Rank
Percentage
Bronze I
Top 100%
Bronze II
Top 98.04%
Bronze III
Top 93.96%
Silver I
Top 86.80%
Silver II
Top 75.85%
Silver III
Top 62.74%
Gold I
Top 49.51%
Gold II
Top 36.40%
Gold III
Top 25.76%
Platinum I
Top 17.92%
Platinum II
Top 11.43%
Platinum III
Top 7.21%
Diamond I
Top 4.55%
Diamond II
Top 2.48%
Diamond III
Top 1.21%
Champion I
Top 0.66%
Champion II
Top 0.29%
Champion III
Top 0.12%
Grand Champion
Top 0.06%
Rocket League Season 6
Start Date: September 28, 2017 End Date: February 7, 2018 Start Date Avg Players: 31,315 End Date Avg Players: 31,401 Start Date Peak Players: 70,230 End Date Peak Players: 60,694 RLCS Season 6 Champions: TBD Rocket League Season 6 Rewards: Wheels
Rocket League season 6 kicked off with more changes to the ranking system. The skill rating threshold for individual ranking tiers was updated due to the feedback that the current thresholds were too exclusive at the higher tiers. The threshold for Champion tier was relaxed in Season 6, allowing players who were on the cusp of champion rank in the prior season to finally achieve the coveted status for the first time. The Grand Champion tier was still as exclusive as before however. Below is the skill rating thresholds for Season 6 compared to Season 5 for reference using the doubles playlist.
RANK
NEW ENTRY RATING
OLD RATING ENTRY
GRAND CHAMPION
1515
1514
CHAMPION 3
1396
1414
CHAMPION 2
1296
1314
CHAMPION 1
1196
1241
DIAMOND 3
1096
1172
DIAMOND 2
1016
1098
DIAMOND 1
936
1025
PLATINUM 3
856
961
PLATINUM 2
776
887
PLATINUM 1
696
819
GOLD 3
616
750
GOLD 2
556
679
GOLD 1
496
607
SILVER 3
436
540
SILVER 2
376
470
SILVER 1
316
399
BRONZE 3
256
325
BRONZE 2
196
256
Due to the changes in the tier thresholds, Psyonix once again soft reset all rankings. All players had to play 10 matches in every playlist in order to earn their placements. Once again, it was a fierce opening couple of weeks in the beginning of the season in the upper tiers. Top tier players were getting placed in matches with prior season diamonds in an all-out jockeying for placements.
The changes between Season 3 and Season 6 really had players in the Diamond to Champ ranks question their progression. Had they really gotten better or did they simply benefit from the more relaxed skill rating thresholds that Season 6 put into place?
Rocket League Season 6 Ranking Distribution Stats
Rocket League Season 6 ranking distribution stats was around in line in the 2s playlist as Season 6 for Grand Champion. Champion I tier was a bit easier Below are the official stats from Season 6 on all playlisst:
TIER
SOLO DUEL
SOLO STANDARD
STANDARD
DOUBLES
BRONZE 1
99.99
99.98
100.01
100.01
BRONZE 2
96.53
97.1
98.54
94.54
BRONZE 3
92.54
93.95
96.6
89.37
SILVER 1
85.92
89.5
93.09
82.06
SILVER 2
75.76
83.12
87.41
72.77
SILVER 3
63.61
75.13
79.34
62.53
GOLD 1
51.01
65.51
69.58
52.49
GOLD 2
38.82
54.51
58.6
42.88
GOLD 3
28.72
43.78
47.89
34.5
PLATINUM 1
18.36
33.91
35.28
25.35
PLATINUM 2
10.7
24.71
24.31
17.66
PLATINUM 3
5.96
15.5
16.19
12.07
DIAMOND 1
3.23
9.21
10.59
8.13
DIAMOND 2
1.62
4.91
6.37
5.11
DIAMOND 3
0.78
2.48
3.68
3.12
CHAMPION 1
0.35
1.16
1.52
1.49
CHAMPION 2
0.1
0.33
0.46
0.52
CHAMPION 3
0.04
0.1
0.15
0.2
GRAND CHAMPION
0.02
0.03
0.05
0.08
Rocket League Season 7
Start Date: February 7, 2018 End Date: May 29, 2018 Start Date Avg Players: 31,401 End Date Avg Players: 27,809 Start Date Peak Players: 62,492 End Date Peak Players: 66,081 RLCS Season 7 Champions: TBD Rocket League Season 7 Rewards: Goal explosions & player banners
The biggest announcement that has come from Season 7 was an announcement that the rank distribution for Duels (1v1) and Solo Standard (3v3) will be adjusted in order to bring a higher percentage of players into Champion and Grand Champion ranks. Rewards were pretty mild with new banners getting released (I personally still like the dragon banners). The long awaited goal explosions were released, but there was not a unique explosion offered to higher level players in Season 7 as only Diamond Tier was required to get the Striker Legend reward.
Source – Rocket League Official Blog
Rocket League Season 7 Ranking Distribution Stats
As of 6/2/18, we are still waiting for Psyonix to release the Season 7 Ranking distribution stats for Rocket League. as soon as we have it will we update on the post :). We are expecting similar distribution stats from Season 6.
Rocket League Season 8
Start Date: May 29, 2018 End Date: TBD Start Date Avg Players: 27,809 End Date Avg Players: TBD Start Date Peak Players: 66,081 End Date Peak Players: TBD RLCS Season 8 Champions: TBD Rocket League Season 8 Rewards: TBD
The main announcement from Season 8 has been the compression and resetting of the Grand Champion tier. Per Psynoix_Corey:
We are only going to compress the Grand Champ part of the skill curve this season based on feedback on previous seasons about the Champ compression. We do need to keep the top end from inflating too much which is why we do any kind of compression, but it’s doable to focus this solely on GC. Should save D3/C1/C2 some grief.
This is a HUGE relief for players in D3 to C2 tiers. I never look forward to the start of the season getting the random GC in solo queues to play against and witnessing them carry the other team to an easy victory.
Comparing the Rocket League Ranking System – Season 2 to Season 6 Translations
Within our discord, a lot of players around my tier level ask have we really progressed in Season 6 or are we simply benefiting from relaxed thresholds. The best way to gauge your progression in the Rocket League Ranking system is to compare yourself to the player population percentages overall from season to season and see where you would have been placed compared to your percentage today.
This is also helpful so you can just do what-if analysis. For example, what would have you been in Season 3 if you were a Diamond I player in Season 6 and so forth. So let’s analyze this so we can see for ourselves using the 2s playlist as an example. In the graph below, I have taken the official Season 5 distribution status and compared it with the tier levels of the prior Seasons and Season 6:
Lvl
Current Tiers
Season 2
Season 3
Season 4
Official Season 5 Rank Percentages
Season 6
1
Bronze I
Prospect I
Prospect I
Bronze I
100.00%
Bronze I & II
2
Bronze II
Prospect II to Prospect III
Prospect II
Bronze I
98.00%
Bronze III
3
Bronze III
Prospect Elite
Prospect Elite
Bronze II
93.96%
Silver I
4
Silver I
Prospect Elite
Challenger I
Bronze III
86.80%
Silver II
5
Silver II
Challenger I
Challenger II
Silver I
75.85%
Silver III
6
Silver III
Challenger I
Challenger II
Silver II
62.74%
Gold I
7
Gold I
Challenger II
Challenger III
Silver III
49.51%
Gold II
8
Gold II
Challenger II to Challenger III
Challenger Elite
Gold I
36.40%
Gold III
9
Gold III
Challenger III to Challenger Elite
Challenger Elite to Rising Star
Gold II
25.76%
Platinum I
10
Platinum I
Rising Star to Challenger Elite
Rising Star
Gold III to Platinum I
17.92%
Platinum II
11
Platinum II
Rising Star
Rising Star
Platinum I to Platinum II
11.43%
Platinum III
12
Platinum III
Rising Star
Rising Star
Platinum II to Platinum III
7.21%
Diamond I
13
Diamond I
Rising Star
All Star to Super Star
Platinum III to Diamond I
4.55%
Diamond II
14
Diamond II
Rising Star
Super Star to Champ
Diamond I to Diamond II
2.48%
Diamond III
15
Diamond III
Rising Star to All Star
Super Champ to Grand Champ
Diamond III to Champ I
1.21%
Champion I
16
Champion I
All Star to Super Star
Super Champ to Grand Champ
Champion I
0.66%
Champion I
17
Champion II
Super Star To Champion
Grand Champ
Champion II
0.29%
Champion II
18
Champion III
Champion
Grand Champ
Champion III
0.12%
Champion III
19
Grand Champion
Super Champ to Grand Champ
Grand Champ
Grand Champ
0.06%
Grand Champ
From taking it from a top percentage % basis, Seasons 2, 4, and 5 were the most difficult seasons to get Grand Champion while Season 3 was the easiest. Season 2 was the most difficult season to get Champion rank and season 3 was the easiest. It looks like Season 6 has retained the difficulty of achieving Grand Champion from past seasons, but has made Champ a bit easier to attain, but not at the ridiculous level of Season 3.
It is important to keep in mind that the overall Rocket League population has gotten better over time. So while you can say if you are a Diamond III player now and you may have been a Rising Star in Season 2, the overall skill level of the players have improved dramatically over those 4 seasons. My aim in providing this graph is to mostly make sense of all the changes to the Rocket League ranking system over time. I can definitely feel for players regarding the confusion, as I have been on the cusp of Champion level since season 3 until I finally got it in Season 6.
Comparing the Rocket League Ranks from Season 4 and 5 to Season 6 and 7
Recently ItsBluez from r/rocketleague came up with this cool graphic using all the info we compiled visualizing these seasons ranks and where you would fall now. Check it out below:
Assessing Your Progression – A Game Time Hrs to Rank Correlation Survey
On January 24, 2017, Reddit user /uUnicornsaucy held a survey on RL Reddit asking participates to submit their highest Rocket League rank tier and the number of hours they have logged into the game. Over 2,000 users submitted their information, which produced the hours to rank correlation survey on the Rocket League ranking system. Below are the results of the survey.
Source – https://imgur.com/gallery/Ga61p
We have to keep in mind that this survey was taken during Season 3, which was the easiest season to attain Grand Champion and Champion ranks. This was probably one of the best times to get Grand Champion surveys though as nowadays there could be Grand Champs that have logged over 3000 hours in the game and have been Grand Champions for several seasons.
Champ and Grand Champion tiers are such huge milestones for a Rocket League player so I’m going to focus my estimated correlation off these two tiers. This is a very common question in our discord group when a member asks how many hours should it take to get to a certain rank or if they are on the right path given the hours they have logged.
So in adjusting for tier thresholds for Season 3 I would estimate for Season 6 the following hours played to rank for Champ and Grand Champion:
Tier
Estimated Hours
Champion
800 – 1000
Grand Champion
1200 – 1400
Achieving these ranks before these hours in a great accomplishment. It is also a good gauge to see how you are progressing. If you have logged in over 1400 hrs and still not at Champion level, perhaps you really should seek out some coaching and reassess what you are doing to get better. We often times find out with players who have not hit Champion rank within these times frames lack routine and focus. With routine, the focus tends to be heavy on mechanical with them, but not much on the rotational and adaptability part of the game. With focus, we typically find that players grind ranked play but do not spend much time in replay analysis or strategy discussion.
We do have members in our discord server who have achieved Champion rank within 500-600 hours. I am a prime example of one of these discord member, as I hit Champion rank in Season 6 at around 550 hours.
Closing Thoughts on the History of the Rocket League Ranking System
It’s been an incredible ride and I have been on playing Rocket League since season 1. The changes made to the Rocket League ranking system have all been for the benefit of the community. The professional level tournaments have been amazing and inspirations to all to strive for. Rocket League’s growth in the Esports scene has allowed us to have our favorite Rocket League Professionals play this game for a living and ensures the game will stick around for a long time.
Whether it was to provide a greater number of players to match up against, to mitigate against boosting, or to provide a better sense of rank progression for the player, everything Psyonix has done has always been for the love of the community. We really are fortunate to have makers of the game just as passionate as us fans.
Creator Bio of Rocket League Ranks Article
Chupa49 is part of the RLCD.GG website staff. He joined us as a Challenger 1 back in Season 3 and finally achieve Champion Rank in Season 6. He has benefited from the discord server by getting coached by several members. As a part of giving back to the community that has helped him get to a tier he never thought was possible, he wrote up this guide to help out many others in his situation with very limited time and with no direction to go to find the right type of training and coaching at his level that would be beneficial to him.
Hello. I’m Pasadena, a coach within the RLCD. You might have previously seen an editorial piece that I wrote here, about the theory behind learning in Rocket League. In this post, I’m going to do my best to answer a question I get asked very often: “What’s the difference between a square and a cross deadzone?” as well as give you some ideas about which you should use. I have played Rocket League extensively with both types, and the differences between the two are farfrom negligible. Changing from one to the other might be a step in the right direction towards becoming the best Rocket League player you can be.
Rocket League Deadzones – A Game Changing Explanation!
What is a Deadzone in Rocket League?
Firstly, I’d like to take a paragraph to briefly describe what a deadzone is, and provide resources regarding how you can configure your deadzone appropriately. A deadzone essentially refers to an area of input from your controller’s analog stick (also known as ‘joy stick’) which is ignored by a system. This means that if you move your analog stick within a deadzone, then you should see no changes on screen, effectively acting as if you didn’t move the deadzone at all. Typically, deadzone configuration settings range from 0.00 to 1.00. It is important to note that in Rocket League, the Controller Deadzone configuration setting refers to a radial deadzone, which means that the area of the deadzone is described as a circle. The deadzone settings within Rocket League can be found in the options menu, under the ‘Controls’ tab. Within this tab you can also find the ‘Dodge Deadzone’ setting, which will allow you to configure a cross-sectional deadzone that impacts at which point enough analog input is received to warrant a dodge, instead of a regular jump. Rocket Science is a fantastic YouTube content creator who has created a deadzone visualiser you can try out here, to better understand both of these concepts. I will include a video below that includes all you need to know about Rocket League and deadzones, by the same content creator.
Visual Differences Between Radial and Square Deadzones in Rocket League
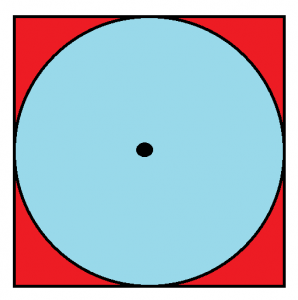
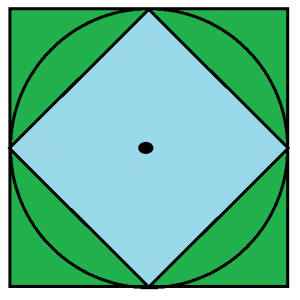
With my fantastic artistic abilities and the use of Paint, I’ve attempted to make a simplified visual representation of both a square and a cross deadzone, that will be useful for most intents and purposes in understanding where the differences between the two come from.
A cross radial deadzone. The area in blue describes the area of input that can be received from the controller within the limits of the deadzone. The red area describes any area where input cannot be received from the controller within Rocket League.
A square radial deadzone. The area in blue describes where input can be received from the controller within the limits of the deadzone. The area in green describes where input can be interpreted and made into an output within Rocket League.
Functional Differences with Rocket League Deadzones
To break this idea down, on the left, within the cross deadzone, the small black dot should be interpreted as a pointer, or where the analog stick input is received by Rocket League as being. The black dot is able to move within the entirety of the blue area, but is unable to reach the red area, however the red area is a part of the analog input that can still be received by the game, but with a cross deadzone, you’re unable tor reach this. In the picture to the right, depicting my representation of a square deadzone, the circle described on the left is now instead a kite shape, or a rotated square. The difference, however, is that the entirety of the input area, both the red and blue area, are all within that small square. The blue area once again represents where the black dot is able to move, however the green area describes where input can still be interpreted by the game. In short: there are parts of the analog controls that a square deadzone can reach, through manipulation of the deadzone, but the cross deadzone can’t. As the image shows, this is apparent in the diagonals. Since mathematically a diagonal is comprised of both its horizontal and vertical components, then unless you are holding the analog stick exactly to the sides or towards the top and bottom, the square deadzone’s input is able to achieve a stronger output from Rocket League. This difference reaches its maximum if the analog stick is held directly at 45 degrees to the normal. Below, I’ll describe some of the maths behind this, if you’re interested.
The Mathematics – Why Square Deadzones Have More Reach
For this example, we want to find out the ratio between the circle’s radius r and the diagonal across the highlighted area, d.
Using Pythagoras’ theorem, it follows that:
d² = r² + r² d² = 2r²
(d²)½ = (2r²)½
d = (√2)r
√2 ~ 1.414
If we assume that r has an arbitrary value of 1, then:
d = (1.414)(1) = 1.414
So a square deadzone is able to reach approximately 41% further than the regular radial cross deadzone. Since the deadzones are measured in terms of vertical and horizontal components, in actuality, this value is halved, to which we’ll approximate as ±21% difference.
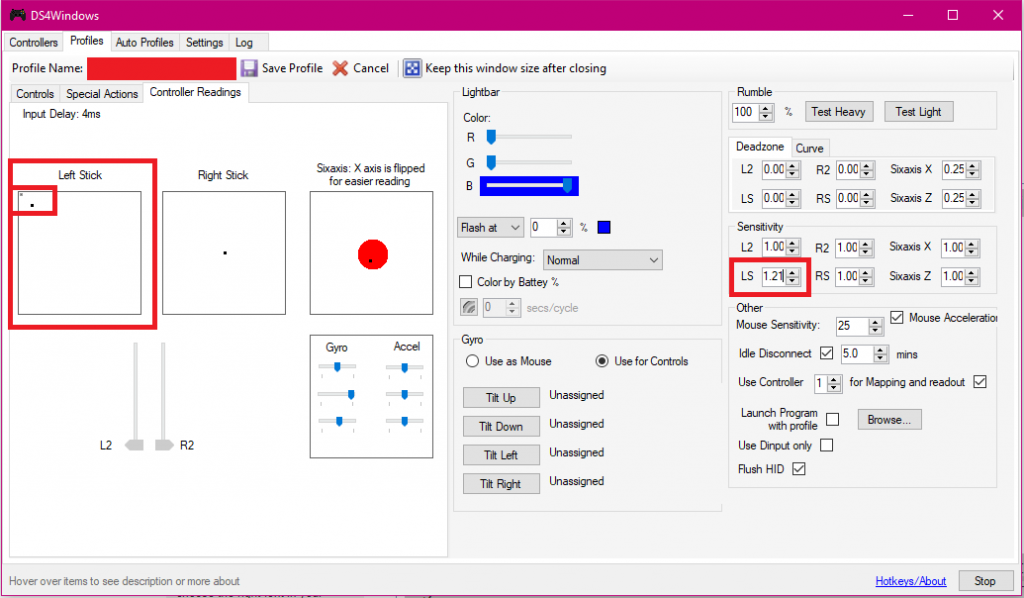
If you use an XInput software, such as DS4Windows, you can visually see this by adjusting the sensitivity of your analog controls.
This is a controller profile of mine shown in the XInput Software DS4Windows. On the right, you can see I’ve increased the left analog stick sensitivity to 1.21, or 121%. On the left, in the ‘Left Stick’ display, the more opaque dot shows the input my controller is receiving, and the more transparent, grey dot shows what the output is. As you can see, along the diagonal, the analog input is effectively emulating a square deadzone.
Solutions – How to Modify Deadzone Settings in Rocket League
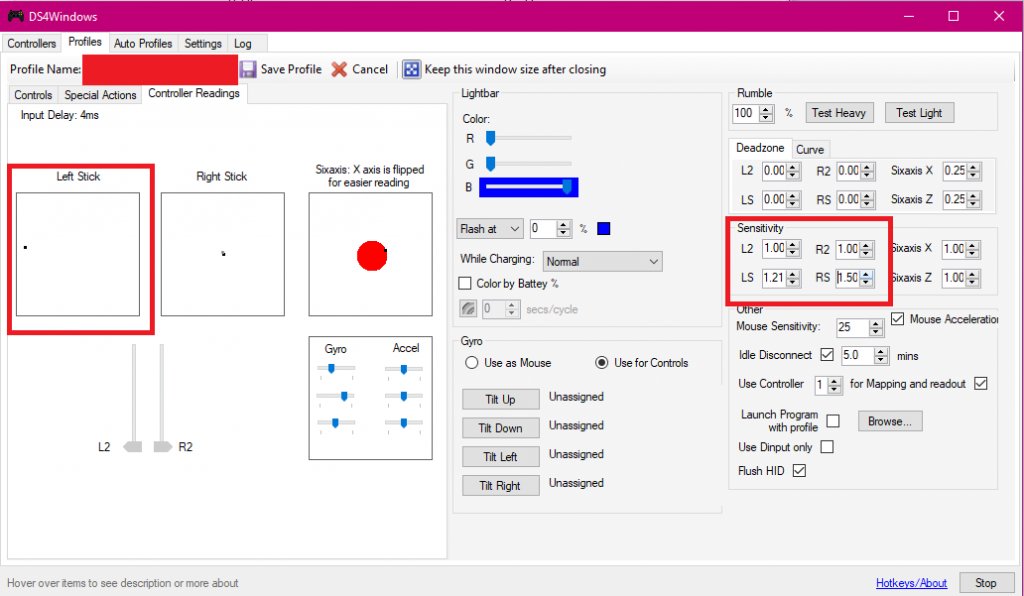
Ways to square your deadzone are described in Rocket Science’s video through the Steam controller configuration settings. These configuration settings can be quite difficult to use, and there have been numerous reports of them causing problems for others – myself included. When I used to use a square deadzone, I used Durazno’s Squareness software, which can be found in a Reddit thread here. As mentioned in that post, the DS3, or Dualshock 3, (the controller the Playstation 3 uses) uses a squared deadzone by default. Two notable players who use a Dualshock 3 are Kuxir97 and Fairy Peak, for this reason. This begs the question: what can console players do? Am I at a significant disadvantage playing on console because of this? Well, there’s a fairly rudimentary way of getting around this on consoles, however it is far from perfect, for reasons I will explain shortly. As shown above, you can increase the sensitivity of analog inputs by approximately 21% in order to achieve an otherwise squared deadzone. There are two configurable settings within the Rocket League options menu under ‘Controls’: ‘Steering Sensitivity’ and ‘Aerial Sensitivity’. For all intents and purposes, I would keep these two near the same value at all times. Increase them how you like, however having them different will likely result in inconsistent controls, and thus less control. Console players can increase their sensitivity values to approximately 1.40 or higher to help overcome the ‘inertia’ felt from lacking the diagonal strength in your controls. I don’t believe this increases the range, so this is unlikely to effectively square your deadzone, but it’s currently the best thing to do on console to stay competitive. On PC, you can effectively emulate a square deadzone to a better extent as seen below, by increasing the analog sensitivity by 21%, but you’ll see the issue that arises when you do this.
If you look at the image above, you’ll see that within the ‘Left Stick’ display, the grey dot is no longer there, however the sensitivity of the left stick is still the same. Just to make things more clear, I increased the sensitivity of the right stick by 50%, and you can see the dot barely next to the centre point of the ‘Right Stick’ display. So, where is the dot; what’s the output? Well, the dot displaying the output is actually outside of the borders of the area shown. Going beyond the border doesn’t make the input any greater, however it’s effectively receiving an input of me pushing the analog 100% towards the left, when in actuality I’m holding it at around 80-90%. This means that unless you are holding the analog stick at exactly 45 degrees to the normal, or in diagonal fashion, then your deadzone is no longer able to emulate a square one. If you’re interested, this happens because the inputs are received as vectors with horizontal and vertical components, however the sensitivity option applies this to the resultant vector, and not its components independently. So, unless you were to hold the stick fully towards any of the sides, then your input will always be stronger than intended. Is this a problem? I personally believe it is. As you’ll see in the next section, the way a square deadzone can affect your ability to play Rocket League can be quite drastic, and sometimes allowing you to utilise mechanics that are otherwise impossible, or extremely difficult to do, with a cross deadzone.
Effective Differences – Field Examples of Deadzone Differences
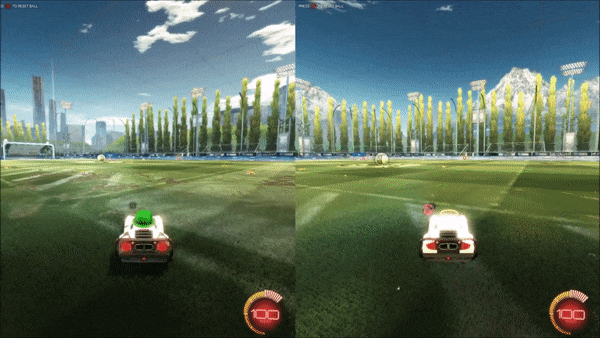
Generally, playing with a squared deadzone makes the game more difficult to control, however offers the ability to do more things, effectively increasing the skill ceiling. Since the diagonal of the inputs is able to be reached, things you will immediately notice are a tighter turning radius (or feels more responsive) and the ability to spin on the diagonals more quickly during aerials. The latter of the two is shown below. The video in which this particular instance is shown can be found here.
The car on the left spins with a squared deadzone whilst the car on the right uses a regular deadzone. The squared deadzone requires a quicker spin.
Freestylers often use a squared deadzone to allow them to make more full rotations before making the final shot. Flip resets (off the ball) are also markedly more easy to achieve with a squared deadzone, however controlling the ball in the air can be a lot more difficult to achieve without using a very high deadzone value, such as 0.25 or higher.
The area in which square deadzones dominate the most is in the Solo Duel playlist. Generally, in my experience, regaining control of the ball after a challenge in playlists like Standard and Doubles is more difficult with a squared deadzone, simply because you’re more likely to make a more powerful hit, or your increased speed of play means you’ll beat your opponent to the ball without them challenging it as strongly, which can lead to possession being given away. In the Solo Duel playlist, you don’t have to be too concerned about where the ball goes so long as you beat your opponent to it: tighter turning, faster aerials, faster rotations and a stronger diagonal are all key to being a threatening opponent and purely keeping your opponent out of the game. Often, you will find very mechanically gifted players on the Solo Duel leaderboard who struggle in other playlists. I’ve found that this can often be due to a square deadzone, however this isn’t always the case. Personally, I find I’m much more easily able to compete at a high level during solo duels with a square deadzone, as opposed to a regular one. Try each out yourself, and see what feels better for you.
Flick Differences with Deadzones
One very important part of dribbling and the Solo Duel playlist in general are flicks. As you get more highly rated in Rocket League, you will begin to see your opponents utilise flicks from an angle instead of linearly, which in short, means that diagonals are going to be involved. A certain flick has the potential to dominate a game should you be consistent enough with it: the 45-degree flick. The 45-degree flick essentially involves rotating your car to a 45-degree angle, and back-flip half-flipping to launch the ball across the length of your car. In my experience, with the extra power from the squared deadzone, these flicks have the potential to be absolutely unstoppable. It is also significantly more difficult to set up 45-degree flicks with a regular deadzone, as well as the flicks launching the ball more slowly and often lower. Below, is an unlisted video I created showcasing a few minutes with -and without- a square deadzone, and trying out a few flicks in free play. Hopefully you can see the differences in power and height. These flicks can be extremely venomous, check out a few of these flicks by RLCD.GG official team member, xXander. Also be sure to check out his Twitch channel, which he soon plans to fill with streams, showcasing his incredible Rocket League abilities.
Turning Differences with Squared Deadzones
In relation to the tighter, more responsive turning that comes from having a squared deadzone, one specific area in which the difference is very noticeable is when turning clockwise or anti-clockwise up a wall. Since Rocket League is a physics-based game, just as you’ve probably realised by now that the ball always returns to the ground – so must your car. As you drive up a wall, the in-game ‘gravity’ pulls your car back down. As you turn towards the normal of this force, then the force propelling you upwards will become weaker and weaker relative to this gravitational force. So how is this effective? Well, when trying to turn as previously described, there’s a noticeable sluggish nature with which you’re able to navigate the wall, and often to keep control, you need to powerslide at certain times in order to maintain a tight turning radius. When using a squared deadzone, because there’s a greater vertical component wherever your analog stick is diagonally held, you’re able to maintain a greater upwards force, and in effect, you’re more easily able to turn on the walls when pulling away from gravity. This might seem like a very small thing, but I’m sure we can all recall times where turning in the corner whilst defending has felt particularly sluggish and difficult, sometimes resulting in you not being able to face the ball as quickly as you’d intended to. Although this can’t really be shown visually, I’ve included an example of the kind of turn I mean below.
Also take note that the “sluggish” feeling when using a non-squared deadzone is still present in general turning. Your turning radius technically isn’t affected, since you’re only holding the analog stick at right-angles, however when turning in games and the analog stick crosses the diagonal, the difference is definitely apparent. Going from a squared deadzone back to a regular one is something I’ve experienced a lot of difficulty with personally. Turns that you are normally expected to make with ease suddenly require a much more hefty use of powerslide, and it can be difficult to chip the ball effectively when turning on it with very little space.
Flip Resets with Deadzones in Rocket League
As previously mentioned, another high-level mechanic I’ve noticed is considerably easier with a squared deadzone is using the ball as a surface to reset your flip from. It’s generally easier in practicality because the quicker diagonal turning allows you to get around the ball, and often in games making the decision to go for a flip-reset is a quick-to-be-made under certain circumstances, and being able to find your way towards the side or the bottom of the ball as quickly as possible is extremely important in being able to generate enough power to reset your flip. Another reason they are much easier is because you are able to recover more quickly after the reset. If you didn’t know, to achieve a flip-reset, you’re required to touch the ball with all four of your wheels (and some force) at once, but at the same time, your undercarriage will make contact with the ball. The undercarriage of your car is the weakest part of it, and actually has the unique quality of slowing the ball down when making contact. Due to the nature of this, often when attempting to achieve a reset, you’re inevitably slowed down, and often too much to properly catch up with the ball or get under it enough to take another shot with your newly-acquired flip. The quicker turning from the squared deadzone and the more powerful diagonals help to create a much ‘cleaner’ feel to resetting your flips, since as you slide off the ball, you don’t seem to lose as much power. Flip-resets made with a regular deadzone in my experience generally require quite a large set-up as opposed to being something you can spontaneously do. Here’s an example of a more ‘spontaneous’ flip-reset I got with a squared deadzone.
Visual with Square Deadzone
Visual with RegularDeadzone
Aerials and Recovery Deadzone Differences
A ‘game-changer’ for me when it comes to discerning between my playstyles using each type of deadzone if definitely the way it affects my aerial play and recoveries in general. Lots of people switch deadzones when learning to properly half-flip. Half-flips are remarkably easier using a squared deadzone, and gives you a much better feeling of manoeuvrability; it is far easier to half-flip diagonally. In an intensive solo duel, a quick half-flip can absolutely be the difference maker in challenging the ball effectively and leaving yourself out of position. For the purposes of testing this, I attempted to half-flip in a rough radius around and towards the ball, however I was using the type of half flip I don’t use. The type of half-flip seen is done without using a control binding for air-roll left or air-roll right; only the regular air roll binding is used, in combination with diagonal flips. When testing both types of deadzones, I didn’t experience too much difficulty either way, since I’m used to manipulating flips accordingly, however there was a noticeable difference: the regular deadzone often made it difficult to half-flip towards certain angles, and sometimes resulted in my car being unable to complete a flip properly. Below will be two clips, firstly using a squared deadzone, and the other – a regular one. Notice during the testing with the squared deadzone, even when I messed up slightly, I was able to recover; I wasn’t able to do so without.
Visual with Square Deadzone
Visual with Regular Deadzone
As mentioned previously, a squared deadzone often gives you the competitive edge by being able to recover much more quickly, both in the air and on the ground. It’s difficult to show this through any kind of demonstration beyond you testing this for yourself, however the difference should be immediately apparent to any player with a good sense of their mechanical ability. A big downside, in my opinion, of the squared deadzone is that it can make aerials feel much more difficult to control due to the added speed of rotation, and what feels like an almost increased sensitivity. Personally, I’ve developed the chronic habit of rotating unnecessarily when aerialing, which may make my claim dubious, however I often see the accuracy versus speed trade-off in players who choose to square their deadzone. For this reason, I’d definitely recommend not changing from a regular deadzone until you’re very mechanically competent, e.g: Champion I and above. I’ve included some final clips below that are quite old, but would have felt impossible at the time without the recovery speed of the squared deadzone.
In some areas of the game, I’d much prefer the slower and more methodical control that a regular deadzone offers. One area in which this is particularly noticeable is when air dribbling. Due to the slower rotations, and less powerful diagonal axes, it can be a lot easier to set up a controlled air dribble, from the ground and the walls, but note that it’s noticeably more difficult to get under the ball to ‘re-lift’ it without a squared deadzone, simply because the rotations can be too slow. Just as before, I’ve included an example below that demonstrates this. In this example, I’d just followed up on a kickoff in a two-versus-two, and had been bumped multiple times by an opposing player, who was also blocking me during my ascent up the side wall. Despite this, and working with very little space, I was able to set up a controlled air dribble, and even flick ballcam off to get the last touch around the defender. This might seem like a fairly unremarkable example, but this is something I would have struggled to do if I had been using a squared deadzone.
Parity Concerns
Before I go, I’d like to share my opinion on the parity concerns I believe come into question with regards to squared versus regular deadzones in Rocket League. For anyone unfamiliar, ‘parity’ is the state or condition or being equal, or at least here, a measure of it. In any competitive environment, parity is a serious concern, and is especially applicable within competitive video gaming. It’s very important that every player has the same tools at their disposal, and has the same opportunities as their competitors. The practical differences between these deadzones in Rocket League have always bothered me immensely, because it feels like a distinct trade-off between aspects of my play, and I feel sometimes at an advantage or disadvantage when compared to my competitors because of this. For example, I feel like using a square deadzone in the Solo Duel playlist is an objective advantage in a lot of circumstances, and often it’s immediately clear at high ranks if your opponent is using one, and you have to compensate for this with how you play. A lot of people might liken this to different cars having different hitboxes, and whilst that in and of itself is a parity concern, i.e: “what car is best?”, it’s something that’s available to all players. Squared deadzones are not available to all players, and something feels horribly unsatisfying about being able to consistently nail certain mechanics exclusively with it – and others exclusively without it. If an issue as polarising as this happened as a result of an update, it would likely be patched as soon as possible. but it’s been in the game from the start, with keyboards and certain controllers emulating a squared deadzone perfectly, and so it feels like this parity concern will always reach an impasse. I don’t believe it’s appropriate to remove it entirely, since certain players are accustomed to using it, and only it, and it’s certainly not a good solution to make a standardised deadzone of any kind, however I feel like all users should have have access to it. I’m not a technical, or design, expert, so I’m unsure of if this would be possible to implement, if at all, however after using both deadzones, the apparent differences can make the game feel totally unsatisfying and leaves me feeling discontent about it. What do you think? Is this an issue that should be taken more seriously if Rocket League is to be taken as such, as an e-sport?
Auf Wiedersehen; Until We Meet Again
I hope you enjoyed reading about this, and I apologise profusely for any errors in the article, or technical issues arising, however I’m a fairly inexperienced editor – I’d love your feedback. There are many aspects to both deadzones that I’ve not covered in this article, which leaves me with a bad taste in the mouth, since this is something I’m strangely passionate about, however I implore that anyone considering switching between either to extensively test this for themselves, As previously mentioned: I’m passionate about this topic, and would be happy to answer any personal questions you might have about all kinds of configuration settings – deadzones included! Stop by at the Rocket League Coaching Discord and say hi – I’d love to hear what you have to say. Once again, a big thanks to xXanderand Rocket Science for helping to provide some of the content in this article. Until next time – happy queuing!
Deadzones – A Game Changer (About the Authors)
Pasadenais a Rocket League expert who shares her wealth of knowledge of mental game and gamesense to regulars on the RLCD server. She is been solely responsible for coaching up several high level players into Grand Champion levels. She has been featured in Mockit tournaments and had an epic 1 on 1 battle with xXander in our RLCD I Suck at 1s Tournament
xXanderis a competitive Rocket League player who is a regular on the RLCD discord server and a top player on the 1s leaderboard. He is a frequent player in 6 mans and has been featured on JohnnyBoi’sYouTube Channel.
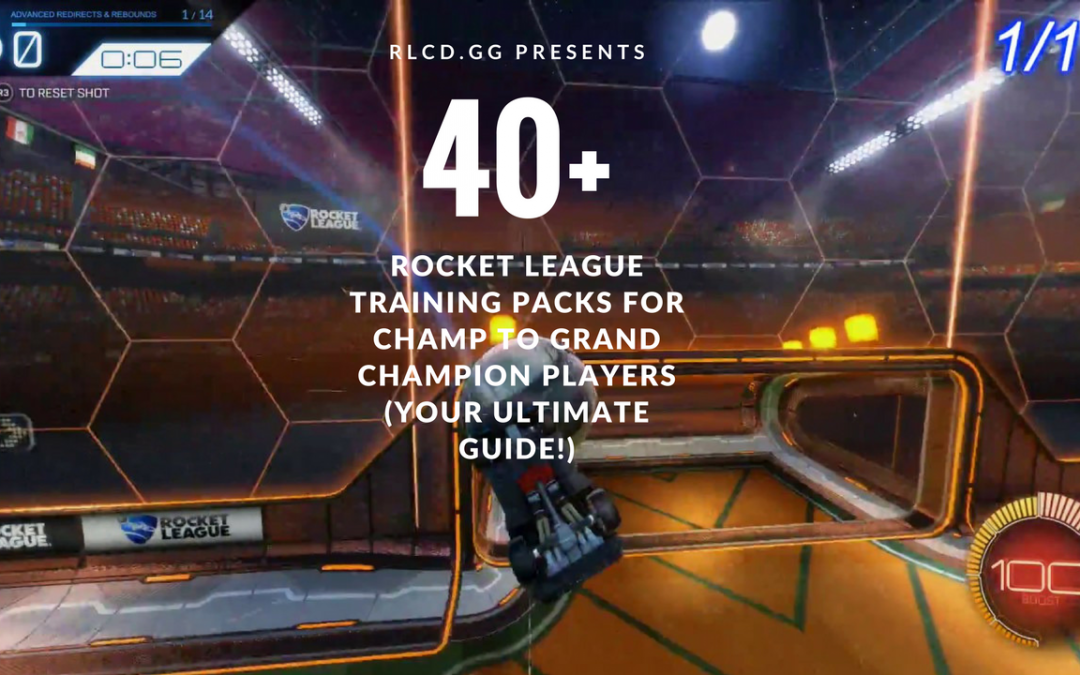
What’s going on Rocket League Fam! Wayprotein here to drop some Rocket League Trainer Pack recommendations today. Back around 4 months ago, Rocket League Coaching Discord Staff dropped an epic posted called The Ultimate Training Pack Guide For Diamond and Below Players. It was a huge hit in the Rocket League Community
The post by Chupa49 was meant for Diamond and below players, so when Chupa approached me to compile this post, I was hyped to get started. This guide is for the big boys. Whether you are new to the Champ Ranks or a Grand Champion looking to refine your skills and looking for new challenges I have included them all. 40+ videos and recommendations in total. Let’s get started!
The Ultimate Rocket League Trainer Pack Guide For Champ & Up Players
Air Dribbling
Okay, so at this point I would assume that you know how to air dribbling competently. Chupa’s post offered a lot of great intro packs that would have gotten you familiar with air dribbling. For this level play, it’s mostly about pushing for a new challenge so what better way to push your stuff and challenge a world record!
Challenge Hexz’s Air Dribble World Record
No training pack here. Below is proof of Hexz air dribble record currently at 13:02. Can you beat his time? Watch the video, fire up free play (or a private match), and go for the record!
Longest Air Drag Ever [13:02] *WORLD RECORD* | Rocket League
Air Roll Shots
There are times when the ball is near the net, but you need to adjust quickly in order to hit the ball quickly. An air roll shot brings in a balance mix of speed, precision and power. Azure RL provides a great tutorial introducing the skill.
Air Roll Shots | ROCKET LEAGUE TUTORIAL
Air Roll Ground Shots
Creator: Wayprotein Level – Diamond to Champion I Code – B4EB-C56A-BA9D-5300
Air Roll shots is a big transition you need to make when you start hitting Champ + ranks. This Rocket League Trainer Pack from yours truly is a 24 shot pack that introduces the player to air roll control for shots. When you were Diamond and below, you likely just moved your analog stick, boosted and flip. This pack throws in angled shots that require the player to adjust using air roll before hitting the ball. This is how advance players hit hard angle shots and a skill you must master at higher levels.
Rocket League Training | Air Roll Ground Shots
Air Roll Shots
Creator: Yeeza Level – Diamond to Champion I Code – 84D2-072D-80CF-7D0D
Yeeza provides a nice 20 shot trainer pack that mixes up various angels. This may seem simple if you are higher in the Champ ranks, but air roll shots is such a big foundational skill for entering champ+ level that it should be practiced and mastered.
Air Roll Shots – Rocket League Custom Training Tutorial #12
Squishy Muffinz brings it which this 10 pack shot pack that is all about speed an precision. Getting good at this thing will build up your speed when hitting backboards.
Rocket League – My Custom Training Shots!!!
Grand Champ Backboard Aerials
The title says it all. This small 6 shot pack is intense with backboards that require speed and precision.
Creator: Peeter Level – Champ+ Code – CC69-668B-4507-0272
100% GRAND CHAMPION BACKBOARD AERIALS TRAINER (Very Hard) – Keyboard
This 8 shot Rocket League trainer pack features several above the goal and off center backboards. This is a great pack for those in lower Champ ranks.
Rocket League | Advanced Backboard Training Shot Pack
Car Control
Car control in the air is an advanced skill you need to master entering the champion ranks. Players who get to the Grand champion ranks know how to adjust in mid car and can direct shots to where they want it to go with power or finesse.
Obstacle Course #2
Creator : French Fries Level – Champ+ Code – See Steam Workshop link
French fries keeps delivering great map packs that can really enhance your car air control mechanics. This map tests your aerial adjustments. If you want to git gud at air control, give this map a try!
[Rocket League] Obstacle Course #2 World Record (7:32)
Parkour-Map #2
Creator : Dreale Level – High Diamond to Low Champion Code – See Steam Workshop link
This custom workshop map includes moving obstacles for you to maneuver around and helps build mechanics on aerial adjustments
Parkour-Map #2 : It's moving!
Speed Jump by DMC
Creator : DMC Level – Champ+ Code – See Steam Workshop link
A very challenging map that pushing your air control abilities to the max. Squishy demonstrates how hard this map is as there are sections that he even struggles with!
EASY WAY TO PRACTICE CAR CONTROL | CONTROLLER OVERLAY
The Wall
Creator : French Fries Level – Champ+ Code – See Steam Workshop link
A custom map that not only works on your car control, but also your speed! Race through a series of obstacles faster than The Wall chases you. If The Wall hits you, the level restarts!
Rocket League Custom Map – The Wall
Ceiling Shots
Many Rocket League players play around with ceiling shots before they hit Champ and likely spend way too much time practicing. However, once you hit champ ranks this become a common skill set. It’s time to master this skill if you want to get into the higher champ ranks. G2 Rocket League Pro Kronovi breaks down Ceiling Shots and Flip Resets below in this well done 10+ minute tutorial.
Rocket League Tutorials – Ceiling Shots & Flip Resets
This is one of the best intro ceiling shot packs out there. This is a very comprehensive 12 shot trainer pack that sets you up with doable ceiling shots.
Yeeza’s pack introduces some more advanced ceiling shots that require delayed shots and redirections.
Ceiling Shots – Rocket League Custom Training Tutorial #3
Okay, so you got the prior two packs down. It’s time to graduate to Way’s 16 shot pack. This one starts mixing up pass situations and using your flip resets to hit goals. Trying getting 100%.
At this point in your Rocket League career, I’m going to assume you have at least some higher immediate level understanding of dribbling mechanics. It’s time to step up your dribble with challenges and there is no better than the Dribbling Challenge #2 course. You can make is extra challenge by making a run for the speedrun record.
Creator : French Fries Level – Champ+ Code – See Steam Workshop link
INTENSE DRIBBLING OBSTACLE COURSE
Freestyling
Everyone loves flashy plays. Chupa’s post had introductory freestyling play. It’s time to take it up to the next level with these Rocket League trainer packs.
This training pack puts you in very useful advanced freestyling scenarios. What I love about this pack is that you are giving several options to be creative in how you make a goal. This video by Legend walks you through all the shot options to mix things up.
Rocket League – Advanced Freestyles & Control Training Pack
This is a classic Jhzer training pack. It literally puts up shots that you see Jhzer make in his highlights. Creator Hexzi really shows off his skills here with several triple touches and flip resets. If you want those highlight plays, start practicing this!
Rocket League Freestyle Training Pack | Hall of Rockets #3
This is only a 7 shot Rocket League Trainer Pack, but the demonstrator in the video, Slope, shows a lot of advanced skills on hitting the ball using double touches and ceiling shots. Try to mimic Slope in the demo video here for max effectiveness.
A 10 shot pack that mixes double touches and freestyling. If you can hit shot #9 like Slop in this video, you are a god.
Rocket League | Gravittyy's Freestyle Double Touch Training
Flip Resets
Flip resets is the big meta going on in Rocket League right now. They were covered in Chupa’s original post, but if you are in Champ rank you should start building familiarly with it. At high champ ranks, pretty much anyone you come across can pull them off when they need to. These shot packs will tune your skills.
This is an excellent intro pack by YeeZa. He does a great job at explaining the mechanic and this Rocket League trainer pack is more on the newbie friendly side. You can challenge this at Diamond ranks. It’s just that there are more impact things to learn before Champ rank.
Ball Flip Reset Shots – Rocket League Custom Training Tutorial #13
Torment’s flip reset pack focuses on close range flip resets. These are good practice for when 50/50s happen or when a ball gets popped up in your direction.
Torment's Flip Reset Aerial Training Pack (10 Shots!)
Flip Cancels
At this point in your Rocket League career, you are familiar with half-flips. Half-flips utilize a mechanic called flip cancelling. We are taking the defensive application of flip cancelling and now applying it to offensive play. There is a trainer pack below for flip cancel shots below, but there is a good video from Squishy and shows how to apply this to adjust in mind air or to fake.
Rocket League | STALL TUTORIAL (With Controller Overlay)
Flip shot cancels are an accuracy and speed skill that will keep you from losing control of your car when you need to flip to hit the ball with extra power. This 10 shot training shot pack provides several scenarios where you can practice.
Cancel Flip Shots – Rocket League Custom Training Tutorial #16
When you get to Champ+ level, teammates are going to start passing you the ball during breakaways. This pack by Rocket League Pro Lethamyr sets you up for success with easy to digest pass situations.
Rocket League – Breakaway Passes Training by Lethamyr (Best Shots)
KarmaRL Shot Pack
Creator – KarmaRL Level – High Diamond to Low Champ Code – 0C38-2D11-109D-EAF3
This 10 shot training pack by Karma mixes up a number of passing and rebound situations will build good muscle memory for those entering the low champion levels.
This 14 shot pack offers both advanced rebound and redirect training for Champ+ players. There are 7 shots for rebounds and 7 shots for redirects. The rebounds need to be be set up by yourself, but the video below shows how you would set them up. Freestyling is optional :).
Rocket League – Advanced Redirects & Rebounds Training Pack
Torment's Aerial Training Pack – Roof Reads (10 Shots)
This training pack is made to help increase consistency on reading bounces off of the ceiling, specifically for aerial goals. You can either score the shot straight in or make a rebound for yourself, depending on the situation
Wall Pitch Shots
In Chupa’s post, he shared a great 30 shot training pack that focused on pitch shots. That is a great pack to use at this level, but Squishy offers a new pack that works really well at learning how to make those Kuxir shots.
Squishy offers us a new training pack that focuses on wall pitch shots that can turn into shots on goals (AKA Kuxir pitch shots). What I love about this pack is that the setup for these shots are similiar to air dribbles and ceiling shots. Getting familiar with this would now allow you to have a 3 pronged approach to your wall offense, which pitches really being shots that are unexpected when they happen.
EASIEST WAY TO PRACTICE WALL PINCH SHOTS | INSANE MECHANIC (NEW META?)
Wave Dashing
Some of you reading this are already familiar with Wave Dashing in Rocket League. For those of you not fimiliar with Wave Dashing, here is Sir Timber’s tutorial explaining how to perform the mechanic.
This training pack applies wave dashing to actual shots. This is a great introduction on how to start using wave dash for offense and not just for recovery
Wave Dash Shots – Rocket League Custom Training Tutorial #14
Bunny Hop Wave Dashing (Gallop Dash)
There is no training pack here, but at this level it’s time to introduce advanced wave dashing mechanics. The first introduction to multiple wave dash mechanics is the the bunny hop wave dash. Shippotv provides an introduction to it below:
Bunny Hop Wave Dash Tutorial
Wave Dash Flicks
Again, no training pack here, but this is another valuable tutorial from RLCS Elite player Red showing how to use the wave dash for dribbling and flicks.
WAVE DASH FLICK TUTORIAL (Advanced Mechanic)
Goalie Training Packs for Champs
Goalie training is hard to do at this level because of how the trainer is setup. You mostly want to work on wall defense, intercepting passes, and clearing wall. But there is one type of save that comes in handy below.
This packs combines ceiling shots with goalie defense. If you can get good at this you can clear the ball much further than you normally would.
Rocket League Training | Goal Roof Saves
Rocket League Trainer Pack Creator Credits
This post would have not been possible without these great creators who put the hours in their game to develop these rocket league training packs. Below are all the creators used in this post and where to find them and follow on social media. If I couldn’t find their social media, I have linked to their Rocket League Tracker Profile. Give them some love by following them.
DMC – Link Dreale – Link Gravitty – Link French Fries – Link Hexzi – Link KarmaRL – Link Kdium – Link Kronovi – Link Lachino – Link Legend9873 – Link Lethamyr – Link Peeter – Link Red – Link Torment – Link Sir Timbers – Link Squishy Muffinz – Link Way Protein – Link Yeeza – Link
Thanks for reading and viewing and see you in-game or on our Discord server!
Rocket League Trainer Packs for Champ+ Players – About the Author
Wayproteinhas been a Grand Champion in Rocket League since season 3. He competes regularly in Rocket League tournaments, including RLCS and CRL (Collegiate Rocket League). He is a proud member of Team RLCD NA and is known in the Rocket League community for his training packs.
For games that offer tradable, in-game items, the methods used to exchange these “goods” from one user to another become hugely relevant and develop entire communities of their own (whether we like it or not!). Rocket League is no different, and its item economy has boomed along with the popularity of the game itself. With the amount of information out there and new cosmetics being released almost every update, getting your feet wet with trading or even staying up to speed can be a daunting task. Thankfully, we’re here to answer all your questions! This ‘how to trade in Rocket League’ guide is a comprehensive article describing all the aspects of the trading system, including item descriptions, how to get keys, how to trade, where to go to trade, and most importantly — how not to get ripped off in a trade. It is strange that a Rocket League Coaching group would provide a guide like this, but our goal is to coach the player how what trading is and how not to get scammed! Hopefully, at the end of this article, you will be informed enough to get out there and start trading in Rocket League!
How To Trade In Rocket League Guide TOC
How To Get Keys In Rocket League
The most straightforward way of getting keys in Rocket League is to purchase them from the in-game menu. Purchasing keys directly from the in-game menu supports the developer, and a part of the proceeds go towards funding the Rocket League eSports scene. Keys purchased in-game cannot be traded for 7 days to protect users against fraudulent charges, so keep that in mind.
How To Get Free Rocket League Keys
This is what some of you are here for. Let’s face it, the game doesn’t give one an obvious way of getting keys for free like you might be able to in some F2P mobile games. There are, however, several ways to get Rocket League keys without spending your cold hard cash. They are:
Trade items to other players for keys
Trade crates to other players for keys
Using trade-ups for betters items and trading upgraded items
Trading items from RLCS events for Keys
Trade Items To Other Players for Keys
This is the simplest way. If you have items that other players want, you can trade them for items that you want. There are several places I’m going to recommend for you to go to trade without fear of getting scammed
Trade Crates To Other Players for Keys
If you are not going to use keys to open crates up yourself, this is a good way to get free rocket league keys. Crates drop regularly during online play. When new crates types come out, that is the best time to trade them as they can go for nearly a key a piece or 2 crates for a key. Other crates will fetch a much lower piece.
Using Trade Ins for Better Items and Trading Upgraded Items
With the newest update to the training up system there are some valuable items you can pull from the trade in system. In other to trade in your items, you need to trade in an item of the same rarity. The trade in system is shown in the video below:
Rocket league item trade ups|rare|very rare|
One of the more up to date trade in simulators out there is RL Market’s simulator. You can go there and see what items you can get. As of this post, it does not include the new banner updates so it’s a little out of data, but still helpful. Some valuable trade items you can obtain for free would include:
Any painted octane
Any painted breakout
Titanium white octane
White painted boosts
Painted banners
Opening Crates without Keys – Decryptors
During certain events like the Christmas event, you can purchase decryptors with in-game free currency for a limited amount of them. You can use this currency to purchase decryptors which are usually capped at 5. To maximize your returns, it would be best to use all your points for the special event crates and trade them away while the event is going on for free Rocket League keys.
How to Get Crates (The Rocket League Crate System)
There are 3 ways to get crates in Rocket League:
Play online matches
Trade items or keys to other players for crates
Purchase event-themed crates
Psyonix announced on May 22, 2017 that each different type of crate will be scheduled for retirement roughly six months after their initial release. This means that the retired crates will no longer drop after matches. Consequently, fewer types of crates can be acquired via online matches, increasing the chance for newer crates.
What is the Rocket League Crate Drop Rate?
There is no official statement from Psyonix regarding this. Players have theorized that the crate drop is around 10 hours per crate. However, keep in mind that drops occur randomly and on a weekly basis they get reset. Drops also occur unevenly so one week you make get 1 crate and the next week you might get 4.
Rocket League Crate Farming
Crate farming is a bannable offense in Rocket League. Given how random crate drops are in-game, the best recommendation would be to just play and not worry about it or utilizing additional Rocket League accounts (Smurfs) if you play more than 10 hours a week.
Rocket League Item Rarity Levels
There are 7 levels of rarity associated with items. Here they are, from most common to least common:
Common
Uncommon
Rare
Very Rare
Import
Exotic
Black Market*
You can trade up 5 items of the same rarity to receive one item from the next-highest tier. If you are trading in items from crates, all 5 items must be from the same crate, and you will receive one item of the next-highest rarity level from that crate. Note that you cannot trade up to black market rarity. You can only receive black market items from opening crates or trading other players.
Certified Items In Rocket League
When you receive an item, either from a drop or a crate, there is a small chance that the item will have special attributes. They can either be painted or certified (or both, if you’re lucky!). Certified items will keep track of a specific in-game stats as long as you have that item equipped on your car (online matches only).
In total, there are 15 certifications. Here they are, along with the stat that they keep track of:
In addition, you can level up item certifications by hitting milestones in each stat. There are 10 levels for each tag. The Each certification has different milestones. Here are the 1-5 levels titles:
Certified
Capable
Skillful
Veteran
Fantastic
After level 5 there are 5 more additional titles. The names differ depending on the certification, but they are listed below (Source – Rocket League wiki):
Tag Name
Level 6 1000-1999
Level 7 2000-4999
Level 8 5000-9999
Level 9 10000-17999
Level 10 18000-∞
Striker
Incredible
Absurd
Unreal
Unrelenting
Berserker
Sweeper
Ridiculous
Unbelievable
Preposterous
Stupendous
Chief Custodian
Tactician
Ridiculous
Unbelievable
Preposterous
Tremendous
Master Planner
Tag Name
Level 6 500-999
Level 7 1000-2499
Level 8 2500-4999
Level 9 5000-8999
Level 10 9000-∞
Acrobat
Ridiculous
Unbelievable
Preposterous
Astounding
Cyclist
Aviator
Incredible
Absurd
Unreal
Audacious
Aerial Ace
Goalkeeper
Ridiculous
Unbelievable
Preposterous
Impenetrable
Immovable Object
Guardian
Ridiculous
Unbelievable
Preposterous
Gallant
Guardian Angel
Juggler
Incredible
Absurd
Unreal
Marvelous
Magician
Playmaker
Incredible
Absurd
Unreal
Psychic
Unsung Hero
Scorer
Incredible
Absurd
Unreal
Supersonic
Unstoppable Force
Show-Off
Daring
Relentless
Exhausting
Cheeky
Total Showboat
Sniper
Incredible
Absurd
Unreal
Unforgiving
Cold-Blooded
Turtle
Ridiculous
Unbelievable
Reckless
Timeless
Turtle God
Tag Name
Level 6 250-499
Level 7 500-1249
Level 8 1250-2499
Level 9 2500-4499
Level 10 4500-∞
Paragon
Determined
Stunning
Wonderful
Eternal
The Most Valuable
Victor
Daring
Relentless
Fearless
Valiant
Unbeatable
There is no set value for level 5+ certification and given the level of effort needed to get them, it is not recommended to trade them.
Painted Items in Rocket League
The painted attribute alters the appearance of an item to emphasize a specific color or color scheme. For example, a cobalt-painted Chakram wheel will cause the spokes and rim of the wheel to appear blue, even though Chakram wheels normally appear red.
There are 13 different paint colors in Rocket League:
Black
Burnt Sienna (Brown)
Cobalt (Blue)
Crimson (Red)
Forest Green
Grey
Lime
Orange
Purple
Saffron (Yellow)
Sky Blue
Titanium White – Most valuable
Pink
Note: not all items have painted variants, and not all items that can be painted have all 13 paint colors available.
Best Places To Go Trade For Items (And Rocket League Price Lists Sites)
Know that you know about different, crates, items, and attributes, you probably want to know where to go to trade and look up prices. I’m going to just say this straight up that I only recommend ONE website that you use to conduct trades. That would be Reddit’s R/RocketLeagueExchange
R/RocketLeagueExchange
It’s very active community and legitimate place to post trades and make exchanges. There is also a price checking trend where you can ask the price for items. Here is why I only recommend them:
They Do Not Control The Rocket league Trading Market
The subreddit is an independent site where you can meet other peers and get trusted values assessments for trades. They do not own a value database like other sites so all the pricing info you get is from the players and from grassroots.
They are not tied or have partnerships with paid trading
This is the biggest pitch from me to you about why you should only trade here. Many trade sites are either affiliated with larger website networks (which means they are backed behind commercial websites) or they take paid ad placements from paid trading sites. Paid trading is where things can go seriously wrong with Rocket League Training. It is also against the terms of service in the game. Just like you trust us for your Rocket League Coaching needs because we are free and independent, go with the trading community that promotes the same philosophy. The trading system was designed to be free and using the keys system is one of the best ways to directly support the developers.
They Have A Trusted Middleman Network
I’ll get into common rocket league trading scams later in this post. Middleman scams are one of the most harmful and common scams in the trading community. You should NEVER for valuable items unless you have a trusted middleman to conduct your trade. The R/rocketleagueexchange maintains since a network and these middlemen have experience in handling these transactions in a mature and friendly way.
Should I Use A Rocket League Prices Spreadsheets?
With all these sites out now that provide up to date information and the trading subreddit, a google spreadsheet is really not a reliable way to go to get up to date Rocket League trading information. It is better to go to the subreddit to check for prices and to find other players who want to trade with you.
How Do I Avoid Getting Ripped Off on Rocket League Trades?
Here are some quick tips to avoid getting ripped off on a Rocket League trade
How To Trade In Rocket League Scam Avoidance – Never trade for real money!
This is the #1 reason on how people get scammed or ripped off on trades. It is very easy to scam someone with a real money trade exploiting charge-backs and paypal or simply by having you trade first. It is just best to just avoid it completely and only trade with keys.
Get familiar with Rocket League item prices
Spending a few days not trading, but instead looking at trade sites like r/rocketleagueexchange will give you a good idea about prices and want players are willing to trade for.
Common Scams
Here is a list of Rocket League Trading scamming methods and how to avoid them.
Trade Stuffing Scam
A common scam technique is when you are trading with someone and they add some junk items in the trade window. They will add a lot of them and then add the item you want. Then, just before accepting the trade, they will remove the item you want from the list hoping you will not notice. When you see traders like this, just reject it and kick them from your party. It’s not worth the risk and do not even roll with their lame excuse that they are just messing around. A lot of people get scammed this way. An example video of the tactic is shown below:
I got Scammed..
The Fake Color Scam
This method uses the image preview of an item in the trade window to fool you into thinking it is a better item. The best way to avoid this scam if you are on console is to hover over the item that the player has put down and use the L3 button so you can see the color. On PC, look for a button near the item called “show item details”. Example video is below:
Reddit user /u/dylan_aliff whos PSN is Spirtlink427 Scam Video Proof
The Fake Middleman Scam
A middleman is used where there is an item you are trading for that involves more than 50 items (e.g. – very valuable items). A middleman is utilized to ensure both players are protected when the trade is being performed. The middleman collects and distributes the items so there are no problems. This scam involves using a fake middleman. The middleman will collect the items from you and then will disappear.
The best way to avoid this scam is to only deal with middleman transactions with a trusted source. R/rocketleagueexchange maintains an updated list of trusted middleman that you can use for your high-value transactions. The link to the trend is here.
Too Good To Be True Scams
A not well known, but very effective scam that preys on the excitement when trading. This scam will involve 2 traders. One will post an amazing offer for a very specific item. It looks like a great deal, but you do not have this item because it is very specific. Then, right after this trading post, you see another with the item you need! The specfic item is a low value item and the trade is asking for 3-4 keys. It is overpaying, but it seems worth it because you will get more keys out of the second deal so you jump in. You trade your keys for this item and the other player you try to get a hold of never responds.
The best way to avoid these scams is to not trust these too good to be true offers. They are likely scams — and also avoid two deal trades unless you are using a trusted middleman.
Duplicating Items Scam
This has been a well known scam in any game with a trading system. It’s a classic scam that claims many victims everyday. The scammer will claim to know a glitch or have a program that can duplicate item. They may actually should you how they “duplicate” an sample low value item in an attempt to prove what they are saying is true. This trick is easy to exploit in game because the scammer can show you the item, but this item is a client side version. They will use this to bait you into attempting to duplicate a more valuable item, which they will happily steal from you and leave you with the fake “duplicate” version, which will disappear soon after.
This scam is a little hard to explain in words, so here is a video that shows how the scam works:
Rocket League – Ghost Item/Duplication Glitch – Don't get Scammed!
The best way to avoid this scam is to ignore players offering rocket league item duplication. Like I said, duplication in video games with trade systems is one of the most common scams and has been used for years to scam players. Don’t be a victim!
Scamming Using Gift Cards or Payment Through Paypal
A scammer will attempt to give you a gift card or paypal money for your rocket league item (e.g. – pay you money for your item). They may even attempt to overpay you to get you to bite. They will usually try to get you to provide the item first, then will quickly go away and steal your item. Another method is they will attempt to use a middleman for the transaction, then the middleman will steal your item. They can also give you an invalid gift card code.
The best way to avoid this is to simply avoid trading for real life money. Stick to using keys and the trade system itself.
Popular Items with Approximate Value (in Keys/on PC) *as of 1/20/18
Here is a list of popular items with approximate value. Any of these items below are highly sought after and will likely maintain a high key value throughout the life of Rocket League
Titanium White Zomba = 170-180
Titanium White Octane = 100-110
Heatwave Decal = 20-24
Dueling Dragons Goal Explosion = 23-26
Titanium White Apex Wheels = 100+ Keys
Note: The value of items can change quickly based on many different factors. Prices listed may not be accurate.
Most Valuable (Expensive) Rocket League Create Items
People have asked this in the past on our discord server so I wanted to list it here. In summary, the most expensive or valuable items in Rocket League at Alpha items and the infamous white hat. Values are shown below as of the date of this post.
The White Hat is perhaps the rarest of all Rocket League items, which is worth at least 3,000 keys (and that’s being conservative). There is no real way to obtain this hat via crates, and people who have found and reported game-breaking bugs to Psyonix. Considering all that, you can imagine how few of these hats exist within the Rocket League community.
The first person to ever get this hat reported an extremely game-breaking bug, which would have allowed him to change anybody’s level at any point in time. Instead of abusing the bug, he hid it from everyone else and reported it immediately to the developers in hopes of keeping his favorite game clean and fun. While Psyonix wanted to pay him monetary compensation for his honesty, he declined, and instead, created the unique white hat we know today. Don’t ever let anybody tell you that last folks finish last!
How To Trade In Rocket League Author Bio
MatthewIcicleis a longtime community member and a part of RLCD’s events & media team. He enjoys running tournaments, opening unwarranted amounts of crates, and mediocre games of solo standard.
If you you have come across this post, you likely are wondering what is the best Rocket League Car in the game. I have wondered this over and over again when I first started playing the game. Over my play time since Season 1, I have switched to multiple cars, tried DLC cars, and fine tuned my play with the cars I use. To answer this question, you really need to do a detailed analysis on the types of cars, the stats of them, turning radius, physical appearance of the car, and look at your own skill set. Let’s go through the analysis so you can figure out what the best rocket league car is for you.
Determining the Best Car in Rocket League
If you have checked out other videos or looked around at other articles most players will tell you it comes down to personal preference. The problem I have with this statement especially if you are new to the game is you probably lack the hours or skill set to really know what your play style is. If you know your play style than you can match the car that best fits your style and your skills. Many of the coaches in Rocket League Coaching Discord have told me in the past that play style really does not start forming until you get to around Champion rank. Some of our coaches argue that it really doesn’t develop until you hit high Champ level tiers or even early Grand Champion (a statement I heard during season 3). So before we determine what Car is best for you, you really need to understand the differences in the cars, and then align your car selection with the skill set you have. From there as your personal play style develops, you can switch your car based on what fits your style of play and the playlist you are challenging.
Best Rocket League Car Stats
We are going to break down Rocket League Cars with a statistical analysis. When analyzing car stats we look at the following parameters:
Hitbox
Hitbox Length
Hitbox Width
Hitbox Height
Turn Radius at max speed
Turn Time at max speed
Power slide 180 Turn Radius at max speed
Power slide 180 Turn Radius at max speed
Rocket League Car Hitboxes
As Rocket League is a video game and not real life, each car in the game has a hitbox. These hitboxes are the total area of the vehicle where a hit would register. Regardless of what topper or accessory you stick on your car, the hit box is always absolute on your car. Some cars are fairly accurate to their hit box visually and others are not. I’ll go more into this later in the post, but let’s breakdown the stats first.
Car Hitbox Length
This is the total length of your car hitbox. Some cars like the Breakout and Animus have very long hitboxes while others like the Octane and Takumi have shorter hitboxes
Car Hitbox Width
This is the total width of the car hitbox. Wider cars will have an easier time dribbling the ball side to side and thinner cars tend to be longer in the game.
Rocket League Car Hitbox Height
This is the total height of the hitbox. Taller cars will have an easier time bounce dribbling and winning kickoffs. Shorter cars will have an easier time flicking and dribbling the ball on top of their car.
Rocket League Car Surface Area
The total 3D footprint of your car’s hibox. The larger the surface area, the larger the potential hit area of your car. Below are several of the more popular cars hitbox stats highlighted
Turn Radius to me is the the biggest factor of my car decision. A shorter car tends to turn and rotate faster and feel more agile while a longer car will turn and rotate slower but will feel more stable in the air. Below are the same sample of cars and their turn radius. In the sheet, there is a breakout of turn speed without boost and at supersonic or 100% boost power. Average turn radius is also displayed. The higher the value on this table, the tighter the turn. The values here are velocity values generated by the game itself.
Car
0% Boosting Turn Radius
100% Boosting Turn Radius
Average
Batmobile
2.377534
2.053953
2.2157435
Breakout
2.374295
2.083253
2.2287740
Endo
2.337055
2.028737
2.1828960
Dominus
2.381345
2.084136
2.2327405
Merc
2.370560
1.976070
2.1733150
Octane
2.365267
2.013627
2.1894470
Takumi
2.366744
2.020642
2.1936930
Venom
2.353566
2.061694
2.2076300
All stats are up to date as of this post. You can see the full turn radius stats here
Rocket League Car Differences
So I provided all these stats and you can tell there are in fact differences in the Rocket League Cars. I can go and break down each value and tell you which car has the tightest turn speed, the widest hitbox, or fits best visually with its actual in-game hitbox, but I feel it is best to simplify the car stats analysis. I feel this is important to not only prevent information overload, but to also future proof this analysis. Psyonix continues to release new DLC cars and special crate cars so continuing to update these stats can be a bear. In addition, Psynoix may choose to nerf or buff certain cars to balance out game play. So let’s breakdown this car stats analysis into car type categories.
When I look at all the Rocket League car stats, I see commonalities between all of them where you can group them together. Knowing these groupings will help identify what would be the best rocket league car for you. So to simplify, we have five types of Rocket League Cars:
Octane
Dominus
Plank
Breakout
Hybrid
Octane Rocket League Car Type
Credit to https://imgur.com/gallery/jvDlG1M
These would be cars that share similar stats to the default Octane model. The following cars fall in this category:
Backfire
Bone Shaker
DeLorean Time Machine
Gizmo
Grog
Marauder
Merc
Octane
Octane ZSR
Proteus
Rog Hog
Rod Hog XL
Scarab
Takumi
Takumi RX-T
Triton
Vulcan
Characteristics of these cars are they tend to have taller hitboxes (better kickoffs) and feel more agile when turning. You could make a valid argument that the Merc should be in its own category, but for simplification I prefer to keep the Merc here versus separating it into its own car type.
Dominus Rocket League Car Type
Credit to https://www.artstation.com/artwork/yZzLn
These would be cars that share similar stats to the default Dominus model. The following cars fall in this category:
’70 Dodge Charger R/T
Aftershock
Dominus
Dominus GT
Hotshot
Ice Charger
Imperator DT5
Masamune
Ripper
Characteristics of these cars are that they have shorter hit boxes and are known for having an easier time flicking balls. Dominus and Plank car types tend to be favored among freestylers due to feeling more stable in the air and having an easier time hitting the ball on the nose of the car.
Plank Rocket League Car Type
These cars are more extreme versions of the Dominus Car type. They are short and long cars. The most popular of these cars is the Batmobile:
Batmobile
Centio V17
Mantis
Paladin
Twin Mill III
These cars have similar feel to the Dominus, they are just on the more extreme ends when it comes to their hitboxes
Breakout Rocket League Car Type
Credit to https://www.artstation.com/artwork/AXxXV
These cars balance the Octane and Dominus Car type. There aren’t many cars on this list:
Animus GP
Breakout
Breakout Type-S
These are shorter hitbox cars that have a similar turn feel to the Octane car types.
Hybrid Rocket League Car Type
Credit to https://i.redd.it/bq8jhnlcizqy.jpg
These cars balance the Octane and Plank Car Types. If you want the higher hitbox of the Octane car types, but the length of the Plank cars this is the way to go:
’99 Nissan Skyline GT-R R34
Endo
Esper
Jager 619RS
Venom
X-Devil
X-Devil Mk2
Determining Your Rocket League Car Tier List
I’m not here to create a car tier list of the best cars in Rocket League, but rather to help you determine the best car for you. Now that we have broken down all cars in Rocket League to 5 car types, let’s break down your mechanical skill set so you can determine the best car.
Skills that work well with Octane and Hybrid Car Types
50/50s
Bounce Dribbling
Kickoffs
Shooting (Accuracy)
Side to Side Dribbling
Powerslide turns
Wavedashing
Skills that work well with Breakout, Dominus, and Plank Car Types
Aerials
Air Dribbling
Flicks
Freestyling
Goal Defense
Redirects
Shooting (Power)
Take a look at these skills. Of the skills above, which ones do you feel strongest at? Pick the car that plays to your mechanical strengths at first. The one that plays to your mechanical skills will initially be the Best Rocket League Car for you. As you progress in the game, you may switch to the other car types to improve upon parts that you are weak at, to play stronger with the teammates, or to play stronger on the playlist you trying raise your Rocket League Ranks on.
Do Cars Matters?
I know several of the coaches on our Discord would disagree with me, but I would say yes cars do matter in Rocket League. They matter not the way most people think though. When you probably clicked on this article you were probably wondering what the best car in rocket league is or if there was a consensus Rocket League Car Tier list. Others will say it is all about personal preference. I’m mostly saying cars matter when you can look at your mechanical skill set, your teammates, and your playlist.
If you have a potato set of mechanical skills like me, than the Octane or Hybrid car type is going to be the best for me. If you are a freestyler or a heavy 1’s player, the Dominus or Plank Car types will likely be a better fit for you. From there it comes to your teammates. Which brings us to our next question.
Why Do So Many Rocket League Pros Use the Octane?
At the highest ends of Rocket League competition, Rocket League Pros are very well rounded players. On top of that, the highest earnings Pro Competitions are all 3 on 3 playlist tournaments. The Octane car type is among the safest pick in the entire game because of its balance. In an environment where split second decisions matter and a single mistake will cost you several thousand dollars, it would make sense that Pros would stick with safe. To quote Remko:
“There’s less mistakes to be made with Octane than with some other cars”
There is of course, good arguments with a certain plank type car that is popular with pros – The Batmobile. If you saw RLCS Season 4, you likely saw the insane skill display of Mock-It League’s Fairy Peak vs G2 (highlight below). To quote Sizz on the offensive potential of the Batmobile:
“The air dribbling with the Batmobile is definitely the best in the game, by far. That car is so easy to air dribble with. It’s insane.”
These quotes don’t mean that you should just pick car based on what the pros pick. At low tiers, we should pick the car to our strengths. If you are a platinum player who is a flick master, then go with a car that plays to that strength as platinum players are going to have a hard time defending against your flicks.
Closing Thoughts On The Best Rocket League Car Debate
I hope this article helped you in determining what the Best Rocket League Car is for you and how you can go about determining what car fits best with your abilities. If you have any additional thoughts or want to talk about your experiences with the Rocket League Car of your choice, leave a a comment below. See you in-game or on our Discord server and thanks for reading!
About Author
Chupa49 is part of the RLCD.GG website staff. He joined us as a Challenger 1 back in Season 3. As of the beginning of season 6, he is a Diamond 3 player. He has benefited from the discord server by getting coached by several members. As a part of giving back to the community that has helped him get to a tier he never thought was possible, he wrote up this guide to help out many others in his situation with very limited time and with no direction to go to find the right type of training and coaching at his level that would be beneficial to him. Chupa49’s best rocket league car is between the Octane and ’99 Nissan Skyline GT-R R34.